

5 Types of Fillers Woodworking : Choosing the Right One
Different types of woodworking fillers each serve specific repair needs
The first step in successful wood repair is selecting the appropriate filler for your specific application. Let’s explore the five main types of woodworking fillers, their characteristics, and when to use each one.
1. Epoxy Wood Fillers
Pros
- Exceptional durability and water resistance
- Provides structural strength to damaged wood
- Won’t shrink or crack over time
- Can rebuild large missing sections
- Bonds tenaciously to existing wood
Cons
- More expensive than other fillers
- Requires mixing two components
- Longer working and curing times
- Can be difficult to sand once fully cured
- Not ideal for small, cosmetic repairs
Epoxy fillers are the heavy-duty option in the woodworking arsenal. These two-part systems combine a resin and hardener that create a chemical reaction, resulting in an incredibly strong material that can actually restore structural integrity to damaged wood. If you’re dealing with rot repair or need to rebuild significant portions of wood, epoxy is often the best choice.
Top 3 Epoxy Wood Fillers
- Abatron WoodEpox – Perfect for serious restoration work, this epoxy system includes a wood consolidant (LiquidWood) and a moldable putty that can be shaped, sanded, and painted.
- System Three SculpWood – Offers excellent workability with a longer open time, making it ideal for detailed repairs that require careful shaping.
- PC Products PC-Woody – A more budget-friendly option that still provides excellent adhesion and durability for exterior repairs.
2. Latex Wood Fillers
Pros
- Easy water cleanup
- Quick drying time
- Low odor
- Good for interior repairs
- Paintable and sometimes stainable
Cons
- May shrink as it dries
- Less durable for exterior applications
- Not ideal for structural repairs
- Limited depth in single applications
- Can crack if applied too thickly
Latex-based wood fillers are water-based products that offer convenience and ease of use. They’re perfect for quick interior repairs where structural strength isn’t a concern. These fillers dry relatively quickly and can be easily sanded, primed, and painted. Some newer formulations claim to be stainable, though results vary significantly depending on the wood species.

Latex fillers work well for filling nail holes in painted trim
Top 3 Latex Wood Fillers
- DAP Plastic Wood-X – All-purpose latex filler that dries quickly and accepts paint well. Good for interior trim repairs.
- Elmer’s Carpenter’s Color Change Wood Filler – Changes from purple to white when dry, taking the guesswork out of when to sand.
- Minwax High Performance Wood Filler – Premium latex formula that resists shrinking and cracking better than most water-based options.
3. Solvent-Based Wood Fillers
Pros
- Excellent durability
- Minimal shrinkage
- Good for exterior applications
- Better stainability than latex fillers
- Can be built up in layers
Cons
- Strong odor during application
- Requires solvent for cleanup
- Longer drying time than latex
- More difficult to work with
- Higher VOC content
Solvent-based fillers contain volatile organic compounds that evaporate as the filler dries, resulting in less shrinkage than water-based alternatives. These fillers are more durable and weather-resistant, making them suitable for exterior applications. They typically sand well and can accept stain, though rarely as well as the surrounding wood.
Top 3 Solvent-Based Wood Fillers
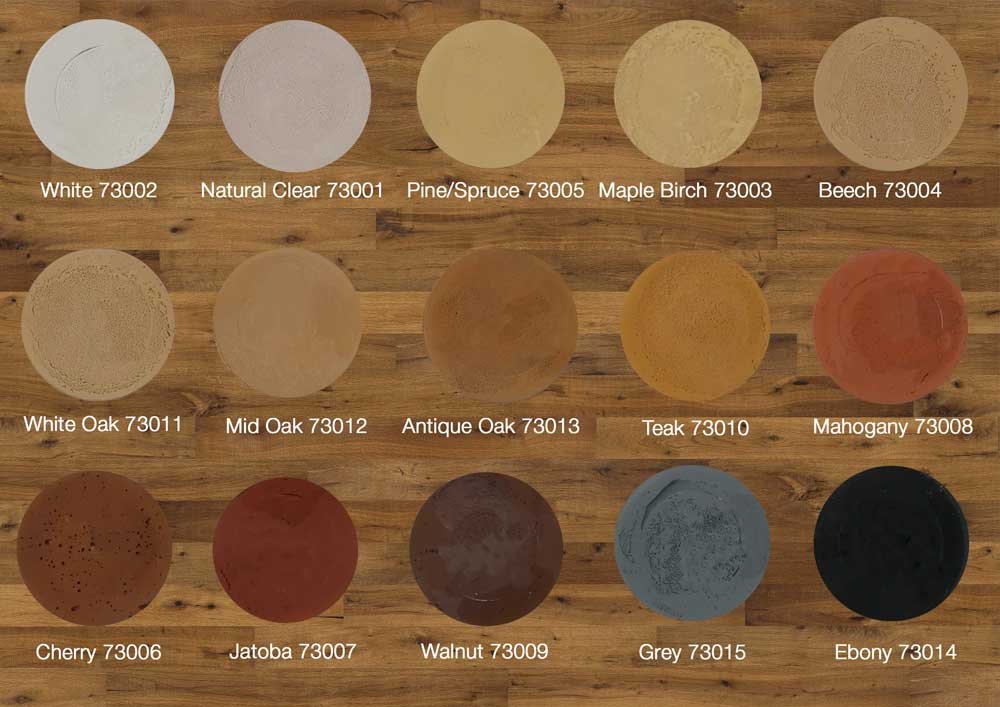
- Famowood Original Wood Filler – Professional-grade filler available in 18 wood tones that accepts stain and provides excellent results.
- Minwax Stainable Wood Filler – Specifically formulated to accept stain, though color matching remains challenging.
- Durham’s Rock Hard Water Putty – Powder that mixes with water to create an extremely hard, durable filler for larger repairs.
4. Cellulose Wood Fillers
Pros
- Excellent for fine woodworking
- Good stainability
- Easy to sand
- Available in wood-matched colors
- Minimal shrinkage
Cons
- Not ideal for structural repairs
- Limited depth capacity
- Can be more expensive
- Some formulations dry quickly
- Not all are suitable for exterior use
Cellulose fillers contain wood fibers suspended in a binder, creating a product that mimics the properties of actual wood. These fillers are excellent for fine woodworking projects where appearance matters. They sand beautifully and accept stain better than most other commercial fillers, though still not perfectly matching the surrounding wood.

Cellulose fillers are ideal for fine furniture repairs where appearance is critical
Top 3 Cellulose Wood Fillers
- Timbermate Wood Filler – Water-based, won’t shrink or fall out, and accepts stain better than most commercial fillers.
- Woodwise Wood Filler – Professional-grade filler available in many wood-specific colors for excellent matching.
- Mohawk Epoxy Wood Filler Sticks – Semi-solid sticks that can be melted and applied for quick touch-ups on finished surfaces.
5. Sawdust and Wood Glue Mixture
Pros
- Perfect color match to your project
- Inexpensive using materials you likely have
- Accepts finish similar to surrounding wood
- Custom consistency based on mix ratio
- No harmful chemicals
Cons
- Limited working time
- Requires fresh sawdust from the same wood
- Not suitable for structural repairs
- Can be difficult to get consistent results
- Not ideal for painted surfaces
This DIY approach involves mixing fine sawdust from the same wood you’re repairing with wood glue to create a custom filler. The key advantage is color matching—since you’re using sawdust from the actual project, the color and grain pattern will be much closer than any commercial product. This method works best for small repairs in visible areas of stained or clear-finished projects.

Creating a custom wood filler by mixing sawdust with wood glue
Pro Tip: Perfect Sawdust Mix
For the best color match, collect sawdust from the same wood you’re repairing by sanding it with fine-grit sandpaper. Mix with just enough wood glue to create a paste-like consistency. Work quickly as the mixture will begin to set within 5-10 minutes.
When to Use Each Type of Woodworking Filler
Choosing the right filler depends on several factors including the size and location of the repair, whether the project will be painted or stained, and if structural strength is needed. Here’s a quick reference guide for common scenarios:
| Repair Scenario | Best Filler Type | Why It Works |
| Rotted exterior wood | Epoxy | Provides structural strength and water resistance needed for outdoor repairs |
| Nail holes in painted trim | Latex | Quick drying, easy sanding, and takes paint well |
| Deep cracks in furniture | Solvent-based | Minimal shrinkage and good durability for high-use items |
| Fine woodworking with clear finish | Cellulose or Sawdust+Glue | Best color matching and stainability for visible areas |
| Large missing chunks | Epoxy | Can be built up in layers without shrinking and shaped to match profiles |
| Quick fixes on painted surfaces | Latex | Fast drying time and easy cleanup for simple repairs |
| Outdoor furniture repair | Epoxy or Solvent-based | Weather resistance and durability needed for exterior conditions |
Different repair scenarios require specific types of woodworking fillers
Step-by-Step Guide to Applying Wood Filler
Proper application technique is just as important as choosing the right filler. Follow these steps for professional-quality repairs:
Following the proper application process ensures long-lasting repairs
1. Prepare the Damaged Area
- Remove any loose, damaged, or rotted wood using a chisel, scraper, or utility knife.
- For rot repairs, treat the area with a wood hardener or fungicide to prevent further decay.
- Clean the area thoroughly, removing all dust and debris with a vacuum and tack cloth.
- For painted surfaces, lightly sand the surrounding area to improve adhesion.
- For deep repairs, consider creating a slightly undercut edge to help lock the filler in place.
2. Mix and Apply the Filler
For Two-Part Fillers (Epoxy, Some Solvent-Based):
- Mix only the amount you can use within the working time (typically 10-30 minutes).
- Follow the manufacturer’s ratio instructions precisely.
- Mix thoroughly until color is completely uniform.
- Apply with a putty knife, slightly overfilling the void.
- For large repairs, apply in layers rather than one thick application.
For Pre-Mixed Fillers:
- Stir the filler thoroughly before use.
- Apply with a putty knife, plastic spreader, or flexible scraper.
- Press firmly to eliminate air pockets and ensure good adhesion.
- Slightly overfill the repair area to allow for sanding.
- Smooth the surface as much as possible during application.

Thorough mixing of two-part fillers is essential for proper curing
3. Allow Proper Drying Time
| Filler Type | Typical Drying Time | When to Sand |
| Latex | 15 minutes – 2 hours | When completely dry to touch with no soft spots |
| Solvent-Based | 1-8 hours | When completely hardened throughout |
| Epoxy | 4-24 hours | When fully cured according to manufacturer’s instructions |
| Cellulose | 30 minutes – 4 hours | When completely dry with no soft spots |
| Sawdust+Glue | 2-24 hours | When glue is completely cured |
Important!
Rushing the drying process can ruin your repair. Temperature and humidity significantly affect drying times. In cold or humid conditions, allow extra time before sanding or finishing. When in doubt, wait longer.
4. Sand and Finish
- Start with medium-grit sandpaper (120-150) to level the filler with the surrounding wood.
- Progress to finer grits (180-220) for a smooth finish that matches the surrounding surface.
- Use sanding blocks on flat surfaces to prevent dishing out the filler.
- Remove all sanding dust with a vacuum and tack cloth before finishing.
- For stained projects, test the stain on an inconspicuous area of the filled surface first.
- Apply primer to filled areas on painted projects for consistent color and adhesion.

Proper sanding technique ensures a seamless repair
🔗 Get instand Access to Ted’s Woodworking
Pro Tips for Perfect Wood Filler Results

Master woodworkers develop specialized techniques for invisible repairs
Color Matching and Staining Tips
For Pre-Colored Fillers:
- Buy multiple shades and blend them to match your wood’s exact color.
- Remember that wood darkens with age, so choose a slightly darker shade for older pieces.
- Test your color match in an inconspicuous area before applying to visible surfaces.
- Apply finish to a test piece to see how it affects the color match.
For Stainable Fillers:
- Accept that no commercial “stainable” filler will match perfectly—they all absorb stain differently than natural wood.
- Pre-stain the filler slightly before application for better matching.
- Consider using artist’s acrylic paints to tint filler for perfect matching.
- Apply stain before filling for the most invisible repairs (then fill with colored putty).
Preventing Shrinkage and Cracking
- For deep repairs, apply filler in multiple thin layers rather than one thick layer.
- Allow each layer to dry completely before adding the next.
- Slightly overfill the repair area to compensate for minimal shrinkage.
- For latex fillers (which shrink more), consider a final top layer of solvent-based filler.
- Ensure the repair area is completely dry before applying filler to prevent trapped moisture.
- In deep repairs, create mechanical “keys” by drilling small holes in the base material.
Applying filler in thin layers prevents shrinkage in deep repairs
Enhancing Durability for Long-Lasting Repairs
- For exterior repairs, always use epoxy or exterior-rated fillers regardless of size.
- Seal all sides of the repair with primer or sealer to prevent moisture intrusion.
- For structural repairs, consider reinforcing with fiberglass mesh or cloth.
- Treat surrounding wood with preservative before filling to prevent future rot.
- Apply UV-resistant clear coat over exterior repairs to prevent degradation.
- For high-wear areas like floors or tabletops, choose the hardest filler available.
Expert Trick: The “Burn-In” Technique
Professional furniture restorers often use a “burn-in” technique with shellac sticks for invisible repairs on finished surfaces. These colored sticks are melted with a special knife and applied to the damage, then leveled and polished for a seamless repair that requires no refinishing of the surrounding area.

🔗 Get instand Access to Ted’s Woodworking
The shellac stick burn-in technique allows for invisible repairs on finished surfaces
🔗 Get instand Access to Ted’s Woodworking
Common Mistakes to Avoid When Using Woodworking Fillers
Learning from common mistakes can dramatically improve your repair results
Preparation Mistakes:
- Failing to remove all damaged or rotted wood before filling
- Not cleaning the repair area thoroughly
- Skipping the wood hardener step for rot repairs
- Applying filler to wet or damp wood 🔗 Get instand Access to Ted’s Woodworking
- Not roughening smooth surfaces for better adhesion
Application Mistakes:
- Using interior fillers for exterior applications
- Applying filler too thickly in a single layer
- Improper mixing of two-part products
- Rushing the drying time before sanding
- Using the wrong tools for application
Finishing Mistakes:
- Sanding too aggressively and dishing out the filler
- Expecting perfect stain matching with commercial fillers
- Not sealing repairs on exterior projects
- Skipping primer on filled areas before painting
- Using water-based finishes over oil-based fillers before full cure
Selection Mistakes:
- Using putty for repairs that require structural strength
- Choosing latex fillers for deep repairs
- Using Bondo or auto body filler on wood (it doesn’t move with the wood)
- Selecting the wrong color for pre-colored fillers
- Using expensive epoxy for simple nail hole repairs
Conclusion: Mastering Woodworking Fillers
The right woodworking filler, properly applied, can transform a damaged piece into something beautiful and durable. By understanding the strengths and limitations of each filler type, you can make informed choices for your specific repair needs. Remember that practice makes perfect—don’t be discouraged if your first attempts aren’t invisible. With time and experience, your repair skills will improve dramatically.
Whether you’re restoring valuable antiques, repairing exterior trim, or finishing a new woodworking project, the knowledge you’ve gained from this guide will help you achieve professional-quality results. Keep a selection of different fillers in your workshop, as no single product can handle every repair scenario.
Take Your Woodworking Skills to the Next Level
Want more in-depth techniques and step-by-step tutorials? Download our free comprehensive guide to wood restoration and repair. You’ll get detailed instructions, product recommendations, and expert tips not covered in this article.

With the right techniques, wood filler repairs can be virtually invisible
❓1. What is the best type of filler for woodworking?
Answer:
The best filler for woodworking depends on the repair. For structural or outdoor repairs, epoxy wood fillers offer the most durability and water resistance. For interior touch-ups like nail holes or trim, latex wood fillers are ideal. If color matching is important, cellulose fillers or a DIY sawdust and glue mix can provide excellent results.
❓2. Can you stain wood filler to match the wood?
Answer:
Yes, but results vary. Stainable wood fillers absorb stain differently than natural wood and rarely match perfectly. For better results, use wood-colored cellulose fillers, pre-tint with artist paints, or create your own filler by mixing sawdust from the same wood with glue. Always test stain on a scrap or hidden area first.
❓3. How do I prevent wood filler from cracking or shrinking?
Answer:
To prevent cracking or shrinking, apply filler in thin layers, allowing each to dry completely before adding more. Avoid overfilling and only use fillers rated for deep or structural repairs (like epoxy). For latex fillers, finishing with a solvent-based layer can improve stability.
❓4. Can I use automotive body filler (like Bondo) on wood?
Answer:
Technically yes, but it’s not recommended. While Bondo can adhere to wood and harden quickly, it’s not flexible and won’t move with wood’s natural expansion, leading to future cracks. For best results, use wood-specific fillers designed for flexibility and long-term bonding.
❓5. What’s the difference between epoxy and latex wood fillers?
Answer:
Epoxy wood fillers are two-part, heavy-duty fillers that provide structural strength and resist water — ideal for large or exterior repairs. Latex wood fillers are water-based, easy to clean, and better for small, interior touch-ups. Latex dries faster but can shrink, while epoxy requires mixing and longer curing time but is much stronger.
✅
🎁 Want 16,000+ Woodworking Plans at Your Fingertips?
If you’re serious about woodworking, don’t waste time starting from scratch.
👉 TedsWoodworking offers over 16,000 detailed plans — from beginner projects to pro-level masterpieces.
Whether you’re building furniture, fixing flaws with wood filler, or designing custom cabinetry, having the right plans makes all the difference.
✅ Instant access
✅ Step-by-step instructions
✅ Full materials & cutting lists
✅ Lifetime updates
🔗 Get instand Access to Ted’s Woodworking
Affiliate Disclosure
Some of the links in this article are affiliate links. If you click through and make a purchase, I may earn a small commission — at no additional cost to you.
This helps support my work so I can continue creating helpful woodworking tutorials and product reviews.I only recommend products and services that I have thoroughly researched and believe could provide real value to my readers.
Thank you for your support!