
Video Source: Embedded from YouTube. All rights belong to the original creator. If you are the owner and wish to remove it, please contact us and we’ll comply immediately.
👉 Check out our recommended A-Frame chicken coop plans and tools here
Building a cozy home for your backyard chickens is a fun DIY project. I recently saw an idea from Country Living that turned a chicken coop into a cocktail coop. It shows how creative and versatile DIY projects can be.
Creating a DIY A-Frame chicken coop gives your flock a safe and comfy space. It also adds a personal touch to your backyard.
Starting this project will bring you joy as you craft a haven for your backyard chickens. In this article, we’ll show you how to build your own DIY A-Frame chicken coop.
Key Takeaways
- Learn how to build a cozy and safe home for your backyard chickens.
- Discover the benefits of having a DIY A-Frame chicken coop.
- Understand the steps involved in creating your own chicken coop.
- Get tips on making your coop comfortable and secure.
- Explore the creativity and personalization possible with DIY projects.
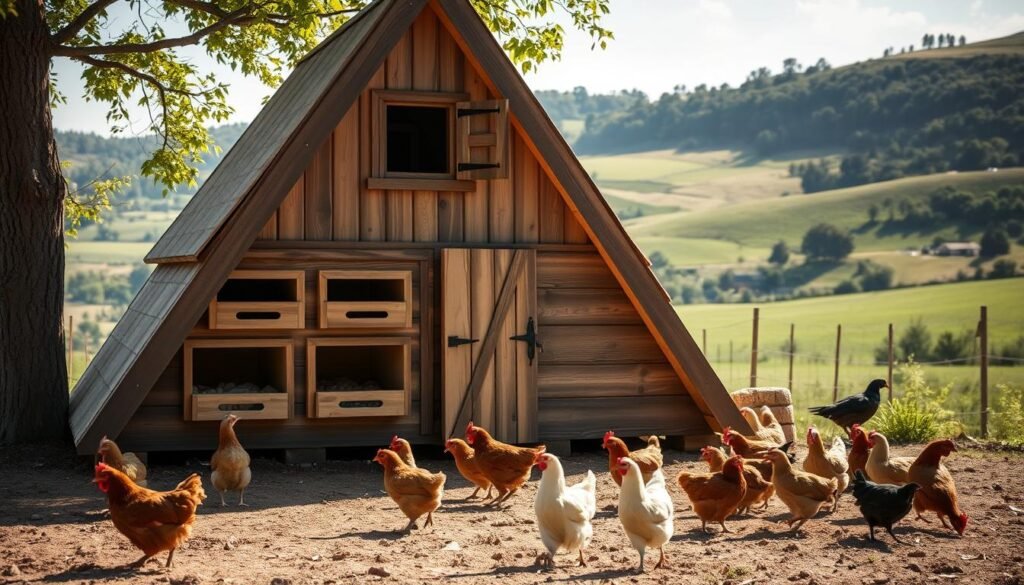
Why I Chose to Build an A-Frame Chicken Coop
My journey into backyard chickens led me to choose the A-Frame design for my coop. I didn’t pick it lightly. I looked at many designs before picking the A-Frame. Its unique shape and many benefits made it perfect for my backyard chickens.
Benefits of the A-Frame Design
The A-Frame design has many advantages for backyard chickens. It’s sturdy and gives my chickens plenty of space. The sloping roof helps snow slide off, preventing roof collapse. It also promotes good ventilation, keeping the air healthy for my chickens.
| Design Aspect | A-Frame | Traditional Coop |
|---|---|---|
| Structural Integrity | High | Variable |
| Space Efficiency | High | Moderate |
| Ventilation | Excellent | Variable |
My Experience with Backyard Chickens
Raising backyard chickens has been rewarding. It taught me the value of a well-designed coop. My A-Frame chicken coop has given my flock a safe and healthy home. The coop’s design has lowered stress in my chickens, making them more productive and happy.
Planning Your A-Frame Chicken Coop Project

👉 Check out our recommended A-Frame chicken coop plans and tools here
A well-planned A-frame chicken coop is key to a happy backyard flock. When I started building my coop, I learned planning is essential.
Determining the Right Size for Your Flock
The coop’s size depends on how many chickens you’ll have. Aim for 3-4 square feet per chicken inside. For 6 chickens, your coop should be at least 18-24 square feet.
| Number of Chickens | Minimum Coop Size (sq ft) |
|---|---|
| 4 | 12-16 |
| 6 | 18-24 |
| 8 | 24-32 |
Choosing the Perfect Location
The coop’s location is as important as its size. It should be in a spot that drains well, is safe from strong winds, and gets sunlight during the day.
Considering Local Regulations and Permits
Before building, check local regulations and homeowners association rules. Some places need permits for backyard chickens or have coop construction guidelines.
With careful planning, your A-frame chicken coop will be a safe and cozy home for your chickens. This ensures a happy and healthy flock.
Essential Materials for Your A-Frame Chicken Coop

Building an A-Frame chicken coop needs the right materials for durability and comfort. The materials you choose are key for the coop’s life and your chickens’ health.
Lumber and Hardware List
You’ll start with durable lumber for the frame and walls. Use pressure-treated lumber for the base to fight rot and pests. For the frame, 2x4s or 2x6s work well, depending on your coop’s size.
Don’t forget galvanized nails, screws, and hinges for a secure build.
| Material | Quantity | Purpose |
|---|---|---|
| 2×4 Lumber | 8 pieces | Frame |
| Galvanized Nails | 1 box | Assembly |
| Plywood | 1 sheet | Walls and Floor |
👉 Check out our recommended A-Frame chicken coop plans and tools here
Roofing and Siding Options
For the roof, pick from asphalt shingles, corrugated metal, or translucent panels for light. Plywood, OSB, or cedar boards are good for siding, adding a rustic touch.
Additional Materials for Comfort and Safety
Add insulation to keep the coop’s temperature right. Ventilation is also key; windows or vents help keep air fresh.
Choosing the right materials ensures a safe, durable, and cozy A-Frame chicken coop for your flock.
Tools You’ll Need for This Project

Building an A-Frame chicken coop needs the right tools for a smooth and safe build. Having the right carpentry tools is key for any DIY project.
Basic Carpentry Tools
You’ll need a hammer, tape measure, square, level, and clamps. These tools help you measure, cut, and put the coop together.
- Hammer
- Tape measure
- Square
- Level
- Clamps
Power Tools That Make the Job Easier
Power tools like a circular saw, drill, and jigsaw make building easier. They help you cut accurately and screw in place, which is important for an A-Frame coop.
Safety Equipment
Remember safety equipment like gloves, safety glasses, and a dust mask. They keep you safe from injuries and health risks from power tools and materials.
A-Frame Chicken Coop Design Principles

To build a successful A-Frame chicken coop, focus on its structure, ventilation, and predator protection. The A-Frame design is simple yet effective. It creates a safe and healthy space for chickens.
The Structural Advantages of the A-Frame
The A-Frame design has many structural advantages. Its triangular shape makes it stable and allows snow to slide off. This reduces the risk of roof collapse. It also uses materials efficiently, making it cost-effective.
Ventilation Considerations
Good ventilation is key in a chicken coop. It removes moisture and ammonia from droppings. The A-Frame design can be improved for ventilation. Add windows or vents near the top to let warm air out and fresh air in.
Predator Protection Features
Keeping your chickens safe from predators is crucial. The A-Frame coop can be made safe with predator protection. Use hardware cloth instead of chicken wire. Make sure doors and windows are secure. Bury the coop’s perimeter fencing to stop digging predators.
By following these design principles, you can build an A-Frame chicken coop. It will be safe and healthy for your chickens, giving them a comfortable home.
Step-by-Step Building Process: The Foundation

👉 Check out our recommended A-Frame chicken coop plans and tools here
Building a strong foundation is key for your A-Frame chicken coop’s safety and life span. A good base means your chickens will have a dry, safe spot to rest.
Creating a Level Base
To begin, make a level base for your coop. First, clear the area of any debris and plants. Then, level the ground. Use a spirit level and a board to check if it’s even. If not, adjust the ground to get it perfectly level.
Building the Floor Frame
After that, build the floor frame with treated lumber to fight off rot and pests. The frame must be strong enough to hold the coop and chickens. Use 2×4 lumber for the frame and hold it together with galvanized screws.
Installing the Floor
With the frame ready, it’s time to install the floor. Choose plywood or oriented strand board (OSB) for the floor. Make sure it’s thick enough to be solid. Attach the floor to the frame with screws, ensuring it’s even with the top of the frame.
By following these steps, you’ll have a solid foundation for your A-Frame chicken coop. It will provide a safe, healthy space for your chickens.
Constructing the A-Frame Structure
Now that the foundation is set, it’s time to build the A-Frame structure. This is a key part of your chicken coop. It’s important because it supports the whole coop.
Building the End Frames
The end frames are the base of your A-Frame. You’ll need to cut two frames that match your design. Use 2×4 lumber for these frames. They need to be strong to hold the coop’s weight.
Assembling the Ridge Beam
The ridge beam is the top part of your A-Frame. It runs along the coop’s peak. Make sure it’s securely attached to the end frames. Use appropriate hardware for a strong connection.
Securing the Frame Together
With the end frames and ridge beam ready, it’s time to connect them. Use screws or nails to hold the structure together. Check that the corners are square and the frame is level.
Proper Bracing Techniques
Bracing is key for a stable A-Frame structure. Use diagonal bracing to keep the structure from shifting or collapsing.
Ensuring Square Corners
To have square corners, use a carpenter’s square during assembly. This keeps the coop’s integrity.
| Component | Material | Quantity |
|---|---|---|
| End Frames | 2×4 Lumber | 2 |
| Ridge Beam | 2×4 Lumber | 1 |
| Diagonal Bracing | 1×4 Lumber | 2 |
By following these steps and making sure each part is securely in place, you’ll have a strong A-Frame structure. It will give your chickens a safe and cozy home.
Installing Walls and Roofing
The final stages of building my A-Frame chicken coop involved installing walls and roofing. This step is key for weatherproofing. It keeps my chickens safe from the weather and makes the coop stronger.
Attaching Wall Panels
I started by attaching wall panels to the frame. I made sure they were securely fastened to block wind and rain. It’s important to use materials that can handle different weather.
Choosing the right material for the wall panels is crucial. I chose plywood because it’s durable and keeps moisture out.
Applying Roofing Materials
Next, I applied roofing materials. I picked asphalt shingles for their cost and ability to protect against rain and sun.
To keep the coop dry, I overlapped the shingles and nailed them down. Making sure they’re aligned right is important to avoid leaks.
Weatherproofing Tips
Weatherproofing is essential to keep the coop in good shape. I used waterproof sealant around the edges of the walls and roof. This stops water from getting in.
Checking the coop regularly helps spot any problems early. This keeps it safe and dry for my chickens.
Creating Doors and Windows
Building an A-Frame chicken coop means focusing on doors and windows. They are key for your chickens’ health and the coop’s function. Doors and windows let chickens in and out, and they also help with air and light.
Building a Secure Main Door
The main door is vital for keeping your chickens safe. Use strong materials and a good lock. Adding a latch that you can open from outside makes cleaning and egg collection simpler.
Installing Nesting Box Access
A special door for the nesting box makes egg collection easy. It should be simple to open and close, but still secure.
Adding Windows for Ventilation
Windows are important for air and light. Place them for good airflow to keep the coop cool and dry. Cover them with chicken wire for safety.
| Feature | Purpose | Design Consideration |
|---|---|---|
| Main Door | Secure Entry/Exit | Sturdy materials, robust lock |
| Nesting Box Access | Egg Collection | Simple hinge, secure latch |
| Windows | Ventilation, Lighting | Cross-ventilation, hardware cloth |
Interior Features for Happy Chickens
The inside of your chicken coop is key to keeping your chickens happy and healthy. A well-designed interior makes your flock more comfortable and boosts their egg-laying.
👉 Check out our recommended A-Frame chicken coop plans and tools here
Building Nesting Boxes
Nesting boxes are vital for your chicken coop. They give your hens a safe place to lay eggs. Use softwoods like pine or cedar for the boxes, as they’re gentle on the chickens.
Make sure the boxes are well-ventilated and have a soft bedding like straw or hay.
- Use one nesting box per 3-4 hens.
- Keep the nesting boxes clean and dry.
- Place them in a quiet, dark area of the coop.
Installing Roosting Bars
Roosting bars are crucial for your chickens’ health. They let your birds roost comfortably at night, reducing stress. Make sure the bars are sturdy and higher than the nesting boxes.
Key considerations for roosting bars:
- Use 2×4 lumber or round bars for roosting.
- Space the bars about 12-18 inches apart.
- Ensure the bars are clean and dry.
Creating Feeding and Watering Stations
Feeding and watering stations are essential for your chickens’ health. They should be designed to reduce waste and prevent contamination. Choose feeders and waterers that are easy to clean and accessible.
“A clean and well-organized feeding area is crucial for maintaining the health of your flock.”
To keep the feeding and watering stations clean, set up a regular cleaning schedule. This prevents bacteria buildup and keeps your chickens healthy.
Maintaining Your A-Frame Chicken Coop
Keeping your A-Frame chicken coop in top shape needs regular care and attention. It’s key to keep your chickens healthy and the coop lasting longer.
Seasonal Maintenance Tasks
Each season brings its own challenges for your coop. In spring, give the coop a deep clean and check for winter damage. Summer means making sure the coop has good airflow to stay cool.
Fall is about getting ready for cold weather. Check for drafts and add insulation if needed. Winter calls for keeping the coop dry and preventing water from freezing.
Common Issues and Solutions
Problems like predators, diseases, and damage are common. To fight off predators, make sure the coop is locked up tight and think about adding hardware cloth. Watch your chickens for sickness and keep the coop clean to avoid diseases.
| Issue | Solution |
|---|---|
| Predator threats | Secure coop, hardware cloth |
| Disease | Regular cleaning, inspect chickens |
| Coop damage | Regular inspections, repairs |
Upgrades and Modifications
Think about adding features like automatic doors or more ventilation. You might also want to expand the coop or add nesting boxes as your flock grows.
By following these tips, your A-Frame chicken coop will stay a safe and healthy home for your chickens.
Conclusion: Enjoying Your New A-Frame Chicken Coop
Building your A-Frame chicken coop is a fulfilling journey. It’s the end of your DIY adventure. Now, you have a cozy home for your backyard chickens.
Your new coop will give your chickens a safe and healthy place to live. You’ll also get fresh eggs from them. The A-Frame design makes your backyard look charming and keeps your chickens happy.
Remember to take care of your coop to keep your chickens happy and healthy. Regular upkeep helps spot any problems early. This ensures your coop stays a safe and comfy place for your chickens.
By following this guide, you’ve made a great home for your chickens. Now, it’s time to enjoy the rewards of your hard work. Happy chicken keeping!
❓FAQ
💡What are the benefits of building an A-Frame chicken coop?
💡How do I determine the right size for my A-Frame chicken coop?
💡What materials are needed to build an A-Frame chicken coop?
💡What tools are required to build an A-Frame chicken coop?
💡How do I ensure proper ventilation in my A-Frame chicken coop?
💡What are some common issues with A-Frame chicken coops and how can I solve them?
💡Can I customize my A-Frame chicken coop to fit my specific needs?
💡How do I maintain my A-Frame chicken coop?
💡What are some tips for building a portable or movable A-Frame chicken coop?
💡How can I make my A-Frame chicken coop more affordable?
Affiliate Disclosure
Some of the links in this article are affiliate links. If you click through and make a purchase, I may earn a small commission — at no additional cost to you.
This helps support my work so I can continue creating helpful woodworking tutorials and product reviews.I only recommend products and services that I have thoroughly researched and believe could provide real value to my readers.
Thank you for your support!