
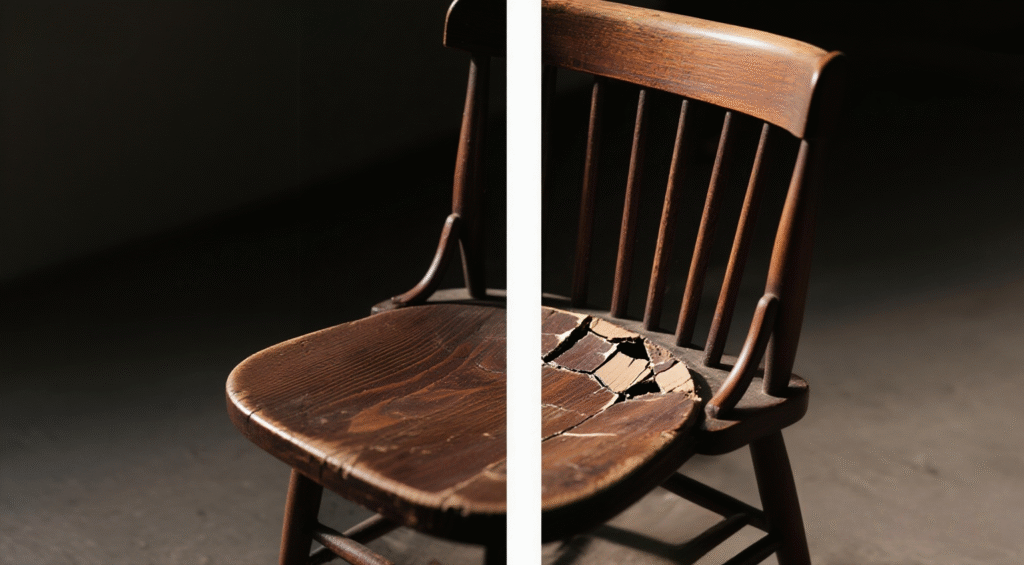
Ever sat in your favorite wooden chair and felt it sink? It’s a common problem, and it’s not just about looks. A dipping chair might signal a bigger issue.
When we relax in our chairs, we rarely think about their structure. But a wooden chair dipping is a serious matter. We’ll look at why chairs dip and how to fix it for good.
Key Takeaways
- Understand the common causes of chair dipping
- Learn how to identify the signs of a dipping chair
- Discover simple and effective DIY fixes for your wooden chair
- Prevent future dipping issues with our expert tips
- Enhance the overall durability of your furniture with our repair advice
👉 👉Start your woodworking journey with Ted’s 16,000 plans »
Understanding Chair Dipping: What’s Really Happening to Your Furniture
When we sit in wooden chairs, we often don’t think about the forces that can make them dip. But knowing about these forces is key to fixing the problem.
The Science Behind Wood Degradation and Structural Weakening
Wood degradation is a main reason for chair dipping. Wood is a natural material that reacts to its surroundings. It can get weaker over time due to different factors.
How Weight and Pressure Affect Wood Over Time
Weight and pressure on a chair’s joints and legs can make the wood compress and weaken. This leads to dipping.
The Role of Moisture and Temperature Fluctuations
Changes in moisture and temperature make wood expand and contract. This weakens its structure and adds to chair dipping.
Common Misconceptions About Chair Stability Issues
Many think tightening screws will fix a dipping chair. But this isn’t always true.
Why Simply Tightening Screws Isn’t Always Enough
Tightening screws might seem like a quick fix. But it doesn’t solve the real problems of wood degradation or structural weakening.
The Truth About “Unfixable” Antique Chairs
Even old chairs can be fixed with the right methods and knowledge of their design.
The 5 Main Causes of Chair Dipping Identified in Our Study
Our study found the top five reasons why wooden chairs might dip. Knowing these causes is key to fixing the problem and stopping it from happening again.
Loose Joints and Connections
Loose joints and connections are a big reason for chair dipping. Over time, the glue can weaken, making the chair unstable.
Dowel Joint Failures
Dowel joints are used a lot in chair making. But, they can fail if the glue is weak or the dowel is damaged.
Screw and Hardware Issues
Screws and other hardware can get loose, making the chair unstable. Checking and tightening these regularly can help prevent dipping.
Wood Deterioration and Aging
Wood naturally deteriorates over time due to various factors.
Natural Shrinkage and Expansion Cycles
Wood shrinks and expands with humidity changes. This can affect the chair’s structure and cause dipping.
Insect Damage and Rot
Insects and rot can weaken the wood, leading to dipping. Regular checks can spot these issues early.

👉 👉Start your woodworking journey with Ted’s 16,000 plans »
Improper Weight Distribution
How you use your chair affects its stability.
Uneven Leg Length Problems
If the chair’s legs are uneven, it can dip. Adjusting the legs can often fix this.
Seat Support Structure Weaknesses
The seat support structure is key to the chair’s stability. If it’s weak or damaged, the chair may dip.
Environmental Factors Affecting Wood Integrity
Environmental conditions impact the longevity and stability of wooden chairs.
Humidity’s Effect on Different Wood Types
Different woods react differently to humidity. Knowing your chair’s wood type can help prevent dipping caused by humidity.
Sun Damage and Heat Exposure
Direct sunlight and heat can damage the wood, weakening it and potentially causing dipping.
Manufacturing Defects and Poor Design
Sometimes, the problem is not how you’ve used the chair, but how it was made.
Identifying Factory Flaws
Checking your chair for manufacturing defects can reveal if dipping is due to a flaw in construction.
Design Weaknesses in Common Chair Styles
Certain chair designs are more prone to dipping due to inherent weaknesses. Knowing these can help you choose a more stable chair.
Different Types of Wooden Chairs and Their Unique Chair Dipping Problems
Wooden chairs come in many types, each with its own dipping issues. It’s important to know the type of chair you have. This knowledge helps solve dipping problems effectively.
Dining Chairs: Stress Points and Common Failures
Dining chairs are used a lot in homes. They have stress points and common failures.
Side Rail Separation Issues
Dining chairs often face side rail separation from legs or frames. This is due to loose joints or weakened wood over time.
Spindle Loosening Patterns
Spindles in dining chairs can loosen. This is from wear and tear or bad tightening. Regular checks can spot this early.
Rocking Chairs: Runner and Joint Challenges
Rocking chairs have unique dipping problems. These are related to their runners and joints.
Runner Wear and Deformation
The motion of rocking chairs wears down runners. This affects the chair’s stability.
Arm Joint Stress Points
The joints where arms meet the chair can stress. This can lead to dipping if not maintained.
Office and Swivel Chairs: Mechanism Failures
Office and swivel chairs have complex parts that can fail. This leads to dipping problems.
Base Attachment Weaknesses
The base of these chairs can be weak. This is if it’s not attached well.
Seat Pan Support Problems
The support under the seat can weaken. This causes dipping or sagging.
Folding Wooden Chairs: Hinge and Stress Point Issues
Folding chairs have hinges and stress points that can lead to dipping.
Hinge Wear Patterns
Hinges on folding chairs wear out. This affects the chair’s stability.
Cross-Support Failures
The cross-supports in folding chairs can fail. This causes dipping or collapse.

👉 👉Start your woodworking journey with Ted’s 16,000 plans »
How to Properly Diagnose Your Chair’s Specific Dipping Problem
To fix your chair’s dipping issue, you first need to understand what’s causing it. Accurately diagnosing the problem is key to applying the right fix.
Visual Inspection Techniques
A thorough visual inspection is the first step in diagnosing chair dipping. Look for signs of wear and tear. Also, check the chair’s structure for any visible damage.
Identifying Hairline Cracks and Hidden Damage
Inspect the chair’s surface and joints for hairline cracks or any signs of damage that might not be immediately visible. Using a magnifying glass can help in identifying these issues.
Checking for Glue Failure Signs
Glue failure is a common issue in chairs. Check the joints for any signs of glue failure, such as gaps or loose parts.
Movement and Stress Tests
After a visual inspection, perform movement and stress tests to further diagnose the issue.
Safe Pressure Testing Methods
Apply gentle pressure to different parts of the chair to identify weak spots. Be cautious not to apply too much pressure, which could cause further damage.
Identifying Loose Components Without Disassembly
Check for loose components by gently rocking the chair or applying slight pressure to various parts. This can help identify loose joints or other issues.
Identifying the Exact Location of Weakness
Once you’ve identified possible issues, pinpoint the exact location of the weakness.
Tracing Problems to Their Source
Trace the problem back to its source. For example, if a leg is loose, check the joint for damage or glue failure.
Distinguishing Between Primary and Secondary Issues
Determine if the issue you’ve identified is the primary cause or a secondary effect of another problem. This distinction is key for effective repair.
| Diagnostic Method | Purpose | Common Findings |
|---|---|---|
| Visual Inspection | Identify visible damage or wear | Hairline cracks, glue failure |
| Movement and Stress Tests | Identify weak spots or loose components | Loose joints, unstable legs |

👉 👉Start your woodworking journey with Ted’s 16,000 plans »
Quick Temporary Fixes for Chair Dipping (When You’re in a Pinch)
Dealing with a dipping chair? Here are quick fixes to stabilize it. These solutions are temporary but can help until a permanent repair is made.
Strategic Shims and Supports
One simple fix is using shims or supports. You can make them from wood or felt to level the chair.
Making Effective Wood and Felt Shims
To make a shim, cut a piece of wood or felt to fit under the chair leg. Choose a material that’s sturdy yet thin enough to fit.
Materials needed: Wood or felt, scissors or a craft knife, ruler.
Proper Placement for Maximum Stability
Put the shim under the leg causing the dip. Adjust the shim’s size for a good fit. This helps level the chair and prevent wobbling.
Temporary Binding Methods
Loose joints can cause a chair to dip. Temporary binding methods can tighten these joints until a permanent fix is applied.
Using Furniture Straps Without Causing Damage
Furniture straps can temporarily bind the chair. They’re adjustable and can be tightened to support the chair’s structure.
Tips: Avoid overtightening to prevent damage.
Rope and Cord Emergency Techniques
In emergencies, rope or cord can bind parts of the chair. It’s not a long-term solution but can help in a pinch.
Weight Distribution Adjustments
Your sitting position affects the chair’s stability. Making a few adjustments can help.
Safe Sitting Practices for Weakened Chairs
Avoid sitting on the edge or leaning to one side. This can make the dip worse. Instead, sit back and try to distribute your weight evenly.
Redistributing Pressure Points
Adjust your sitting position to spread the pressure evenly. This can help reduce the dipping.
| Temporary Fix | Description | Best For |
|---|---|---|
| Shims and Supports | Leveling the chair using shims or additional supports under the legs. | Chairs with uneven legs or floors. |
| Binding Methods | Using straps, rope, or cord to tighten loose joints. | Chairs with loose joints or frames. |
| Weight Distribution | Adjusting sitting habits to minimize dipping. | All types of dipping chairs. |
Essential Tools and Materials for Permanent Chair Dipping Repairs
Before you start fixing your wooden chair, make sure you have the right tools and materials. This will help your repair last longer and be more effective. Let’s look at what you need for a successful fix.
Must-Have Tools for Different Chair Types
Each chair needs its own set of tools. For example, a dining chair might need different clamps than a rocking chair.
Clamp Selection and Usage
Clamps are key for keeping parts together while the glue dries. Bar clamps are good for most repairs.
Specialized Repair Tools Worth Investing In
Tools like joint scrapers and chisel sets are very helpful for specific repairs. They make the job easier and faster.
Recommended Adhesives and Fasteners
The right glue is vital for a good repair. Knowing which wood glue to use is important.
Wood Glue Types and Their Applications
PVA glue works well for general woodworking. But epoxy is better for heavy repairs.
Hardware Selection for Different Chair Styles
Choosing the right screws or dowels depends on the chair’s design and wood type.
Quality Wood Fillers and Reinforcement Materials
For damaged or rotten wood, the right filler is key for a strong fix.
Epoxy vs. Traditional Wood Fillers
Epoxy fillers are stronger and more durable. They’re great for important areas.
Reinforcement Dowels and Brackets

👉 👉Start your woodworking journey with Ted’s 16,000 plans »
Step-by-Step Guide to Fixing Loose Joints (The Most Common Cause of Chair Dipping)
Loose joints cause chair dipping. We’ll show you how to fix them. It takes patience and the right steps, but you can do it.
Disassembly Techniques That Won’t Damage Your Chair
First, you need to take apart the chair carefully. You must understand how the parts fit together.
Safe Joint Separation Methods
To safely separate joints, use a rubber mallet. Tap gently. Don’t use a regular hammer, as it can harm the chair.
Documenting Your Disassembly Process
As you take apart the chair, note how the parts fit. Take photos too. This will help when you put it back together.
Cleaning and Preparing Joint Surfaces
After taking it apart, clean the joint surfaces. This ensures a strong bond when you reglue them.
Removing Old Glue and Debris
Use a chisel or scraper to remove old glue and debris. Make sure the surfaces are clean and dry.
Creating Optimal Surfaces for Regluing
Sand the surfaces lightly. This creates a better area for the new glue to stick.

👉 👉Start your woodworking journey with Ted’s 16,000 plans »
Applying the Right Adhesive for Your Chair Type
Choosing the right glue is key for a strong repair.
Glue Application Techniques for Maximum Strength
Apply glue evenly and clamp tightly. Follow the glue’s instructions carefully.
Working with Hide Glue for Antique Repairs
For antique chairs, use hide glue. It’s reversible and good for traditional repairs.
Proper Clamping Methods for Strong Bonds
Clamping is vital for a strong bond between the joint surfaces.
Clamping Pressure Guidelines
Apply even pressure. Too much can damage the wood, while too little won’t bond well.
Protecting Wood Surfaces During Clamping
Use cauls or pads to protect the wood from clamps. This prevents damage or marks.
| Clamping Method | Pressure Level | Protection Needed |
|---|---|---|
| Bar Clamp | High | Yes |
| F-Clamp | Medium | Yes |
| Spring Clamp | Low | No |
Advanced Repair Techniques for Severely Damaged Chairs
When your chair is badly damaged, it’s time for advanced repair techniques. These methods can make your furniture look new again. Chairs that can’t be fixed easily need more complex solutions to fix their structure.
Wood Replacement Strategies for Critical Components
Replacing damaged wood is key for fixing severely damaged chairs. We focus on matching the original wood type and grain pattern to keep the chair looking right.
Matching Wood Types and Grain Patterns
To fix a chair well, matching the wood and grain is essential. This might mean finding similar wood or using special woodworking skills to match the grain.
Crafting Replacement Parts That Blend Seamlessly
Making replacement parts that fit perfectly takes time and skill. We mix old woodworking methods with new tools to make parts that work well and look good.
Reinforcement Methods for Weakened Areas
Replacing damaged wood isn’t enough. We also need to strengthen weak spots to make the chair last longer.
Corner Block Installation Techniques
Corner blocks make a chair more stable. We use high-quality adhesives and precise cutting for a perfect fit.
Hidden Reinforcement Strategies
For a less obvious fix, we use hidden reinforcement. This includes internal brackets or dowels to add strength without changing how the chair looks.
Dealing with Split or Cracked Wood
Cracks or splits can weaken a chair a lot. We have special ways to fix this problem.
Butterfly Key Inlays for Crack Stabilization
Butterfly key inlays help fix cracks. This method involves carefully cutting out a section of the crack and putting in a matching wood piece, shaped like a butterfly.
Epoxy Techniques for Structural Integrity
Epoxy resins can fill gaps and strengthen damaged areas. Used right, epoxy can make a chair strong again and last longer.

👉 👉Start your woodworking journey with Ted’s 16,000 plans »
Case Study: Solving Persistent Chair Dipping in a 50-Year-Old Dining Set
We recently fixed a 50-year-old dining set with a big problem: chair dipping. This old furniture was a challenge because of its age.
Initial Assessment and Challenges
First, we found many reasons why the chairs were dipping. The set had been used for years, and its age made fixing it harder.
Identifying Multiple Failure Points
The chairs had different problems, like loose joints and wood damage. We listed these issues in a table:
| Chair Number | Primary Issue | Secondary Issue |
|---|---|---|
| 1 | Loose Joints | Minor Wood Deterioration |
| 2 | Wood Deterioration | Loose Joints |
| 3 | Uneven Legs | Minor Cracking |
Complications from Previous Amateur Repairs
Some chairs had been fixed before, but not well. This made our job harder because we had to fix what others had tried to.
Repair Strategy and Implementation
We planned to fix both the structure and looks of the chairs. We aimed to make them strong and look good.
Prioritizing Structural vs. Cosmetic Issues
We took the chairs apart to check the joints. Then, we fixed them using the best methods to make them stable and nice to look at.
Combining Multiple Repair Techniques
We mixed old and new fixing methods. We used strong adhesives and materials to make the repairs last.

👉 👉Start your woodworking journey with Ted’s 16,000 plans »
Results and Longevity After Repairs
Our fixes worked right away and lasted. The chairs were much more stable, and the looks matched the original.
Immediate Stability Improvements
After fixing, we tested the chairs. They were stable, and the dipping problem was gone.
Two-Year Follow-Up Assessment
Two years later, we checked again. The set was just as stable, and the repairs were holding up well.
This case study shows how fixing chair dipping in old dining sets works. With the right plan and techniques, you can make these pieces look and feel new again.
Preventative Maintenance to Avoid Future Chair Dipping
Keeping your wooden chairs in good shape is key to their lasting quality. By being proactive, you can lower the chance of chair dipping. This helps your furniture last longer.
Regular Inspection Schedule
Regular checks are the heart of keeping your chairs in top condition. Spotting problems early lets you fix them before they get worse.
Monthly Check Points for Early Problem Detection
- Look for any signs of loose joints or connections.
- Watch for cracks or splits in the wood.
- Make sure the chair sits level and stable.
Seasonal Maintenance Tasks
- Use a wood conditioner or protector to keep the wood strong.
- Tighten any loose screws or joints.
- Check and adjust the chair’s balance.
Proper Usage Habits That Extend Chair Life
How you use your chairs affects their lifespan. Good habits can prevent damage and wear.
Weight Distribution Best Practices
Spread weight evenly on the chair to avoid stressing joints or areas.
Movement Habits That Reduce Joint Stress
Don’t drag or force the chair, as it can harm the joints. Lift the chair instead when moving it.
Environmental Controls to Preserve Wood Integrity
The place where your chair sits affects its condition. Managing the environment helps keep the wood in good shape.
Humidity Management for Wooden Furniture
Keep humidity stable to stop wood from swelling or shrinking too much.
Temperature Considerations for Different Wood Types
Wood reacts differently to temperature changes. Know what your chair’s wood type needs.

👉 👉Start your woodworking journey with Ted’s 16,000 plans »
When to DIY vs. When to Call a Professional Furniture Restorer
Deciding whether to fix your wooden chair yourself or hire a pro is key. It depends on the repair’s complexity and your skills.
Assessing Repair Complexity and Your Skill Level
First, figure out how hard the repair is. Simple fixes like tightening loose joints might be DIY-friendly. But, complex issues need a pro’s touch.
Projects Suitable for Beginners
Start with easy tasks like tightening joints or applying a new finish. These need basic tools and skills.
Warning Signs That Indicate Professional Help Needed
Look out for big damage, detailed carvings, or antique needs. Also, if your chair keeps falling apart or has tricky parts, get a pro.
Cost-Benefit Analysis of Professional Restoration
DIY fixes save money, but pros bring expertise and lasting results.
Pricing Expectations for Common Repairs
| Repair Type | Average Cost |
|---|---|
| Loose Joint Repair | $50-$100 |
| Structural Reinforcement | $100-$300 |
| Antique Restoration | $200-$500 |
Value Assessment for Antique and Heirloom Pieces
Antiques and family heirlooms are priceless. Professional care keeps their history and emotional value safe.
Finding and Vetting Qualified Furniture Repair Specialists
Find experts who know your chair’s needs.
Questions to Ask Prospective Restorers
- What experience do you have with similar repairs?
- Can you show me your past work?
- How do you restore furniture, and what methods do you use?
Red Flags to Watch For When Hiring

👉 👉Start your woodworking journey with Ted’s 16,000 plans »
Conclusion: Ensuring Your Chairs Stand the Test of Time
We’ve looked into chair dipping and given you ways to fix and stop it. Knowing why chairs dip helps you keep them in good shape. This includes loose joints and things like humidity.
Looking after your furniture is important to make it last longer. Check your chairs often, use them right, and control the environment. This helps a lot. Whether you like to fix things yourself or just want to keep your furniture nice, these steps help.
Our guide helps you not just fix a chair but keep a part of your home safe. With the right tools and some knowledge, you can fix chair dipping. This way, your furniture will last for many years. You can become good at fixing furniture with these tips.
🛠️ Want the Look Without the Sawdust? Here’s Your Shortcut
There’s something rewarding about building a wooden piece with your own hands—but let’s face it, not everyone has the time, tools, or space for a full DIY project.
💡 That’s why I recommend Ted’s Woodworking Plans – a massive library of 16,000+ step-by-step plans for every kind of woodworking project you can imagine. From pet houses to holiday gifts, you’ll get:
✨ Easy-to-follow blueprints
🧰 Complete material & cut lists
🪚 Projects for all skill levels
👉 👉Start your woodworking journey with Ted’s 16,000 plans »
💝 Ted’s Woodworking Plans also makes an amazing gift for parents, children, friends, boyfriends, girlfriends, brothers, and sisters.
FAQ
What is chair dipping, and why is it a problem?
How do I know if my chair is experiencing chair dipping?
What are the common causes of chair dipping?
Can I fix chair dipping on my own, or do I need professional help?
What are some preventative measures to avoid chair dipping?
Are there any temporary fixes for chair dipping?
What are the benefits of chair dip exercises, and are they related to chair dipping?
How can I perform tricep dips using a chair?
Affiliate Disclosure
Some of the links in this article are affiliate links. If you click through and make a purchase, I may earn a small commission — at no additional cost to you.
This helps support my work so I can continue creating helpful woodworking tutorials and product reviews.I only recommend products and services that I have thoroughly researched and believe could provide real value to my readers.
Thank you for your support!