
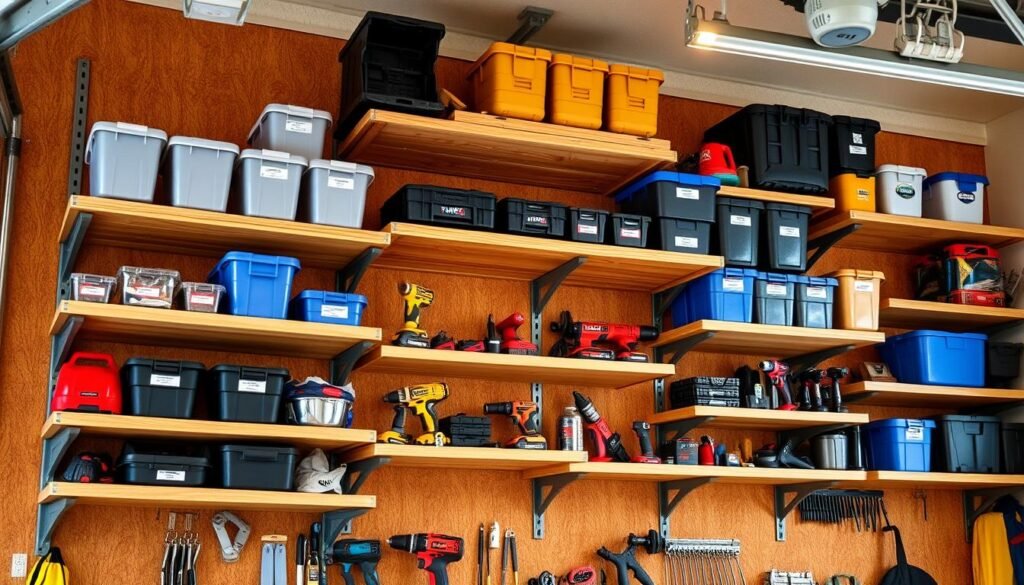
Are you tired of a cluttered garage that’s more chaos than storage? We get it! A tidy space boosts your productivity and makes DIY projects fun. Our woodworking plan is here to help you build the ideal garage wall shelving system.
Our plan lets you make the most of your garage organization. It keeps your tools and equipment organized and easy to find. Whether you’re a pro or a beginner, our guide is here to help you every step of the way.
🛠️ Want the Look Without the Sawdust? Here’s Your Shortcut
There’s something rewarding about building a wooden piece with your own hands—but let’s face it, not everyone has the time, tools, or space for a full DIY project.
💡 That’s why I recommend Ted’s Woodworking Plans – a massive library of 16,000+ step-by-step plans for every kind of woodworking project you can imagine. From pet houses to holiday gifts, you’ll get:
✨ Easy-to-follow blueprints
🧰 Complete material & cut lists
🪚 Projects for all skill levels👉 Start your woodworking journey with Ted’s 16,000 plans »
💝 Ted’s Woodworking Plans also makes an amazing gift for parents, children, friends, boyfriends, girlfriends, brothers, and sisters.
🛒 Prefer to Buy Instead of Build?
No problem! If you love the look of handcrafted wood but would rather skip the tools, we’ve got you covered.
🌿 👉 Browse top-rated Garage Wall Shelving and get inspired on Amazon »
Key Takeaways
- Create a customized shelving system tailored to your needs.
- Maximize your garage’s storage with our woodworking plan.
- Enhance your DIY experience with a clutter-free workspace.
- Learn to build versatile wall shelves with ease.
- Improve your garage’s overall organization and functionality.
Why Garage Wall Shelving Is the Ultimate Storage Solution
If your garage is cluttered, think about using garage wall shelving. It’s more than storage; it’s a way to turn your garage into an organized space. This makes the most of your area.
Maximizing Vertical Space in Your Garage
Garage wall shelving is great for using vertical space. By putting shelves on walls, you free up the floor. This lets you store tools, equipment, and more without cluttering the floor.
It also makes your garage look better and easier to move around. For example, you can put seasonal decorations or out-of-season clothes on high shelves. This keeps them out of the way but easy to reach.
Getting Items Off the Floor for Better Organization
Having things all over the floor can make your garage feel small and messy. Garage wall shelving solves this by giving a place for everything. This keeps your floor clear, making it easier to park, work, or just move around.
It also helps cut down on clutter. This makes it simpler to find what you need when you need it.
| Benefits of Garage Wall Shelving | Description |
|---|---|
| Maximizes Vertical Space | Keeps floor clear, making garage more navigable |
| Improves Organization | Provides designated storage, reducing clutter |
| Increases Accessibility | Makes stored items easier to access |
As garage organization experts say, “A well-organized garage is not just about having more space; it’s about making the space you have work better for you.” Using garage wall shelving is a big step towards that goal.
Planning Your Garage Wall Shelves Project
Turning your cluttered garage into a tidy space is possible with the right planning. You need to think about your storage needs, the wall space you have, and the weight of your items. This will help you choose the best shelving for your garage.
Assessing Your Storage Needs and Weight Requirements
First, list what you want to store. This includes tools, equipment, and seasonal decorations. Think about the weight and size of these items. Heavy items like toolboxes need strong shelves that can hold a lot of weight.
Measuring Your Available Wall Space
Then, measure your garage wall to see how much space you have. Remember to account for windows, doors, and any other things that might get in the way. Use a tape measure and make a sketch to plan your project.
Determining Optimal Shelf Depth and Spacing
Choosing the right shelf depth and spacing depends on what you’re storing. For big or heavy items, you’ll need deeper shelves with more space. For smaller items, shallower shelves with less space work better. Shelves are usually 12 to 24 inches deep.
| Shelf Depth | Ideal for Storing | Weight Capacity |
|---|---|---|
| 12 inches | Small tools, bins | 50-100 lbs |
| 16 inches | Medium-sized equipment | 100-150 lbs |
| 20-24 inches | Large storage bins, heavy tools | 150-250 lbs |
With careful planning, you can make a shelving system that fits your needs and improves your garage’s use.

Essential Materials for DIY Garage Wall Shelves
To build sturdy garage wall shelves, start with the right materials. We’ll guide you through this process. The materials you choose affect the shelf’s durability and function.

Lumber Selection Guide: Plywood vs. Dimensional Lumber
Choosing the right lumber is key in your DIY project. You have two main options: plywood and dimensional lumber. Plywood is made from wood veneer layers, strong yet light. It’s great for shelves because it’s affordable and can hold a lot of weight.
Dimensional lumber is best for the shelf frame. It comes in various sizes and is sturdy. Choose straight, knot-free boards for stability.
| Material | Characteristics | Best Use |
|---|---|---|
| Plywood | Cost-effective, resistant to warping, good strength | Shelf boards |
| Dimensional Lumber | Straight, sturdy, available in various sizes | Frame and structural components |
Hardware and Fasteners: Screws, Brackets, and Anchors
The hardware you pick is as important as the lumber. Screws hold the frame and shelf boards together. Use 2.5-inch wood screws for strength. Brackets add support, and anchors keep shelves on the wall securely.
Optional Materials for Enhanced Durability
For even more durability, add extra materials. A wood finish or sealant protects against moisture and wear. Metal straps and shelf dividers also help.
Tools Required for Building Garage Wall Shelves
Before we dive into the nitty-gritty of building garage wall shelves, let’s talk about the tools you’ll need to get the job done. Having the right tools on hand will make the process smoother and more efficient. This ensures your shelves are sturdy and well-built.
Essential Hand Tools for the Project
You’ll need some basic hand tools to start your project. These include a tape measure for measuring your wall space and lumber, and a level to ensure your shelves are perfectly horizontal. You’ll also need a hammer for tapping pieces into place.
A clamp will help hold your shelf boards in place while you attach them to the frame. Don’t forget a pencil and marker for marking your cuts and assembly points.

Power Tools That Make the Job Easier and More Precise
Power tools will significantly speed up your project and improve accuracy. A circular saw is essential for making straight cuts in your lumber. A drill will help you drive screws quickly and efficiently.
If you have access to a miter saw, it will be invaluable for making precise angled cuts. For assembling your shelves, a cordless drill/driver is a must-have. It provides the flexibility to work anywhere on your project without being tethered to a power source.
Safety Precautions for Your Woodworking Project
When you start your garage wall shelving DIY project, safety is key. Woodworking has dangers like sharp tools and loud noises. It’s important to be ready for these risks.

Personal Protective Equipment You Shouldn’t Skip
Wearing the right gear is vital to protect yourself. You need safety glasses to keep your eyes safe from flying debris. Also, ear protection is a must to prevent hearing loss.
Don’t forget a dust mask to avoid breathing in harmful dust. Wearing gloves will protect your hands from splinters and cuts. And, steel-toed boots offer extra protection against heavy objects.
Safe Working Practices When Cutting and Mounting
Safe practices are as important as wearing the right gear. Make sure your workspace is well-lit and free from clutter. This helps prevent accidents.
When cutting wood, use a push stick or safety device. It keeps your hands away from the blade. When mounting shelves, check that the wall can hold the weight. Use proper anchoring techniques to avoid any collapses. Following these tips will help you complete your project safely and successfully.
Preparing Your Garage Wall for Shelving Installation
Getting your garage wall ready for shelving is key to a solid storage setup. A well-prepared wall supports the shelves and your stored items well.
Locating and Marking Wall Studs Accurately
To attach shelves securely, find the wall studs first. A stud finder helps spot the studs behind the drywall. Mark their spots with a pencil. This is vital for strong support.
Here are some tips for accurately finding wall studs:
- Use a high-quality stud finder that can detect the edges of the studs.
- Scan the wall slowly and methodically to avoid missing any studs.
- If you’re having trouble finding studs, try knocking gently on the wall to help locate them.
Clearing and Cleaning the Installation Area
Clear the area before installing your shelves. Remove clutter, dust, or debris from the wall and floor. This makes your workspace clean and safe.

Cleaning the area is as important as clearing it. Wipe the wall with a damp cloth to remove dirt and old adhesive. This ensures a strong bond with your shelves.
Cutting and Preparing Your Shelf Materials
Now that we have our materials, let’s start cutting and preparing them for our garage shelves. Making accurate cuts is key for the shelves’ stability and look.

Measuring and Marking Your Lumber for Precise Cuts
To get precise cuts, we must measure and mark our lumber right. Use a tape measure to find the length and width for each shelf board. Mark these with a pencil, making sure the cut line is clear.
Always double-check your measurements before cutting. It’s wise to measure twice and cut once to save materials.
Making Clean, Square Cuts for Professional Results
Clean, square cuts are vital for a professional look. Use a circular saw or a miter saw for straight cuts. A jigsaw is best for curved cuts. Make sure your saw is set correctly for the cut.
To get a smooth finish, sand the cut edges. This removes splinters and rough spots. It also makes the shelves safer to handle.
By following these steps, you’ll cut and prepare your materials well. This will help you succeed in your DIY garage wall shelves project.
Step-by-Step Assembly of Your Garage Wall Shelving
Now that we have all our materials ready, it’s time to start assembling our garage wall shelving. This process involves several key steps that will ensure your shelves are sturdy and functional.
Building Strong and Square Shelf Frames
Building strong and square shelf frames is key for your shelving’s stability. We’ll use precise measurements and sturdy materials to achieve this.
- Cut four pieces of lumber to the desired length for your shelf frame.
- Assemble the frame using screws, ensuring it is square by checking the diagonals.
- Use clamps to hold the frame in place while you screw it together.
Here’s a simple table to help you understand the frame assembly process:
| Step | Description | Tools Required |
|---|---|---|
| 1 | Cut lumber to length | Circular saw |
| 2 | Assemble frame | Screwdriver, clamps |
| 3 | Check for squareness | Measuring tape |

Attaching the Shelf Boards Securely
Once your shelf frames are built, it’s time to attach the shelf boards. This step is critical for creating a stable surface for your storage needs.
To attach the shelf boards securely, follow these steps:
- Place the shelf board on top of the frame, ensuring it is aligned properly.
- Use screws to secure the board to the frame, spacing them evenly apart.
- Check the board for any warping or unevenness and adjust as necessary.
Reinforcing Your Shelves for Heavy-Duty Storage
To make your garage wall shelving suitable for heavy-duty storage, you’ll need to reinforce the shelves. This can be done by adding additional support brackets or using thicker, sturdier materials for the shelf boards.
Consider the following reinforcement options:
- Adding support brackets between the shelf and the wall.
- Using thicker plywood or solid wood for the shelf boards.
- Incorporating metal brackets for added strength.
By following these steps and reinforcing your shelves, you’ll have a sturdy garage wall shelving unit capable of handling your storage needs.
Mounting Your DIY Shelves to the Garage Wall
After building your garage shelves, it’s time to mount them. This step turns your DIY project into a strong storage area. Mounting correctly is key for safety and to hold the weight without damage.

Proper Anchoring Techniques for Maximum Strength
Mounting your shelves right means using the right anchors. The right ones make your shelves strong and last long. You’ll face drywall or concrete in a garage. Use drywall anchors or toggle bolts for drywall, and concrete anchors or expansion bolts for concrete.
Step-by-Step Anchoring Guide:
- Find the wall studs with a stud finder.
- Mark where you want the anchor.
- Drill a pilot hole if needed.
- Put in the anchor and screw it in.
- Attach your shelf bracket to the anchor.
| Wall Type | Recommended Anchor | Weight Capacity |
|---|---|---|
| Drywall | Drywall Anchors/Toggle Bolts | Up to 50 lbs |
| Concrete | Concrete Anchors/Expansion Bolts | Up to 100 lbs |
Ensuring Your Shelves Are Level, Plumb, and Secure
After anchoring, hang your shelves. Make sure they’re level and plumb. Use a level tool to check both sides. Adjust as needed before tightening the screws.
Tips for a Professional Finish:
- Double-check your measurements before drilling.
- Use shims if necessary to adjust for any unevenness.
- Tighten all screws and bolts securely.
By following these steps and using the right anchors, you’ll have a sturdy garage shelving system. It will last for many years.
Finishing and Customizing Your Wooden Garage Shelves
Your garage shelves are almost ready. Now, let’s focus on finishing and customizing them. This will make them truly yours. Finishing your shelves not only makes them look better but also protects them. This ensures they last for many years.
Sanding and Finishing Options for Durability
Sanding is key before applying a finish. It smooths the wood and removes splinters or rough spots. Start with coarse-grit sandpaper and move to finer grits for a smooth finish. You can choose from stain, paint, or polyurethane for the finish. Stain adds color, while polyurethane offers protection.
Think about your garage’s style and what you’ll store when picking a finish. For example, a waterproof finish is good for tools or equipment that rust.

Adding Functional Extras: Dividers, Labels, and Hooks
Adding dividers, labels, and hooks can boost your shelves’ function. Dividers keep items organized and prevent them from falling. Labels help you quickly find what you need. Hooks offer extra storage for bikes, hoses, or cords.
Organizing Strategies for Your New Garage Wall Shelving
After installing and customizing your shelves, organize your garage. Sort your items and assign a spot for each on your shelves. Keep often-used items easy to reach. Store less used items higher or lower. These strategies will help you keep your garage tidy and make the most of your new shelves.
Now you know how to make garage wall shelving. It’s time to start your DIY project and make your garage more organized. Our woodworking plan will help you use your space better, keep things off the floor, and make your workspace more functional.
Building garage wall shelving is a great DIY project. It not only increases your garage’s storage but also adds value to your home. With your new shelving, you can store tools, equipment, and other items easily and in order. This makes it simpler to find what you need when you need it.
So, get your tools ready, pick your materials, and start building your garage wall shelving today. We’re sure you’ll do great with our help. You’ll enjoy a more organized garage for many years.
FAQ
What is the best type of wood for building garage wall shelves?
How do I determine the optimal shelf depth and spacing for my garage wall shelving?
What kind of hardware and fasteners do I need for my garage wall shelving project?
Can I customize my garage wall shelving with dividers, labels, and hooks?
How do I ensure my garage wall shelving is level, plumb, and secure?
What safety precautions should I take when building and installing garage wall shelving?
Can I use my garage wall shelving for heavy-duty storage?
How do I maintain and clean my garage wall shelving?
Affiliate Disclosure
Some of the links in this article are affiliate links. If you click through and make a purchase, I may earn a small commission — at no additional cost to you.
This helps support my work so I can continue creating helpful woodworking tutorials and product reviews.I only recommend products and services that I have thoroughly researched and believe could provide real value to my readers.
Thank you for your support!