
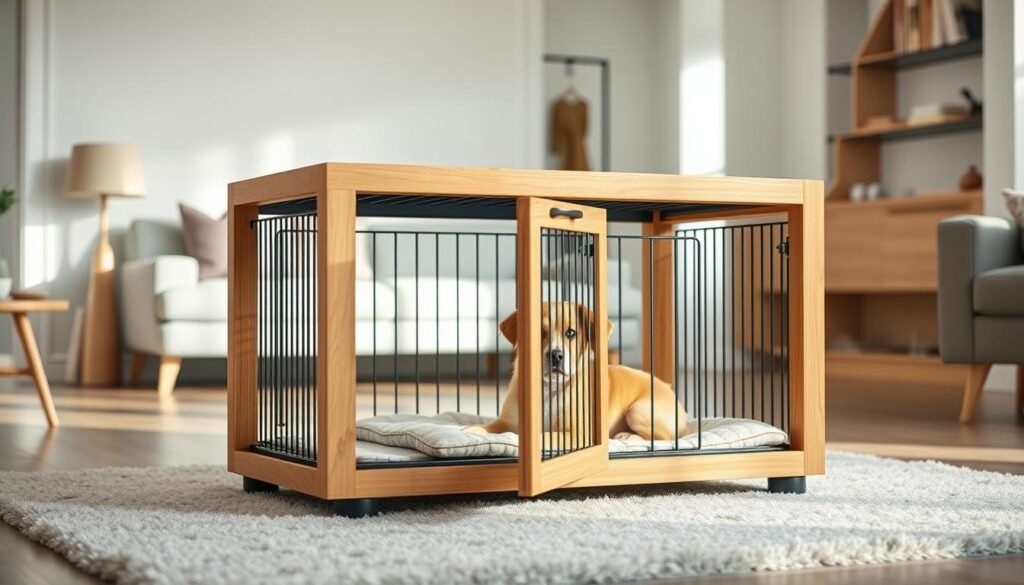
Do you have a dog crate taking up space in your living room? Want a stylish, functional piece that’s also comfy for your pet? You’re not alone. Many pet owners face this challenge, and we’re here to help.
Turning a crate into a multifunctional end table is a smart move. It saves space and adds style to your home. This DIY project lets you make a cozy spot for your pet while keeping your decor modern.
🛠️ Want the Look Without the Sawdust? Here’s Your Shortcut
There’s something rewarding about building a wooden piece with your own hands—but let’s face it, not everyone has the time, tools, or space for a full DIY project.
💡 That’s why I recommend Ted’s Woodworking Plans – a massive library of 16,000+ step-by-step plans for every kind of woodworking project you can imagine. From pet houses to holiday gifts, you’ll get:
✨ Easy-to-follow blueprints
🧰 Complete material & cut lists
🪚 Projects for all skill levels👉 Start your woodworking journey with Ted’s 16,000 plans »
💝 Ted’s Woodworking Plans also makes an amazing gift for parents, children, friends, boyfriends, girlfriends, brothers, and sisters.
🛒 Prefer to Buy Instead of Build?
No problem! If you love the look of handcrafted wood but would rather skip the tools, we’ve got you covered.
🌿 👉 Browse top-rated dog crate end table and get inspired on Amazon »
Key Takeaways
- Create a stylish and functional piece of furniture for your pet
- Save space in your living room with a multifunctional design
- Add a touch of modern style to your home decor
- Provide a comfortable and cozy retreat for your pet
- Follow our step-by-step guide to complete this DIY project
The Perfect Blend of Pet Care and Home Decor
Imagine having a stylish piece of furniture that also serves as a cozy haven for your dog – that’s what a dog crate end table offers. It combines your dog’s crate with a functional piece of furniture. This not only enhances your home’s decor but also creates a comfortable space for your pet.
Space-Saving Benefits
A space-saving dog crate table is great because it serves multiple purposes in your home. It combines a dog crate with an end table, saving space that would be used by two separate pieces. This is super helpful for homes with limited space, where every square foot matters.
Creating a Comfortable Space for Your Dog
A pet crate end table is not just about saving space; it’s also about creating a comfortable and safe environment for your dog. By incorporating your dog’s crate into your living room decor, your pet feels included and secure. The crate, turned into an end table, provides a cozy den for your dog while keeping your living area stylish and uncluttered.
As the saying goes, “A place for everything, and everything in its place.” With a DIY dog crate end table, you can achieve just that – a harmonious blend of style, functionality, and pet comfort.
Planning Your Dog Crate End Table Project
Starting your dog crate end table project is exciting. It combines style with function. Good planning makes sure your DIY project fits your needs and decor.
Measuring Your Dog Crate Dimensions
First, measure your dog crate carefully. Note its length, width, and height. These measurements are key for your end table design, ensuring a perfect fit. Accurate measurements are key to avoid changes later.
Choosing a Design Style That Matches Your Home
Then, think about your home’s design style. Do you prefer modern, rustic, or traditional? Your dog crate end table should match your furniture. Consider materials, colors, and style you want. Your dog crate end table shows your personal style.
Creating Detailed Sketches and Plans
With measurements and design in mind, make detailed sketches and plans. This step is essential for seeing your project and making changes before building. Include all parts, like the tabletop, shelves, and decorations. A good plan makes building easier and faster.
| Dimension | Measurement | Notes |
|---|---|---|
| Length | 30 inches | Include extra inches for the tabletop overhang |
| Width | 24 inches | Consider the space where the end table will sit |
| Height | 18 inches | Ensure it’s comfortable for your dog to enter and exit |

By following these steps, you’ll create a beautiful and useful dog crate end table. It will improve your living space and be a cozy spot for your pet.
Essential Materials for Your DIY Dog Crate End Table
Let’s explore the key materials needed for a stylish dog crate furniture piece. Creating a multifunctional dog furniture item demands picking materials wisely. This ensures both durability and style.
Wood Selection Guide: Pine vs. Oak vs. Plywood
Choosing the right wood is key for your dual-purpose dog crate project. You can pick Pine for its lightness and ease of use. Oak is sturdy and durable, while Plywood is cost-effective and versatile. Each wood has its benefits and drawbacks, so think about your project’s needs and your skill level.
Hardware Requirements: Screws, Hinges, and Brackets
The hardware you pick is vital for your project’s success. You’ll need screws to build the frame, hinges for doors or lids, and brackets to attach the crate to the table. Make sure the hardware fits your wood and design.
Finishing Materials: Stains, Paints, and Sealants
To achieve a professional look, choose the right finishing materials. Stains and paints can boost the wood’s look. Sealants protect it from damage. Think about the color and finish you desire, and how durable it needs to be for your pet’s comfort and safety.
Tools You’ll Need for This Project
To make your pet crate into a pet crate end table, you need the right tools. The right tools make the job easier and ensure your space-saving dog crate table works well and is safe.
Basic Carpentry Tools
Every DIY project starts with the basics. For your modern dog crate makeover, you’ll need a measuring tape. This ensures your measurements are right. You’ll also need a square to check your corners and a level to keep your table even.
Power Tools That Speed Up the Process
Power tools can make your project go faster. A cordless drill is key for drilling holes and screwing things together. You’ll also need a circular saw for straight cuts in wood. For more precise cuts, think about using a jigsaw or a miter saw.

Safety Equipment
Safety is always first. Wear safety goggles to protect your eyes, gloves for your hands, and a dust mask for your lungs. These simple steps help avoid accidents and keep you safe while working.
Preparing Your Dog Crate for Transformation
Before you start turning your dog crate into a stylish end table, get it ready first. This step is key to making a high-quality dog crate furniture piece that looks good and works well.
Cleaning and Inspecting for Damage
Start by cleaning the dog crate well to get rid of dirt or debris. Check it for damage, like rusty hinges or broken wires, and fix any problems. This makes sure your decorative dog crate is ready to go.
Necessary Modifications for Integration
You might need to change the crate a bit to fit it into the end table design. Think about removing parts you don’t need or adjusting its size.
Positioning Considerations for Pet Comfort
Think about your pet’s comfort when placing the crate in the end table. Make sure it’s easy for them to get to and comfy.

By doing these steps, you’re on your way to making a lovely dog crate end table for both you and your pet.
Building the Perfect Dog Crate End Table Frame
Creating a multifunctional dog crate end table starts with building the frame. This part needs precision and care. You want the end result to be strong and look good.
Cutting the Wood to Precise Dimensions
First, cut the wood as your plans show. Use a measuring tape and square for accuracy. Always check your measurements before cutting to save material.
- Measure twice, cut once to ensure accuracy.
- Choose a saw you’re comfortable with, like a circular saw or hand saw.
- Smooth out the cut edges with sandpaper to prevent splinters.
Assembling the Base Structure
Now, put the cut wood pieces together. Use screws and brackets to hold them. Make sure the corners are square and the base is level.
- Begin with the sides and then add the top and bottom panels.
- Use clamps to keep the pieces in place while screwing.
- Ensure the frame is strong enough for the dog crate and any extra weight.
Creating Support Elements for Durability
To make your dual-purpose dog crate last longer, add extra support. This could be more brackets or a center leg. It keeps the table stable under weight.

By doing these steps, you’ll make a solid and stylish frame for your dog crate end table. It will mix pet care and home decor perfectly.
Constructing a Sturdy and Stylish Tabletop
Now that we have the frame ready, let’s make a tabletop that’s both strong and looks good. The tabletop is key for your modern dog crate or pet crate end table. It’s where you’ll put things and hide the crate.
Measuring and Cutting for a Perfect Fit
Getting the measurements right is vital for a smooth fit. Measure the frame’s size, considering any odd shapes. Cut your tabletop material to fit perfectly. “A well-fitted tabletop is key to a professional finish,” say woodworking experts.

Joining Techniques for a Seamless Look
The way you join the tabletop parts affects its look. Dowels, biscuits, or dominos make strong, nice-looking joints. For a rustic vibe, try visible screws or nails.
Edge Finishing for Safety and Style
Edge finishing is about looks and safety. Smooth edges prevent cuts, while fancy edges add class. Use a router for different edge styles, from simple to complex.
By paying attention to these details, you’ll make a tabletop that boosts your DIY project’s look and function. It will be a lovely piece for your home.
Integrating All Components of Your Dog Crate End Table
Now that we have all the parts, let’s put them together. This step is key to making sure your DIY project looks good and is safe for your pet.
Securing the Crate to the Frame Safely
First, we attach the dog crate to the frame. We use strong brackets or screws to hold the crate and your dog’s weight. Remember, “measure twice, screw once” to avoid mistakes. Make sure the crate is level and tight to avoid any shaking.

Attaching the Tabletop Securely
Then, we add the tabletop to the frame. This needs to be done carefully to make sure it’s even and tight. Using high-quality hardware will help your table last longer.
Testing for Stability and Safety
After putting it all together, test the table’s stability and safety. Shake it gently to check if it’s solid. Also, make sure all edges are smooth for your pet’s safety. As a craftsman, I always say, “A safe pet is a happy pet.”
By following these steps, you’ll have a beautiful, useful piece of furniture. It will be a cozy spot for your dog and a nice addition to your home. Your dog crate end table is now ready to be enjoyed, fitting perfectly into your living room while giving your pet a cozy place to relax.
Finishing Touches for Style and Longevity
As we near the end of our DIY dog crate end table project, it’s time for the final touches. These steps are key to making our multifunctional dog furniture stand out. They ensure it fits perfectly with our home decor.
Professional Sanding Techniques
Sanding is a must for a smooth finish. We start with coarse-grit sandpaper and move to finer grits. The last step is high-grit sandpaper for a silky surface. This not only looks great but also gets the surface ready for staining or painting.
- Begin with 120-grit sandpaper to remove any imperfections.
- Progress to 220-grit for a smoother finish.
- Finish with 320-grit or higher for an exceptionally smooth surface.
Staining Options for Different Wood Types
Choosing the right stain is key to the final look of our stylish dog crate furniture. Different woods take stain differently. Always test the stain on a small area first.
For example, oak might look best with a stain that highlights its grain. Pine might need a different stain to get the color you want.
Applying Protective Coatings for Durability
To keep our dual-purpose dog crate durable and long-lasting, we need a protective coating. You can use polyurethane, varnish, or a water-based sealant. Each has its own benefits, and the choice depends on what you want and how much protection you need.
Tips for Application:
- Apply thin coats, letting each dry before adding the next.
- Sand lightly between coats for a smoother finish.
- Follow the manufacturer’s instructions for the recommended number of coats.
By focusing on these finishing touches, we can make a unique piece of multifunctional dog furniture. It will be both stylish and functional.

Creative Customization Ideas for Your Pet Furniture
Admire your new space-saving dog crate table and think about these creative ideas. They can make it even more special. You can boost its functionality and beauty.
Adding Practical Storage Features
Customizing your pet crate end table with storage is a great idea. Add shelves or drawers for toys, treats, and grooming supplies. It keeps your living room neat and makes things easy to find.
Incorporating Decorative Elements
To match your home decor, add decorative touches to your dog crate end table. You can use trim, carvings, or a personalized plaque. These details can transform it into a stunning piece.
Pet-Friendly Modifications for Comfort
Comfort is essential for your pet’s furniture. Add a plush cushion or a soft bed inside. You can also make the interior easy to clean and add ventilation for better air.
| Customization Idea | Benefits | Tips for Implementation |
|---|---|---|
| Storage Compartments | Keeps pet supplies organized and within reach | Use shelves or drawers that fit your crate’s dimensions |
| Decorative Trim | Enhances the aesthetic appeal of your pet crate end table | Choose trim that matches your home decor style |
| Plush Cushion | Increases your pet’s comfort and relaxation | Select a cushion that is easy to clean and durable |

Troubleshooting Common Issues in DIY Furniture Projects
Even with careful planning, DIY projects like your dog crate end table can sometimes hit a snag. Don’t worry, we’re here to help you troubleshoot common issues that may arise during your project.
Fixing Wobbles and Stability Problems
A wobbly dog crate end table can be frustrating. To fix this, check that all legs are even and that the floor is level. If the problem persists, consider adding adjustable feet to your design.
Addressing Finish Imperfections
Imperfections in the finish can detract from the overall look of your decorative dog crate. To address this, lightly sand the area and apply a second coat of finish, ensuring it dries according to the manufacturer’s instructions.
Solutions for Fit and Alignment Problems
If components don’t fit together as planned, double-check your measurements and adjust the pieces. For high-quality dog crate furniture, precision is key.
| Issue | Solution |
|---|---|
| Wobbles and Stability | Check leg evenness, adjust feet |
| Finish Imperfections | Sand and reapply finish |
| Fit and Alignment | Double-check measurements, adjust |

By following these troubleshooting tips, you can overcome common challenges. Enjoy your new dog crate end table, blending style and function seamlessly into your home.
Conclusion: Enjoying Your Stylish and Functional Creation
Now that you’ve made your DIY dog crate end table, you can enjoy both style and function. This piece of furniture is great for your pet and looks modern. It’s a dog crate that also serves as an end table.
Your new dog crate is stylish and practical for your home. You can put it in your living room. It will fit right in with your decor.
Enjoying your creation shows off your hard work and care. Making it yourself took effort, but it’s worth it. It brings happiness to you and your pet.
FAQ
What is a dog crate end table, and how does it serve multiple purposes?
How do I choose the right design style for my dog crate end table?
What materials are best for building a dog crate end table?
How do I ensure my dog crate end table is safe and stable?
Can I customize my dog crate end table with storage or decorative elements?
What are some common issues with DIY dog crate end tables, and how can I troubleshoot them?
How do I maintain and care for my dog crate end table?
Is it possible to build a dog crate end table as a beginner DIY enthusiast?
Affiliate Disclosure
Some of the links in this article are affiliate links. If you click through and make a purchase, I may earn a small commission — at no additional cost to you.
This helps support my work so I can continue creating helpful woodworking tutorials and product reviews.I only recommend products and services that I have thoroughly researched and believe could provide real value to my readers.
Thank you for your support!