
👉 👉Grab Ted’s plans here and start your next project with confidence » Ted’s Woodworking – 16,000 Plans
Remember that old cardboard box your furry friend claimed as their throne last week? There’s something magical about watching our pets claim their own little corner of the world. I discovered this joy firsthand when my tabby refused to sleep anywhere but the makeshift fort I built from scrap wood – that’s when I realized how much these personal spaces matter to them.
We’ve all seen those pricey pet beds at the store, but here’s the truth: your companion deserves something made with your hands and heart. Whether you’re working with leftover materials or repurposing household items, creating a custom retreat strengthens that unique bond you share. It’s not about perfection – it’s about crafting a sanctuary that whispers “you’re home” to your four-legged buddy.
This guide will show you how to transform simple materials into dream hideaways. From quick weekend projects using cereal boxes to sturdier designs that become backyard landmarks, there’s something here for every skill level. You’ll be amazed how these creations become more than pet furniture – they turn into the spots where memories are made, from kittenhood naps to senior-year sunbathing sessions.
Key Takeaways
- Transform everyday materials into personalized retreats your pet will adore
- Choose projects matching your skill level, from beginner-friendly to expert challenges
- Save money while creating higher-quality spaces than store-bought options
- Select designs that fit your living space and your pet’s unique personality
- Discover how building together strengthens your bond with your animal companion
Creative Inspiration and Design Concepts for Cat Houses
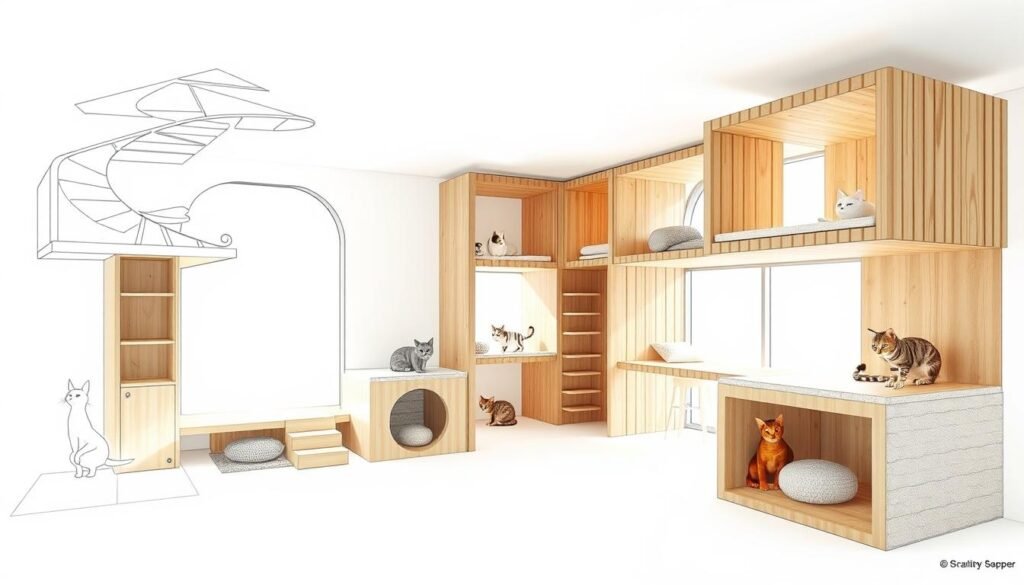
Ever notice how our feline friends turn delivery boxes into five-star hotels? That same magic happens when we create purpose-built spaces tailored to their quirks. Let me share a brilliant solution from a fellow builder – a two-level retreat that combines dining and lounging areas in one compact footprint.
You may also like
Space-Saving Solutions That Work Double Duty
The double-decker structure I helped construct last spring uses vertical space smartly. Four sturdy posts support a weatherproof dining area below, while the upper level offers a snug sleeping quarters. We used plywood cutoffs for walls and added reflective insulation – perfect for temperature-sensitive pets.
Breathing New Life Through Repurposed Materials
That stack of leftover 2x4s in your garage? They’re gold for creating custom shelters. One client transformed wooden pallets into a charming A-frame cabin, complete with angled roof and cedar shingle accents. The table below shows how common materials can become extraordinary pet spaces:
| Material | Best Use | Special Benefit |
|---|---|---|
| Recycled plywood | Wall panels | Natural insulation |
| Old pallets | A-frame base | Rustic charm |
| Cedar shingles | Roof covering | Weather resistance |
| Reflective foil | Wall lining | Temperature control |
Customization makes each shelter unique. Add circular windows for curious kittens or paint geometric patterns using outdoor-safe colors. One of my favorite touches? Cat-shaped cutouts that cast playful shadows at sunset.
Remember those spare Power Pro screws from your deck project? They’re ideal for assembling structures that might need seasonal disassembly. This approach lets you modify designs as your pets’ needs change – because today’s frisky jumper becomes tomorrow’s sunbathing senior.
DIY Cat House Ideas: Step-by-Step Building Guide

👉 👉Grab Ted’s plans here and start your next project with confidence » Ted’s Woodworking – 16,000 Plans
Remember that toolkit gathering dust in your garage? Let’s put it to work creating something that’ll outlast any store-bought pet bed. I learned this lesson building shelters for a local rescue group – nothing beats watching a timid stray claim their first real home.
Blueprint Before You Build
Start by measuring your available space twice. That leftover plywood from last summer’s shed project? Perfect for crafting walls. We recommend sketching dimensions on graph paper – it helps visualize proportions and prevents material waste.
From Foundation to Weatherproof Roof
Begin with treated 2x4s for the base, spacing boards like piano keys to allow expansion. Screw 4×4 posts into each corner, checking levels constantly. “The secret,” as my carpenter friend says, “is building the frame like you’re making furniture – precise and sturdy.”
Attach plywood panels to 2×2 wall frames using exterior-grade screws. Here’s a pro tip: staple reflective insulation behind the outer walls before sealing them. For the roof, angle 2×2 rafters to create proper runoff, then layer cedar shingles like overlapping fish scales.
Cut entrance holes wide enough for fluffy tails but narrow enough to deter unwelcome visitors. Finish with outdoor-safe stain in earthy tones – we’ve found muted greens help shelters blend into garden settings while protecting the wood.
Last touch? Line the floor with removable plywood panels for easy cleaning. Add a layer of straw (not hay!) for insulation. Before you know it, you’ll spot pawprints leading straight to their new favorite napping spot.
Outdoor Shelter Tips for Winter and Feral Cats

That frosty morning when you spot pawprints circling your porch? It’s nature’s reminder that every creature deserves a warm refuge. I learned this watching neighborhood strays during my first Chicago winter – their survival depends on shelters that balance coziness with clever protection.
Design Elements for Insulation and Weather Protection
👉 👉Grab Ted’s plans here and start your next project with confidence » Ted’s Woodworking – 16,000 Plans
Straw beats blankets every time. Unlike fabric that traps moisture, these golden stalks let pets burrow while staying dry. My go-to solution? Convert styrofoam coolers into instant shelters. Cut a 6-inch entryway, stuff with straw, and you’ve created a toasty cave that costs less than takeout coffee.
For hardcore winters, try the dual-bin method. Nest a plastic container inside a larger one, lining the gap with styrofoam sheets. “It’s like putting a thermos around their bed,” explains a Minnesota rescue worker. Always elevate shelters on 2x4s – cold ground steals warmth faster than you’d think.
Ensuring Safety Against Predators and Weather Elements
Position entrances facing walls or fences. This creates a hidden pathway that deters raccoons while letting pets slip through. Keep doorways 5 inches above floor level to block snowdrifts and rain splash.
Two exits prevent ambushes, but stagger them to avoid drafts. Secure lightweight shelters with patio stones – I learned this after a gust sent my first attempt tumbling. Remember to place food and water stations nearby, but never inside. You’ll soon notice visitors treating their new haven like a five-star inn.
Conclusion
There’s a special kind of pride in seeing your pet claim a space you built. Whether crafting a cozy shelter from storage bins or engineering a multi-level adventure structure, each creation becomes part of your shared story.
Your skills have grown with every project – from basic boxes to weatherproof cat houses. Remember that perfect measurements matter less than the love poured into each cut and screw. That plywood palace with mismatched shingles? It’s a five-star resort to your furry tenant.
Snap pictures of your finished home improvements for whiskered clients. Share those “before and after” moments where cardboard prototypes evolved into insulated retreats. We’re always here at [YourEmail@craftsman.com] to cheer your next build – because every scratched post and sun-warmed perch makes our neighborhoods warmer, one shelter at a time.
What’ll you create next? Maybe that cedar-clad cat house with built-in feeding stations? Whatever you choose, know it’s more than wood and nails – it’s a safe place where trust gets woven into every joint.
Not Ready to Build It Yourself? Here’s a Shortcut You’ll Love
While there’s something special about crafting a shelter or toy with your own hands, not everyone has the time, tools, or space to take on a full DIY project right now.
💡 That’s why I highly recommend Ted’s Woodworking Plans – a collection of 16,000+ step-by-step woodworking plans. Whether you’re making a cat house, a dog shelter, or even holiday gifts, this resource gives you pro-level blueprints without the guesswork.
✨ Perfect for beginners
🧰 Detailed diagrams and cut lists
🪚 Projects from simple to expert level
👉 Grab Ted’s plans here and start your next project with confidence » Ted’s Woodworking – 16,000 Plans
Prefer to Buy Instead of Build?
No problem! If you’re short on time or not ready for a saw-and-screwdriver adventure, you can explore these handcrafted and highly rated pet products on Amazon:
👉 Click here to view top-rated pet gifts on Amazon » Shop Pet Gifts
These options save you time while still giving your pet the comfort and fun they deserve.