
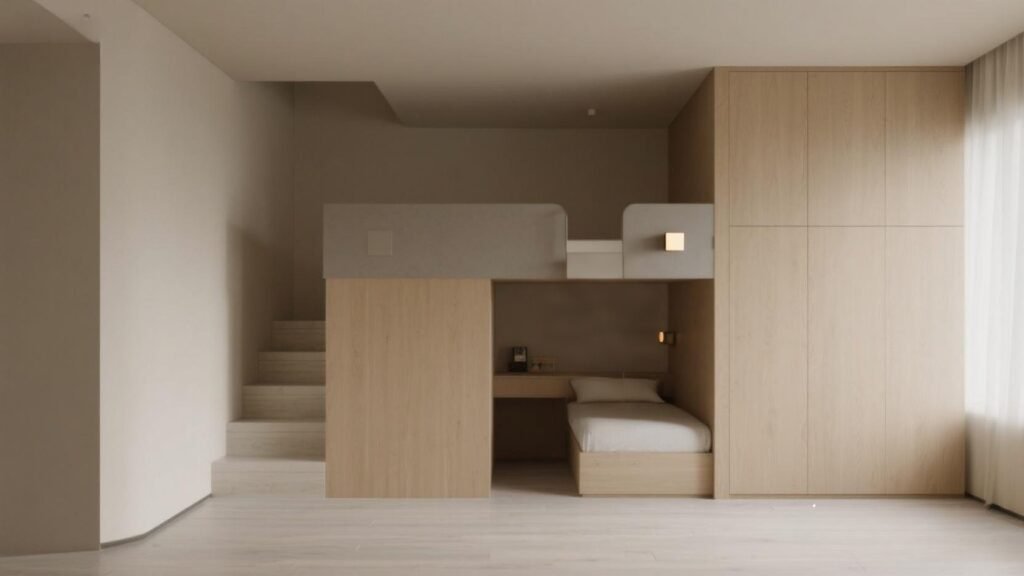
Looking to use your home’s space better? Want a cozy spot to sleep? We’re here to help! A loft bed with stairs is a smart choice for saving room.
Picture a cozy spot for relaxing or reading. Our guide will show you how to build a loft bed that’s both sturdy and stylish. It will fit your needs perfectly.
We’ll cover the benefits, planning, and building steps. This way, you can make a beautiful and useful sleeping area easily.
👉👉 Start your woodworking journey with Ted’s 16,000 plans »
🌿 👉 Browse top-rated Staircase Loft Bedand get inspired on Amazon »
You may also like
Key Takeaways
- Learn how to maximize space in your home with a loft bed
- Understand the benefits of building a staircase loft bed
- Get a step-by-step guide on planning and constructing your loft bed
- Discover how to create a cozy and functional sleeping area
- Find out how to make the most of your room’s vertical space
Benefits of Building Your Own Loft Bed
Building a DIY loft bed is a smart way to use your space better. It’s not just a piece of furniture; it’s a way to improve your bedroom’s layout.
Space-Saving Advantages
Loft beds save a lot of space. They lift your bed off the floor, making room for other things. This is great for small homes or apartments where space is limited.
Cost Comparison with Store-Bought Options
Building your own loft bed can save you money. You can pick your materials and do the work yourself. This way, you avoid the high costs of pre-made beds.
| Item | DIY Cost | Store-Bought Cost |
|---|---|---|
| Lumber | $100 | $300 |
| Hardware | $50 | $150 |
| Labor | $0 (self) | $200 |
| Total | $150 | $650 |
Customization Possibilities
Building your own loft bed lets you tailor it to your liking. You can pick the design, materials, and features you want. Add storage drawers or a desk underneath; the choices are endless.
Planning Your DIY Full Size Staircase Loft Bed
Planning is key to building a successful DIY loft bed with storage stairs. Before you start, it’s essential to plan your DIY full-size staircase loft bed carefully. This involves several steps that will ensure your project is both functional and safe.
Measuring Your Room Dimensions
To start, you need to measure your room dimensions accurately. Note the location of windows, doors, and any obstacles that could affect your loft bed’s design. Accurate measurements are critical to avoid costly mistakes during construction.
Determining Ideal Bed Height
Deciding on the ideal bed height is another critical step. You must consider the ceiling height and ensure there’s enough clearance for you to stand comfortably under the loft bed. Typically, a clearance of at least 5 feet is recommended.
Creating Detailed Blueprints
Creating detailed blueprints is vital for visualizing your project. You can use free online design tools to help you create a precise plan.
Free Online Design Tools
There are several free online tools available that can help you design your loft bed. These tools allow you to input your measurements and create a 3D model of your project.
Important Measurements to Include
When creating your blueprint, ensure you include all important measurements. This includes the length and width of the bed, staircase dimensions, and storage space requirements.
| Measurement | Description | Example Value |
|---|---|---|
| Room Length | The total length of the room | 15 feet |
| Room Width | The total width of the room | 12 feet |
| Ceiling Height | The height from the floor to the ceiling | 8 feet |
| Loft Bed Height | The height of the loft bed from the floor | 6 feet |
By following these steps and using the right tools, you can create a well-planned DIY full-size staircase loft bed. It will meet your needs and fit perfectly in your room.
Essential Tools for This Project
Starting your DIY full-size loft bed project means first getting the right tools. The right tools make building easier and faster.
Power Tools Required
You’ll need a few power tools for this job. A circular saw is key for cutting wood. A drill press helps with precise drilling, and a reciprocating saw is great for curved cuts or removing old stuff. Don’t forget a cordless drill for screwing and making pilot holes.
Hand Tools Checklist
Hand tools are also important. You’ll need a tape measure for measuring, a level to keep things straight, and a hammer for fitting pieces together. You’ll also use screwdrivers and clamps to keep things steady.
Measuring and Marking Equipment
Getting your measurements right is key. Use a combination square for accurate angles and a stud finder to find wall studs. A pencil and marker are for marking cuts and layouts on your wood.
| Tool Category | Tools Needed |
|---|---|
| Power Tools | Circular saw, Drill press, Reciprocating saw, Cordless drill |
| Hand Tools | Tape measure, Level, Hammer, Screwdrivers, Clamps |
| Measuring & Marking | Combination square, Stud finder, Pencil, Marker |

👉👉 Start your woodworking journey with Ted’s 16,000 plans »
🌿 👉 Browse top-rated Staircase Loft Bedand get inspired on Amazon »
Complete Materials Shopping List
Now that we have our tools ready, let’s gather the right materials for our DIY stairway loft bed. Having everything you need will make the process smoother and more enjoyable.
Lumber Selection and Quantities
For a full-size staircase loft bed, you’ll need a lot of lumber. You’ll need 2x4s for the frame and support beams. Also, 3/4-inch plywood is needed for the mattress platform. Here’s a rough estimate:
- 8 pieces of 2×4 lumber (8 feet long) for the corner posts and support beams
- 4 pieces of 3/4-inch plywood (4×8 feet) for the mattress platform and stairs
- Additional 2x4s for the staircase structure
It’s wise to check with your local hardware store or use online calculators. This will help you get the exact amount you need for your design.
Hardware and Fasteners Needed
The right hardware and fasteners are key for a sturdy and safe loft bed. You’ll need:
- 2-inch wood screws
- 3-inch wood screws for assembling the frame
- Wood glue for added stability
- Metal brackets for extra support
Choose high-quality hardware that can handle the weight of the bed and its occupants.
Finishing Materials
For the finishing touches, you’ll need materials to sand, stain, or paint your loft bed. Consider:
- Sandpaper (various grits)
- Wood stain or paint
- Polyurethane for a protective finish
Choose finishes that match your bedroom decor. They should provide the desired sheen and protection.

👉👉 Start your woodworking journey with Ted’s 16,000 plans »
🌿 👉 Browse top-rated Staircase Loft Bedand get inspired on Amazon »
Safety Precautions and Preparations
Before we start building, let’s talk about safety. A DIY project like a full size staircase loft bed can be tough and risky if not done right.
Personal Protective Equipment
Wearing the right gear is key to staying safe. You’ll need safety glasses to protect your eyes, ear protection to keep your hearing safe, and a dust mask to avoid breathing in harmful particles. Always wear protective gear when using power tools or handling materials that could hurt you.
Structural Safety Guidelines
It’s important to follow safety rules when building your loft bed. Make sure it’s strong enough to hold the weight it’s meant for. Check that all parts are securely attached and that it’s level and stuck to the wall to avoid it tipping.
Workspace Setup

A clean and organized workspace is essential for a safe and efficient build. Keep your area tidy and make sure you have enough room to move around. Good lighting is also important; your workspace should be well-lit to avoid accidents caused by not seeing well.
By following these safety tips, you can work on your DIY full size staircase loft bed safely. This will help you avoid accidents and ensure your project goes well.
👉👉 Start your woodworking journey with Ted’s 16,000 plans »
🌿 👉 Browse top-rated Staircase Loft Bedand get inspired on Amazon »
Building the DIY Full Size Staircase Loft Bed Frame
Now we have our materials and tools ready. It’s time to start building the loft bed frame. This is the most exciting part of our DIY project, where our plans start to take shape.
Constructing the Corner Posts
The corner posts are the foundation of our loft bed. They provide the necessary support for the entire structure. Let’s begin by cutting and preparing these posts.
Cutting and Preparing Posts
To ensure our corner posts are sturdy, we need to cut them to the right size. Use a saw to cut the lumber according to your measurements. Accuracy is key here to avoid any issues later on.
Securing Posts to Floor and Ceiling
Once our posts are cut, we need to secure them to both the floor and the ceiling. This involves using appropriate fasteners and ensuring they are level. Proper alignment is critical for the stability of the loft bed.
Assembling the Mattress Platform
With our corner posts in place, we can now assemble the mattress platform. This involves attaching the platform frame to the corner posts. Make sure it’s sturdy enough to support the weight of the mattress and anyone using it.
Use strong brackets and screws to secure the platform. Double-check that it’s level and firmly attached to the corner posts.
Installing Support Beams and Braces
To add extra stability to our loft bed, we need to install support beams and braces. These will help distribute the weight evenly and prevent any sagging.

👉👉 Start your woodworking journey with Ted’s 16,000 plans »
🌿 👉 Browse top-rated Staircase Loft Bedand get inspired on Amazon »
Use appropriate lumber for the support beams, and ensure they are securely attached to the corner posts and the mattress platform.
Constructing the Staircase Structure
Now, we’ll build the staircase for our DIY full size staircase loft bed. The staircase is key for getting to the loft bed. It makes the bed more useful and looks better too.
Calculating Proper Stair Dimensions
First, we need to figure out the right size for the staircase. It should have a slope of 30 to 40 degrees. We’ll find the total rise and run to get this right. The riser and tread should add up to 17 to 18 inches.
Building Sturdy Stair Stringers
The stringers are the main support for the staircase. We’ll cut them and attach them to the bed frame in two steps.
Cutting Stringer Patterns
We’ll use a template to mark the stringer patterns on 2×12 lumber. Cutting them right is key for a uniform staircase. A circular saw works best for this.
Attaching Stringers to Bed Frame
After cutting, we’ll attach the stringers to the bed frame with 3-inch screws. Make sure they’re evenly spaced and well-attached for stability.
Installing Treads and Risers
With the stringers on, we can put in the treads and risers. Use 1-inch thick wood for these. Start at the bottom and go up, making sure each step is tight to the stringers.
Here’s a simple table to help you plan your staircase dimensions:
| Total Rise | Riser Height | Total Run | Tread Depth |
|---|---|---|---|
| 60 inches | 7.5 inches | 80 inches | 10 inches |
| 72 inches | 8 inches | 90 inches | 10.5 inches |
👉👉 Start your woodworking journey with Ted’s 16,000 plans »
🌿 👉 Browse top-rated Staircase Loft Bedand get inspired on Amazon »
By following these steps and using the right materials, you’ll make a sturdy and comfy staircase for your loft bed. Always check your measurements and make sure everything is securely attached.
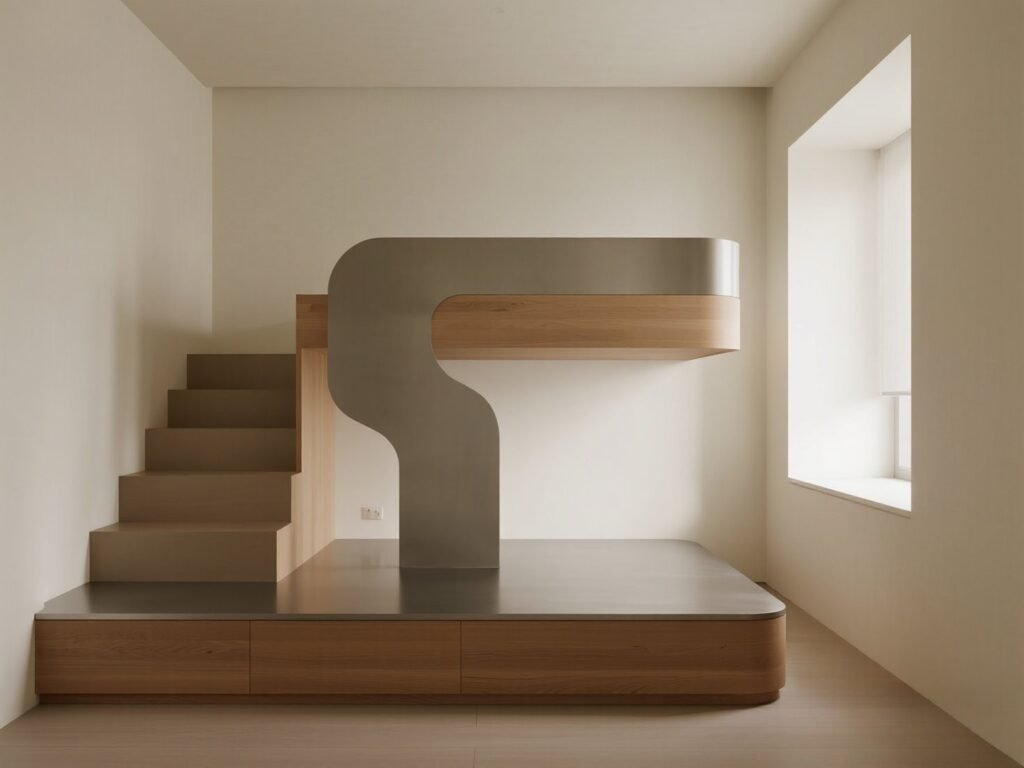
Incorporating Storage Solutions in the Stairs
Transform your loft bed stairs into a storage powerhouse. Adding storage to your loft bed with stairs diy project boosts room space and keeps it tidy.
Designing Functional Drawer Spaces
Think about the drawer size and number for your staircase. Measure the space and plan the drawer sizes. Soft-close drawer glides make opening and closing smooth.
Building and Installing Drawers
To make drawers, use 3/4 inch plywood for sides and bottom, and 1×6 boards for fronts. Assemble with wood glue and 2-inch wood screws. Install drawers with planned glides, ensuring they’re level and stable.

👉👉 Start your woodworking journey with Ted’s 16,000 plans »
🌿 👉 Browse top-rated Staircase Loft Bedand get inspired on Amazon »
Creating Open Shelving Alternatives
Open shelving is a good option if you don’t like drawers. You can place shelves between stair treads or under the stairs for open storage cubbies. It’s perfect for books, decorations, or baskets.
These storage ideas make your loft bed with stairs diy project both useful and organized. They maximize your room’s vertical space.
Installing Safety Features
Safety is key when making a DIY full-size staircase loft bed. It’s important to add the right safety features. This keeps users, like kids, safe from dangers.
Building Guardrails to Code
Guardrails are a must for loft beds. They need to be the right height and have the right spacing. Safety rules say guardrails must be at least 30 inches high to stop falls.
Using sturdy materials like 2×4 lumber makes sure the guardrails are strong and last long.
Proper Rail Height and Spacing
The gap between guardrails is also key. They should be no more than 4 inches apart. This keeps kids’ heads from getting stuck and follows safety rules.
Securing All Components
It’s important to make sure everything on the loft bed is secure. Use appropriate hardware such as screws and brackets to hold everything in place. Check the bed often to make sure it’s not loose.
By following these steps, you can make a safe loft bed with stairs. This gives you and your family peace of mind.
Selecting and Installing a Full-Size Mattress
Finding the right mattress is key to finishing your DIY full-size staircase loft bed. A great mattress improves your sleep and comfort.
Choosing the Right Mattress Type
Think about comfort, support, and how long it lasts when picking a mattress. You can pick from memory foam, innerspring, or hybrid mattresses. For example, memory foam mattresses give great support and relieve pressure. Innerspring mattresses are better for keeping cool.
| Mattress Type | Comfort Level | Support |
|---|---|---|
| Memory Foam | High | Excellent |
| Innerspring | Medium | Good |
| Hybrid | High | Excellent |
👉👉 Start your woodworking journey with Ted’s 16,000 plans »
🌿 👉 Browse top-rated Staircase Loft Bedand get inspired on Amazon »
Creating Proper Mattress Support
To make your mattress last, it needs the right support. Use a solid slatted base or a strong platform under it. The slats should be less than 3 inches apart to avoid sagging.
Ensuring Easy Access for Changing Bedding
It’s important to have easy access to your mattress for changing sheets. Design your loft bed with a simple access point, like a staircase with storage or a ladder. This makes it easy to keep your loft bed clean.
Finishing Touches and Personalization
The final stage of our project is adding the finishing touches and personalization to our DIY full-size staircase loft bed. This is where we turn the structure into a beautiful and functional piece of furniture that shows our personal style.
Sanding All Surfaces
Before we can apply any finish, we need to make sure all surfaces are smooth and free of imperfections. Sanding is a key step that helps create a uniform base for staining or painting. Start with a coarse grit sandpaper (about 120 grit) and move to finer grits (220 grit or higher) for a silky smooth finish.
Painting or Staining Options
When it comes to adding color and character to our loft bed, we have two main options: painting or staining. Painting lets us choose from a wide range of colors and can completely change the look of the wood. Staining enhances the natural grain and texture. Choose a finish that complements your bedroom decor and personal taste. For a “stairway loft bed diy tutorial,” consider a stain that matches your staircase for a cohesive look.
Adding Personal Design Elements
To make our loft bed truly unique, we can add personal design elements. This could be as simple as adding decorative trim, installing LED lighting under the stairs, or incorporating personalized carvings. The key is to have fun and be creative! Consider what makes your bedroom special and reflect that in your design choices.
| Finishing Technique | Description | Best For |
|---|---|---|
| Sanding | Smooths out wood surfaces | All wood surfaces |
| Painting | Adds color, covers imperfections | Changing wood color completely |
| Staining | Enhances natural wood grain | Maintaining wood texture |
Conclusion
Now that you’ve finished your DIY full size staircase loft bed, you’ve saved space and added a personal touch. Our homemade staircase loft bed instructions helped you build a cozy sleeping area. It’s perfect for any room.
We hope this guide inspired you to try more DIY projects. As you enjoy your new loft bed, share your experience. Your feedback helps us make our guides better for everyone.
With your newfound confidence, what’s next for you? Maybe adding storage or building another piece of furniture? We’re excited to hear about your next project!
🛠️ Want the Look Without the Sawdust? Here’s Your Shortcut
There’s something rewarding about building a wooden piece with your own hands—but let’s face it, not everyone has the time, tools, or space for a full DIY project.
💡 That’s why I recommend Ted’s Woodworking Plans – a massive library of 16,000+ step-by-step plans for every kind of woodworking project you can imagine. From pet houses to holiday gifts, you’ll get:
✨ Easy-to-follow blueprints
🧰 Complete material & cut lists
🪚 Projects for all skill levels
👉👉 Start your woodworking journey with Ted’s 16,000 plans »
🛒 Prefer to Buy Instead of Build?
No problem! If you love the look of handcrafted wood but would rather skip the tools, we’ve got you covered.
🌿 👉 Browse top-rated Staircase Loft Bedand get inspired on Amazon »
FAQ
🔍What are the benefits of building a DIY full size staircase loft bed?
🔍What tools are required to build a DIY full size staircase loft bed?
🔍How do I plan my DIY full size staircase loft bed?
🔍What safety precautions should I take when building a DIY full size staircase loft bed?
🔍Can I incorporate storage solutions into the stairs?
🔍How do I ensure the staircase is safe and sturdy?
🔍What type of mattress is suitable for a loft bed?
🔍How do I finish and personalize my DIY full size staircase loft bed?
Affiliate Disclosure
Some of the links in this article are affiliate links. If you click through and make a purchase, I may earn a small commission — at no additional cost to you.
This helps support my work so I can continue creating helpful woodworking tutorials and product reviews.I only recommend products and services that I have thoroughly researched and believe could provide real value to my readers.
Thank you for your support!