
Looking to keep your home tidy and provide a comfy spot for your pet? We’ve got you covered! Making a stylish dog crate console with storage is a fun DIY project. It’s all about combining looks with function.
Building a piece of furniture that does it all will make your home look better. It will also give your pet a cozy place to relax. Our guide will show you how to get amazing results.
🛠️ Want the Look Without the Sawdust? Here’s Your Shortcut
There’s something rewarding about building a wooden piece with your own hands—but let’s face it, not everyone has the time, tools, or space for a full DIY project.
💡 That’s why I recommend Ted’s Woodworking Plans – a massive library of 16,000+ step-by-step plans for every kind of woodworking project you can imagine. From pet houses to holiday gifts, you’ll get:
✨ Easy-to-follow blueprints
🧰 Complete material & cut lists
🪚 Projects for all skill levels👉 Start your woodworking journey with Ted’s 16,000 plans »
💝 Ted’s Woodworking Plans also makes an amazing gift for parents, children, friends, boyfriends, girlfriends, brothers, and sisters.
🛒 Prefer to Buy Instead of Build?
No problem! If you love the look of handcrafted wood but would rather skip the tools, we’ve got you covered.
Key Takeaways
- Learn how to build a stylish dog crate console that fits your home decor
- Discover how to add storage to keep your home clutter-free
- Follow our step-by-step DIY tutorial for a professional finish
- Create a comfortable and cozy space for your pet
- Enhance your DIY skills with a fun and rewarding project
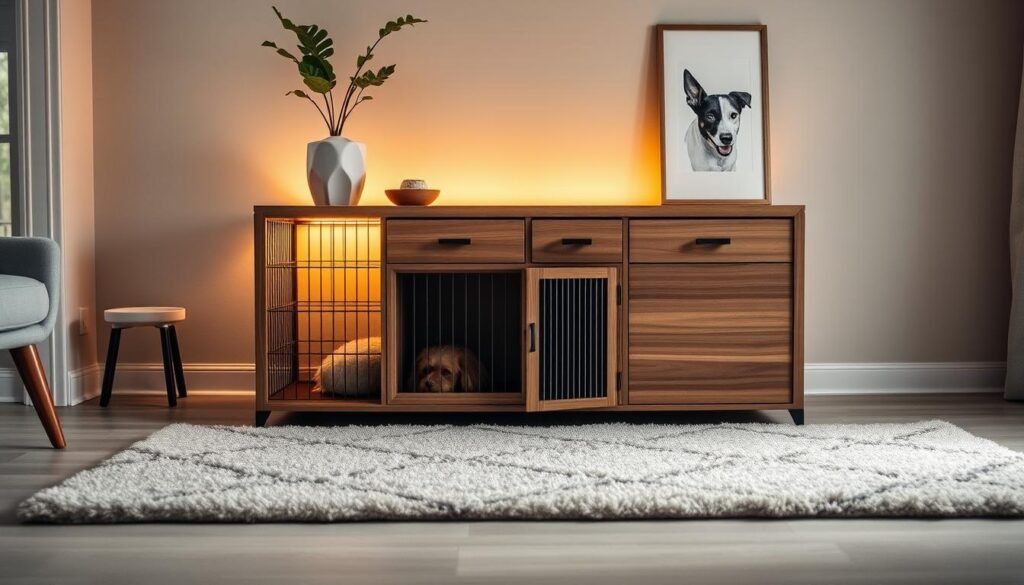
Why a Dog Crate Console is the Perfect Addition to Your Home
Pet owners often struggle to find a balance between style and function. A dog crate console is a perfect solution. It combines a dog crate with a stylish console, making your home look better and work better.
Combining Functionality with Style
A dog crate console is more than just a place for your pet. It’s also a stylish piece for your room. Choose a console that fits your home’s style. For example, a wooden console fits well with rustic or traditional decor. A modern console works great with contemporary homes.
Key benefits of a dog crate console include:
| Feature | Benefit |
|---|---|
| Hidden Storage | Keeps pet supplies out of sight |
| Multi-functional | Serves as both a dog crate and additional storage or display space |
| Aesthetic Appeal | Enhances the look of your home |
Benefits of Hidden Pet Storage Solutions
Hidden pet storage solutions, like dog crate consoles, have many advantages. They keep your home tidy by hiding pet supplies and toys. This makes your home more welcoming for you and your pet.
Adding a dog crate console to your home brings peace of mind. You know your pet has a cozy spot. Plus, your home stays stylish and organized.
Planning Your Dog Crate Console DIY Project
Before starting your dog crate console project, planning is key. It ensures a perfect fit and function. We’ll help you create a console that’s both stylish and practical.
Measuring Your Dog Crate Dimensions
Accurate measurements are vital for a console that fits your crate. Measure the crate’s length, width, and height. Also, note any doors or handles. This helps design a console that fits your crate well.

Choosing the Right Location in Your Home
Choosing the right spot for your console is important. Think about your room’s layout, traffic flow, and your pet’s preferences. You want a spot that’s easy for both you and your pet.
Design Considerations and Style Options
There are many styles to choose from for your console. You can go for modern or rustic, depending on your home’s look.
Modern vs. Rustic Designs
A modern design offers a sleek, contemporary look. A rustic design adds a cozy, traditional vibe. Pick a style that matches your furniture.
Matching Your Existing Furniture
To blend your console with your home, choose a matching design. Consider material, color, and style. This creates a cohesive look.
Essential Tools and Materials for Your Dog Crate Console with Storage
Before starting your DIY dog crate console project, it’s important to gather the necessary tools and materials. Having everything ready will make the process smoother and more enjoyable.
Required Tools Checklist
To begin, you’ll need a set of basic tools. These include:
- A tape measure for accurate measurements
- A saw (circular or hand saw) for cutting wood
- A drill for making holes for screws
- Screwdrivers (both flathead and Phillips) for driving screws
- Clamps for holding pieces together while gluing
- Sandpaper for smoothing out the wood surfaces
Having these tools ready will help you progress through your project without interruptions.
Materials Shopping List
For the console itself, you’ll need materials such as:
- Plywood or MDF for the shelves and enclosure
- Solid wood for the frame and tabletop
- Wood glue for bonding pieces together
- Screws and nails for assembling the structure
- Decorative trim (optional) for adding a finishing touch
If you’re looking for inspiration on how to make a dog crate end table, consider using reclaimed wood or adding a unique stain. This will give your console a personalized look.

Budget Considerations
When planning your homemade dog crate furniture ideas, it’s essential to consider your budget. You can save money by repurposing materials you already have at home or by choosing more affordable options for lumber and hardware. For example, using engineered wood instead of solid hardwood can significantly reduce costs without compromising on the look and feel of your console.
By carefully planning your tools and materials, you can create a beautiful and functional dog crate console. It will fit your budget and enhance your home décor.
Preparing the Base Structure of Your Console
The base structure is key to your DIY dog crate furniture. It provides support and stability. You’ll learn to build a strong foundation for a functional and stylish console.
Building the Frame
First, build the frame for your dog crate. Use solid wood or high-quality plywood. Measure your dog crate dimensions carefully for a perfect fit. Cut and assemble the frame with screws or nails.

Creating the Crate Enclosure
After the frame is ready, add sides and a back. This turns it into a console. Use a mix of materials like plywood and decorative trim for elegance. The enclosure should be well-ventilated and easy to access.
Adding Support for the Tabletop
Now, add support for the tabletop. Use brackets or extra framing. Make sure the support is sturdy for the tabletop and storage items. This is vital for your console’s stability.
Follow these steps to create a solid base for your console. It’s ready for the next stages of construction.
Dog Crate Console DIY with Storage: Step-by-Step Assembly Guide
Now that you have all the materials ready, let’s start the assembly guide for your dog crate console DIY. This project is fun and rewarding. It will give your pet a comfy space and add style to your home.
Constructing the Storage Compartments
The storage compartments are key for your dog crate console. They hold your pet’s essentials and other items. Start by measuring and cutting the wood for your design.
- Cut the sides, top, and bottom panels according to your measurements.
- Assemble the compartments using screws or nails, ensuring they are sturdy.
- Add shelves or dividers as needed to create separate storage areas.
By following these steps, you’ll make functional storage that fits your dog crate console.
Installing Doors or Drawer Fronts
After building the compartments, it’s time to add doors or drawer fronts. This step makes your console look better and makes it easy to access stored items.
- Measure the openings for the doors or drawers to ensure a precise fit.
- Attach hinges to the doors or drawer fronts, making sure they are aligned properly.
- Install handles or knobs that match your home decor.
These finishing touches will make your dog crate console both functional and stylish.

Securing the Dog Crate Area
Securing the dog crate area is key for your pet’s safety and comfort. Make sure the crate is enclosed and well-ventilated.
Ventilation Considerations
Good ventilation is vital to prevent overheating and keep your pet comfortable. Add vents or ensure the crate has enough airflow.
Safety Features
Safety is the most important thing. Check for sharp edges or loose parts that could harm your pet. Also, make sure the crate is securely fastened to prevent it from tipping over.
- Use non-toxic materials for the construction.
- Ensure easy access for cleaning and maintenance.
By following this guide, you’ll make a dog crate console DIY with storage that’s safe and functional for your pet. This project will not only improve your home’s look but also provide a cozy and secure spot for your furry friend.
Adding Finishing Touches to Your Console
Getting close to finishing your dog crate console? The final touches really make it stand out. These steps let you add your personal touch and make it fit right in with your home.
Sanding and Preparing for Finish
Before you apply any finish, sanding is key. Begin with a medium-grit sandpaper (120-grit) to smooth out any rough spots. Then, move to a finer grit (220-grit or higher) for a smooth finish. This step not only looks better but also makes the finish last longer.
Painting or Staining Options
There are many choices for painting or staining your dog crate console. You can pick a color that matches your furniture or try something bold. If painting, use a primer for better results. For staining, test it on a small area first to avoid darkening too much. Some favorite stains include:
- Oak stain for a classic, warm look
- White paint for a modern, clean appearance
- Espresso stain for a rich, dark finish
Hardware Installation
Installing the hardware is the last step. Pick knobs or handles that match your home’s style. For a rustic look, use vintage or antique hardware. Make sure it’s securely attached to last through daily use. A simple DIY hardware installation involves drilling pilot holes and screwing in the hardware. This completes your homemade dog crate furniture ideas, making it a beautiful piece of furniture.

By following these steps, you’ll not only make your dog crate console look great but also ensure it’s durable and functional for years.
Styling Your New Dog Crate Furniture
Now that your dog crate console is built, it’s time to add a personal touch. Styling your dog crate furniture is about finding a balance between looks and function.
Decorative Elements to Consider
Give your dog crate console some personality with decorative elements. You can use wood carvings, metal hardware, or painted designs for a unique look. Adding some greenery around the console brings in a natural touch.

Making It Comfortable for Your Pet
When styling your dog crate furniture, remember your pet’s comfort. Add a comfortable bed or soft cushions inside for a cozy retreat. Place some toys or treats nearby to make it inviting.
Integrating with Your Home Décor
To blend your dog crate console with your home décor, match the console’s finish to your furniture. Add decorative accessories that complement the room’s style. This creates a cohesive look that ties the room together.
By following these tips, you can make your dog crate furniture a beautiful and functional piece that enhances your home’s style.
Troubleshooting Common Issues in DIY Dog Crate Furniture
DIY projects can sometimes run into problems, but we’re here to help. When making your DIY dog crate furniture with storage or DIY dog crate bench with storage, you might face a few common issues.
Fixing Wobbly Structures
A wobbly structure can be unsettling, which is why it’s a big deal if your pet uses it. First, make sure the floor is level. Then, check if the legs of your console are balanced evenly. If not, adjust the legs or add shims to make it stable.
Having a sturdy console is key for your pet’s safety and comfort.
Addressing Door Alignment Problems
Door alignment issues can be a hassle, but they’re often simple to fix. First, check if the hinges are aligned right and if the doors are hanging properly. If not, try adjusting the hinges or adding some lubrication.
Doors that align well not only look better but also work better.
Solutions for Limited Space Challenges
Building your DIY dog crate console in a small space can be tough. Think about using wall-mounted storage or a more compact design. Measure your space carefully before starting to avoid these problems.

Conclusion
Now that you’ve finished your dog crate console DIY, you have a beautiful piece of furniture. It’s great for you and your pet. You’ve made a space that looks good and is useful.
Your DIY dog crate console keeps your home tidy and your pet happy. You’ve faced a tough project and made it rewarding. We hope our guide helped you on your DIY journey.
Enjoy your new console and share your story with others. You’re now ready for more DIY projects. Keep making your home both functional and stylish.
FAQ
What is a dog crate console, and how does it benefit my home?
How do I measure my dog crate for a DIY console project?
What are the essential tools needed for building a dog crate console?
Can I customize the design of my dog crate console to match my home décor?
How do I ensure proper ventilation for my dog in the crate console?
What are some common issues that arise during a DIY dog crate console project, and how can I troubleshoot them?
How can I make my dog crate console more comfortable for my pet?
What are some creative storage solutions I can include in my dog crate console?
Affiliate Disclosure
Some of the links in this article are affiliate links. If you click through and make a purchase, I may earn a small commission — at no additional cost to you.
This helps support my work so I can continue creating helpful woodworking tutorials and product reviews.I only recommend products and services that I have thoroughly researched and believe could provide real value to my readers.
Thank you for your support!