
Welcome to our guide on making your own DIY loft bed. We’re excited to help you create a space-saving solution for your home. In this article, we’ll guide you through the process. We’ll give you easy instructions and tips for a successful project.
📌📌 Check Out TedsWoodworking – 16,000+ DIY Plans
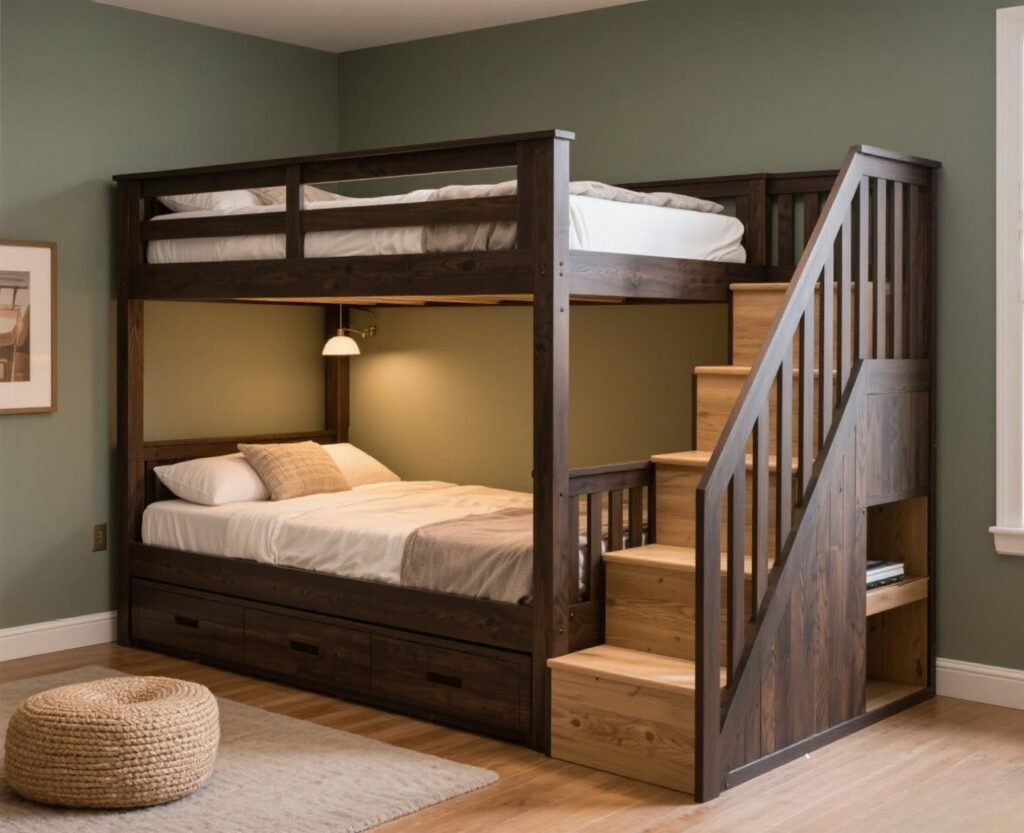
You’ll learn how to plan and customize your bunk bed with stairs. It will be perfect for kids or a cozy retreat for adults. Our aim is to make DIY fun and easy for everyone.
Key Takeaways
- Learn how to plan and build a space-saving loft bunk bed.
- Customize your bed to fit your home decor and needs.
- Follow easy-to-follow instructions for a successful DIY project.
- Discover tips for making your loft bed safe and comfortable.
- Enjoy the satisfaction of creating something with your own hands.
Understanding the Benefits of a Loft Bunk Bed
A loft bunk bed is more than just furniture. It’s a smart way to save space and make bedrooms safer. By lifting the bed, you free up floor space for other uses or furniture.
Space-Saving Advantages
One key benefit of a space-saving bunk bed is how it maximizes room space. With a loft bed with an integrated staircase, you save floor space and create a useful area. This is great for small bedrooms where every inch matters.
Safety Benefits of Steps vs. Ladders
Safety is a big concern when using a loft bunk bed. Steps are safer than ladders, which is good for kids. A kids loft bed with stairs offers a stable way to climb up and down, lowering accident risks.
Choosing a loft bunk bed with steps means you save space and ensure a safer home for your family.
Planning Your DIY Loft Bunk Bed Project
To make your DIY loft bunk bed project a success, start with a solid plan. Planning involves several key steps. These steps will help you create a functional and safe loft bunk bed.
📌📌 Check Out TedsWoodworking – 16,000+ DIY Plans
Determining the Right Size and Height
When deciding on the size and height of your loft bunk bed, think about the room’s space and the user’s age. For example, a twin over full bunk bed with stairs is great for small rooms. It offers plenty of sleeping space and easy access.
Choosing a Design Style
Your loft bunk bed’s design should match your room’s decor. Whether you like modern, rustic, or traditional styles, pick materials and finishes that match. Adding storage steps can also make it more functional.
Creating Detailed Measurements and Plans
After deciding on size and design, make detailed measurements and plans. Use software or graph paper to draw your design. This ensures all parts fit together perfectly. This step is vital for planning a loft bed that’s safe and functional.
| Component | Measurement | Material |
|---|---|---|
| Frame | 80″ long, 60″ wide | 2×4 lumber |
| Steps | 20″ wide, 10″ deep | 3/4″ plywood |
| Rails | 30″ high | 1×2 lumber |
By following these steps, you’ll be well on your way to creating a beautiful and functional loft bunk bed. Remember, careful planning is key to a successful DIY project.

Essential Tools and Materials Needed
Before starting your DIY loft bunk bed with steps, gather the right tools and materials. Having everything ready will save time and make the building process smoother.
Complete Tools List
You’ll need a circular saw for cutting lumber, a drill for screw holes, and a tape measure for accurate measurements. Also, a level, safety glasses, and a clamp are key for gluing and holding pieces together.
Lumber and Hardware Requirements
For the frame, use sturdy lumber like 2x4s or 2x6s. You’ll need screws, nails, and bolts to hold it together. Remember to get hardware for the steps and safety rails too.
Optional Materials for Customization
📌📌 Check Out TedsWoodworking – 16,000+ DIY Plans

To add extra features, consider using wood stain or paint to match your decor. You can also add drawers or
With the right tools and materials, you’re ready to build a beautiful and functional loft bunk bed.
Popoula view
Safety Considerations Before You Begin
Before starting your loft bunk bed project, think about safety first. Building a loft bunk bed is a big task that needs careful planning. You might ask, “How do I make sure my loft bed is safe?” or “What are the weight capacity guidelines?” We’ll share expert advice and tips to make sure your bed is safe and fun for everyone.
Weight Capacity Planning
Planning the weight capacity is key to a safe loft bunk bed. You must think about the total weight the bed will hold. This includes the mattress and the people sleeping on it. A good rule is to make sure the bed can hold at least 400 pounds per sleeping area.
To meet this, use strong materials and solid construction. For example, using thick plywood or solid wood for the bed platform helps a lot.
Structural Integrity Guidelines
It’s important to make sure your loft bunk bed is structurally sound. This means using the right joinery and making sure everything is well attached. The frame should be steady and not shake.
Check your work as you build, looking for any weak spots or material flaws. Adding metal brackets or wooden dowels can strengthen the bed. Also, make sure the bed’s height is safe and won’t tip over.
Building the Loft Bunk Bed Frame
Now we have our plans, it’s time to build the loft bunk bed frame. This is a key part of our DIY project. We’ll make the main support posts, put together the bed platform, and add safety rails.
Constructing the Main Support Posts
The main support posts are the heart of your loft bunk bed. They give it the strength it needs. Cut four posts to the right height using strong lumber like 4x4s. Make sure they are straight and have no flaws.
Use a level to check if the posts are perfectly vertical. Then, attach them to the floor with heavy-duty brackets.
Tip: Find the floor joists with a stud finder. This will help you attach the posts for more stability.
Assembling the Bed Platform
Now that the main support posts are up, let’s build the bed platform. Cut the frame using 2x4s. Then, add plywood or OSB to make the bed surface. Make sure the platform is even with the top of the posts and securely attached with screws.
| Material | Quantity | Purpose |
|---|---|---|
| 2×4 Lumber | 4 pieces | Frame for bed platform |
| Plywood/OSB | 1 sheet | Bed surface |
| Screws | 1 pack | Securing platform |
Installing Safety Rails
Safety rails are essential for any loft bunk bed. They prevent falls and injuries. Cut the rails to the right height and attach them to the posts with brackets or screws. Make sure they are strong and well-attached.
“Safety should always be the top priority when building a loft bunk bed. Installing safety rails is a simple yet effective way to protect users from possible dangers.”
By following these steps, you’ll create a sturdy and safe loft bunk bed frame. It will serve you for many years, providing comfort.
Crafting Your Loft Bunk Bed with Steps
Building the perfect staircase for your loft bunk bed is key. It needs careful planning and execution. The staircase is not just for climbing; it’s also a design feature that can make the room look better.
Designing Functional Staircase Dimensions
First, think about the staircase’s dimensions. The steps should be comfy and safe. A good rule is to have a rise of 7 to 8 inches and a run of 10 inches. This makes climbing easy. Use this table as a guide:
| Rise (inches) | Run (inches) | Comfort Level |
|---|---|---|
| 7 | 10 | High |
| 7.5 | 9.5 | Medium |
| 8 | 9 | Low |
Building the Staircase Structure
Now, start building the staircase. Cut two stringers to the right length first. Use strong lumber like 2x4s. Then, cut the steps and risers as planned. Assemble it by attaching the steps and risers to the stringers with screws or nails. Make sure it’s square and sturdy.

📌📌 Check Out TedsWoodworking – 16,000+ DIY Plans
Attaching Steps to the Bed Frame
Attach the staircase to the loft bunk bed frame next. Plan carefully for stability and safety. Use strong brackets or screws for this. Adding extra support, like corner brackets, helps prevent the staircase from moving or coming loose.
As John Smith, a renowned carpenter, once said,
“The key to a successful DIY project is attention to detail and a commitment to quality craftsmanship.”
By following these tips and focusing on quality, you can make a loft bunk bed with steps that’s both useful and attractive.
Adding Storage Solutions to Your Steps
You can make your bedroom more organized by using the space under your loft bed steps. This area is often wasted but can be turned into a useful storage spot. It helps keep your room tidy and clutter-free.
Building Drawers into the Steps
Building drawers into the steps is a smart way to add storage. It gives you a place to store clothes, bedding, or personal items without them being seen. First, plan the drawer sizes based on the space under the steps. Use strong materials and make sure the drawers slide smoothly.
Here are some benefits of having drawers in your loft bed steps:
- Maximizes storage space
- Keeps belongings organized
- Adds a touch of customization to your loft bed
Creating Open Shelving Options
If you don’t like drawers, try open shelving. You can install shelves or cubbies under the steps. Open shelving is great for books, decorative items, or things you use often. It also adds a nice look to your bedroom.

📌📌 Check Out TedsWoodworking – 16,000+ DIY Plans
Installing Cabinet Doors for Closed Storage
For closed storage, install cabinet doors under the steps. This is perfect for hiding personal items or seasonal decorations. You can customize the doors to match your bedroom’s style, making your loft bed with storage steps look seamless.
Adding these storage solutions makes your loft bed more useful. It also makes your bedroom more organized and peaceful.
Finishing Touches and Decoration
Now that your modern loft bed with steps is built, it’s time to add the final touches. This step is key to making your loft bed look great and fit well with your bedroom.
Sanding and Smoothing Surfaces
Before you start painting or staining, sand all surfaces. This removes splinters and rough spots. Use coarse-grit sandpaper first, then move to fine-grit for a smooth finish. This makes your loft bed look better and safer to use.
Painting and Staining Options
Think about your bedroom’s color and style when painting or staining your loft bed. You can pick a paint that matches your walls or a stain that goes with your furniture. Always apply a primer first for a smooth finish.

📌📌 Check Out TedsWoodworking – 16,000+ DIY Plans
Adding Decorative Elements
To make your loft bed unique, add things like string lights, colorful bedding, or a fun rug. You can also put storage bins or baskets on the steps. This adds style and practicality.
| Decoration Idea | Materials Needed | Skill Level |
|---|---|---|
| String Lights | Lights, Battery Pack | Easy |
| Colorful Bedding | Bedding Set | Easy |
| Storage Bins | Bins, Baskets | Easy |
Testing and Safety Verification
Making sure your DIY loft bunk bed is safe is our main goal. It begins with careful testing. Before letting family members, like kids, use it, check if it’s safe for regular use.
Weight and Stability Testing
To check the weight capacity, start by adding weight to the bed frame slowly. Use heavy objects or have people sit or lie on it. This simulates real use. Watch if the bed stays stable; it shouldn’t wobble or show strain.
Try pushing the bed to see if it tips or shakes. A good loft bed stays steady.
| Test | Expected Outcome |
|---|---|
| Weight Application | No significant sagging or deformation |
| Stability Check | Minimal to no wobbling |
Checking for Hazards and Sharp Edges
Look over the bed frame and steps for sharp edges or points. Sand down any rough spots. Also, make sure all railings are tight and there are no gaps that could trap a child.
📌📌 Check Out TedsWoodworking – 16,000+ DIY Plans

By doing these steps, you make your loft bunk bed a fun and safe place for rest.
Conclusion
Now that you’ve finished your DIY loft bunk bed with steps, you’ve created something useful and saved space in your home. We hope this guide helped you learn and feel confident about this bunk bed project.
Enjoying your new loft bed with steps means following safety rules to keep it safe for a long time. The steps you built make it easy to get up and down, and they add a personal touch to the room.
We’d love for you to share your work and show off your DIY loft bunk bed on social media or with loved ones. Your creativity and skill will likely inspire others to try DIY projects too.
By finishing this project, you’ve made your home better and improved your DIY skills. We’re excited to help you with more fun projects in the future. DIY should be enjoyable and accessible for everyone.
✅ Want to Build More Projects Like This? Try the Teds Woodworking Plan
If you love DIY but want step-by-step guidance and professional plans, we highly recommend:
📌📌 Check Out TedsWoodworking – 16,000+ DIY Plans
With this massive bundle, you’ll get:
- Over 16,000 woodworking plans with diagrams
- Material lists, full instructions, and even videos
- Projects for all skill levels – perfect for beginners too!
📌 This is a great way to save time and avoid mistakes. Build confidently with clear guidance!
🛏️ No Time for DIY? Buy a Loft Bed with Stairs on Amazon!
👉 Browse Our Recommended Loft Beds on Amazon