
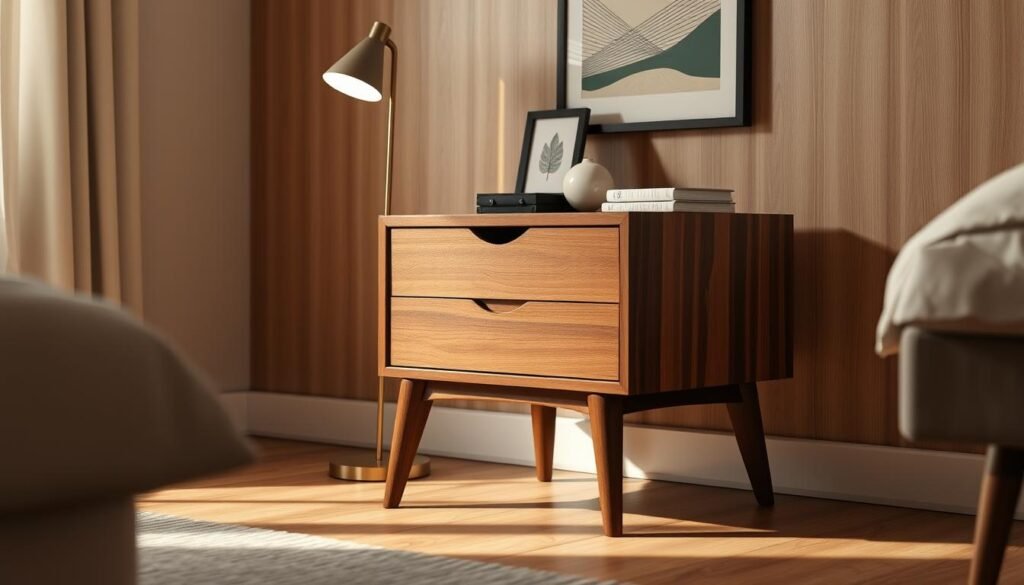
Imagine stepping into your bedroom, surrounded by the elegance of a midcentury-inspired nightstand. We’ve all dreamed of that perfect piece of furniture that brings the room together. Today, we’re excited to help you build your own midcentury nightstand. It’s a project that’s both rewarding and fun.
Whether you’re a seasoned DIYer or just starting, our goal is to make this project fun for you. We’ll guide you through every step, from planning to finishing. We’ll use a friendly tone that’s easy to follow.
🛠️ Want the Look Without the Sawdust? Here’s Your Shortcut
There’s something rewarding about building a wooden piece with your own hands—but let’s face it, not everyone has the time, tools, or space for a full DIY project.
💡 That’s why I recommend Ted’s Woodworking Plans – a massive library of 16,000+ step-by-step plans for every kind of woodworking project you can imagine. From pet houses to holiday gifts, you’ll get:
✨ Easy-to-follow blueprints
🧰 Complete material & cut lists
🪚 Projects for all skill levels👉 Start your woodworking journey with Ted’s 16,000 plans »
💝 Ted’s Woodworking Plans also makes an amazing gift for parents, children, friends, boyfriends, girlfriends, brothers, and sisters.
🛒 Prefer to Buy Instead of Build?
No problem! If you love the look of handcrafted wood but would rather skip the tools, we’ve got you covered.
🌿 👉 Browse top-rated midcentury nightstand and get inspired on Amazon »
Key Takeaways
- Learn how to build a stunning midcentury-inspired nightstand for your bedroom.
- Discover the step-by-step process of creating this timeless piece of furniture.
- Get tips on how to make woodworking accessible and enjoyable for everyone.
- Understand the importance of planning and finishing in woodworking projects.
- Explore the benefits of DIY woodworking for home decor enthusiasts.
The Enduring Appeal of Midcentury Design
Midcentury modern design is loved for its clean lines and organic shapes. It emerged in the mid-20th century. This style is simple, functional, and connects deeply with nature.
Defining Characteristics of Midcentury Modern Furniture
Midcentury modern furniture stands out with its clean lines, minimal ornamentation, and focus on functionality. It often uses natural materials. It also brings the outdoors in with large windows and sliding glass doors.
Why Midcentury Style Remains Relevant Today
The midcentury modern style is popular for many reasons. It’s versatile and fits well with many decor styles. It also values sustainability and craftsmanship, appealing to DIY fans and homeowners.
Versatility in Modern Interiors
Midcentury modern furniture is great because it fits modern interiors well. It can make any space, big or small, look sophisticated and elegant.
Sustainability and Craftsmanship
Midcentury modern design focuses on quality and sustainable materials. This appeals to those who value lasting, well-made furniture. Choosing solid woods and careful construction means your furniture will last for years.
| Characteristics | Midcentury Modern | Traditional |
|---|---|---|
| Lines and Shapes | Clean, Organic | Ornate, Complex |
| Materials | Natural, Solid Woods | Various, including Veneer |
| Functionality | High Priority | Variable |
Planning Your Midcentury Nightstand Project
To start your midcentury nightstand project, you need a solid plan. First, understand the classic proportions of midcentury design. Then, figure out how to adapt them to your needs.
Understanding the Classic Proportions
Midcentury modern furniture is all about clean lines and organic shapes. When planning your nightstand, think about the proportions that define this style. Midcentury pieces often have tapered legs and a balance between form and function.

Customization Options While Maintaining Style
You can customize your nightstand while sticking to midcentury design principles. Think about the size, material, and finish that will match your bedroom decor. For a retro look, consider bold colors or unique wood grains.
Reading and Using the Provided Plans
Our plans will help you build a beautiful midcentury style nightstand. They include cutting lists, assembly instructions, and finishing tips.
Scaling the Design to Your Needs
Our plans can be scaled up or down to fit any bedroom size. The key is to keep the proportions that make midcentury furniture so appealing.
| Dimension | Standard Size | Scaled Size |
|---|---|---|
| Height | 25 inches | 27 inches |
| Width | 18 inches | 20 inches |
| Depth | 15 inches | 17 inches |
Materials and Tools Required
Let’s explore the key materials and tools for making a stunning midcentury nightstand. You’ll need to pick the right wood and have the right tools to get that authentic look.
Wood Selection for Authentic Midcentury Look
The midcentury modern style loves rich, warm woods. Walnut, teak, and oak were the top choices back then.
Primary Woods: Walnut, Teak, and Oak
Walnut was a top pick for its luxurious feel and dark tones. Teak was durable and great for both indoor and outdoor furniture. Oak added warmth with its prominent grain.
Budget-Friendly Alternatives
Looking for cheaper options? Maple or cherry can give you a midcentury vibe without the high cost.
Essential Tools for This Project
To make your midcentury nightstand, you’ll need some key tools. You’ll need a table saw for straight cuts, a miter saw for angled cuts, and a drill press for accurate holes.
- Table saw
- Miter saw
- Drill press
- Sander
Optional Tools to Enhance Efficiency
While not essential, tools like a router or a domino joiner can make your work better. A router can add decorative edges, and a domino joiner makes strong, precise joints easier.

Preparing Your Workshop and Materials
Let’s start our midcentury nightstand project right. Organize your workshop and gather all the needed materials. A clean workspace is key for safety and fun.
Setting Up an Efficient Workspace
For efficient work, keep your space tidy and organized. Remove clutter and place tools where you can easily find them. Plan your workflow to cut, assemble, and sand without moving too much.
Cutting List and Material Preparation
Check the cutting list in the plans carefully. Make sure you have all the lumber and materials before starting. Double-check your measurements and cut lists to avoid mistakes. Cut your materials to size and organize them for easy access.
Safety Considerations and Precautions
Safety is always first. Wear safety glasses and hearing protection. Keep your area well-lit and safe from tripping hazards. Learn about each tool’s safety and always refer to the manual if unsure.
By preparing well, we ensure a successful and fun project. Let’s focus on safety and quality as we build our midcentury bedside table.

Building the Midcentury Nightstand Frame
Now that we have our materials ready, it’s time to start building the frame of our midcentury nightstand. The frame is the foundation of our piece. It’s where the characteristic midcentury design elements come into play.
Creating the Distinctive Tapered Legs
The tapered legs are a hallmark of midcentury furniture. To achieve this distinctive look, we’ll need to carefully cut the legs to the correct angle.
Cutting the Proper Angles
To cut the proper angles, use a miter saw or a table saw with a miter gauge. “Precision is key here,” as noted by woodworking expert Christopher Schwarz, “a small deviation can throw off the entire piece.” Ensure your cuts are accurate to maintain the integrity of the design.
Ensuring Consistency Across All Legs
Consistency is key for the tapered legs. To achieve this, create a template or jig to guide your cuts. This will help you maintain uniformity across all four legs.
Assembling the Base Structure
With the legs prepared, it’s time to assemble the base structure. Use mortise and tenon joints or dowels to connect the legs to the frame. Make sure everything is square and the frame is level.
Reinforcing Joints for Durability
To ensure the durability of our nightstand, we need to reinforce the joints. Use wood glue and clamp the joints tightly. For added strength, consider using screws or additional dowels.
As we complete the frame, our midcentury nightstand starts to take shape. The sturdy frame will support the tabletop and any additional features like drawers.

By following these steps, you’ll create a beautiful and sturdy frame for your midcentury nightstand. This sets the stage for the rest of your woodworking project.
Constructing the Drawer System
Now that we’ve built the nightstand frame, let’s work on the drawer system. It’s a key part of our midcentury modern design. A good drawer system makes the nightstand both beautiful and useful.
Building a Precision Drawer Box
The drawer box is the heart of a smooth drawer. You need to choose how to join the pieces. Let’s look at your options.
Dovetail vs. Simple Joinery Options
Dovetail joints are strong and look great, but they’re hard to make without special tools. Simple joints like dado or rabbet are easier to do and work well too.
- Dovetail joints: Strong, visually appealing, but challenging to construct.
- Simple joinery: Easier to construct, yet strong enough.
Installing Smooth-Operating Drawer Slides
After making the drawer box, it’s time for the drawer slides. These parts make sure your drawers move smoothly. Think about the slide’s weight limit and how far it can extend.
“The quality of your drawer slides can significantly impact the overall functionality of your nightstand.”
Creating the Characteristic Flush Drawer Front
A flush drawer front is key to midcentury modern style. You’ll need to align and attach the drawer front carefully to the box.
Adding Finger Pulls or Hardware
The last step is adding finger pulls or hardware that fits your nightstand’s look. Pick something that’s both useful and nice to look at.
By following these steps, you’ll make a drawer system that’s both beautiful and practical for your midcentury nightstand. Remember, the success of your project depends on the details and your skill.
Assembling the Tabletop and Shelf
Assembling the tabletop and shelf is key to making our midcentury modern nightstand come to life. It needs careful attention to get a professional look.

Edge Treatment for the Tabletop
For the tabletop’s edge, you have a few choices. You can pick a simple rounded edge or a more detailed one. The important thing is to choose something that fits the midcentury modern style.
Installing the Optional Middle Shelf
If your design has a middle shelf, it’s time to put it in. Use hidden fasteners to hold it in place. This keeps the look clean and simple, just like midcentury modern furniture.
| Fastener Type | Advantages | Disadvantages |
|---|---|---|
| Hidden Fasteners | Maintains clean lines, easy to install | Requires precise drilling |
| Visible Screws | Easy to install, no special tools needed | Visible, may detract from design |
Securing Components with Hidden Fasteners
Hidden fasteners are great for keeping things together without ruining the look of your midcentury modern nightstand. They work well for attaching the tabletop and shelf.
Traditional vs. Modern Joinery Methods
Choosing how to join things together is up to you. You can go for traditional methods like mortise and tenon, or modern ones like biscuits or dominos. Your choice depends on your skills and what tools you have.
By carefully putting together the tabletop and shelf, you’ll make a sturdy and beautiful retro bedside table. It will show off the best of midcentury modern design.
Sanding and Finishing Your Midcentury Nightstand
Sanding and finishing bring your midcentury nightstand to life. This step turns raw wood into a beautiful, functional piece. It becomes the centerpiece of your bedroom.
Progressive Sanding Techniques
Begin with coarse-grit sandpaper (about 120 grit) and move to finer grits (220 or higher). Always sand in the wood grain direction to avoid scratches. Sand all surfaces, including drawers and the cabinet’s inside, for a midcentury wood nightstand.
Use a sanding block for flat areas and sandpaper folded over a small object for tight spots. This method ensures even sanding and prevents uneven surfaces.
Choosing Authentic Midcentury Finishes
Midcentury modern furniture often has natural wood finishes. For an authentic look, consider oil-based or water-based polyurethane. Let’s look at the differences between these options.
Oil-Based vs. Water-Based Options
Oil-based finishes give a rich, warm glow, fitting well with midcentury style nightstands. But, they dry slower and clean up harder. Water-based finishes dry faster and clean up easier, though they might not have the same color depth.
Application Methods for Professional Results
To get a professional finish, apply thin coats and let them dry fully before sanding lightly and adding the next coat.
Building Multiple Thin Coats
Apply your chosen finish in thin, even coats with a high-quality brush or clean, lint-free cloth. Let each coat dry as instructed before lightly sanding and adding the next. This method creates a durable, smooth finish that protects your nightstand for years.
Troubleshooting Common Issues
Building a midcentury bedside table can come with challenges. But, we’re here to help. We’ll cover common problems and offer solutions to ensure your project goes smoothly.
Fixing Drawer Alignment Problems
Drawer alignment issues can be a hassle. First, check if your drawer slides are correctly installed. Also, make sure the drawer box is square. If problems continue, you might need to tweak the drawer slides or the box itself.
Addressing Wood Movement Concerns
Wood movement can lead to problems. Make sure to leave enough space for wood to expand and contract. If you see gaps or warping, use wood filler or adjust your design to handle wood movement.
Repairing Minor Mistakes During Construction
Mistakes are common, but they’re not the end. For small errors, wood filler can fix them seamlessly.
Wood Filler and Patch Techniques
When using wood filler, pick a product that matches your wood. Apply it carefully and let it dry before sanding. For bigger repairs, you might need to patch the area with a new piece of wood.
| Issue | Common Cause | Solution |
|---|---|---|
| Drawer misalignment | Improper slide installation | Adjust drawer slides |
| Wood warping | Insufficient allowance for wood movement | Use wood filler or adjust design |
| Minor construction mistakes | Human error | Use wood filler or patching techniques |

Conclusion: Styling and Enjoying Your Handcrafted Nightstand
Now that you’ve made your midcentury nightstand, it’s time to decorate your bedroom with it. This piece is more than just furniture. It shows off your skill and care in every detail.
To make your nightstand fit your bedroom, think about the look you want. Midcentury furniture is all about simple lines and natural shapes. Match it with other furniture that looks similar. Add some warmth with a vintage rug or a few special decorations.
Enjoying your new nightstand is more than just using it. It’s celebrating your effort and passion for making things. The midcentury nightstand you built will be a highlight in your bedroom. It brings a timeless beauty to your space.
FAQ
What is the recommended wood type for building a midcentury modern nightstand?
What tools are essential for building a midcentury nightstand?
How do I ensure the drawer slides are installed smoothly?
Can I customize the nightstand design to fit my needs?
What finish should I use to achieve an authentic midcentury look?
How do I troubleshoot common issues like drawer alignment problems?
What are some tips for styling my new midcentury nightstand?
Can I use a midcentury bedside table plan to build a retro bedside table?
What are the key characteristics of midcentury modern furniture?
How do I choose the right size for my midcentury nightstand?
Affiliate Disclosure
Some of the links in this article are affiliate links. If you click through and make a purchase, I may earn a small commission — at no additional cost to you.
This helps support my work so I can continue creating helpful woodworking tutorials and product reviews.I only recommend products and services that I have thoroughly researched and believe could provide real value to my readers.
Thank you for your support!