
Thinking back on my DIY adventures, I see how custom wooden shelves change a room. They offer storage and bring a personal touch to any space.
Seeing DIY shelving ideas turn messy areas into neat spots is amazing. From a floating shelf in the living room to a bookcase in the office, the options are vast with shelf woodworking.
Key Takeaways
- Custom storage solutions can greatly enhance the functionality of a room.
- DIY shelving projects allow for personalization and creativity.
- Wooden shelves can add warmth and character to any space.
- With the right plans, DIY woodworking can be a rewarding experience.
- Custom wooden shelves can increase the value of your home.
👉👉 Check out TEDS Woodworking Plans here and start creating shelves that truly fit your space and style.
The Art of Shelves Woodworking: Why Build Your Own?
Woodworking shelves is more than just making storage. It’s about adding a personal touch to your home. By making your own woodworking shelf, you can design it just right for you. This way, it’s both useful and looks great.
Working on woodworking projects like shelves lets you show your creativity. It also helps solve storage issues. With custom shelving, you can use your space better, whether it’s for books or tools.
Benefits of Custom Wooden Shelves
Custom wooden shelves have many advantages:
- They fit your space perfectly, saving room
- You can design them to match your home’s look
- They’re made to last, thanks to quality craftsmanship
- There’s joy in making something yourself, like Megan’s egg organizer or Rich’s bookshelves
Choosing the right shelving plans helps you make a shelf that’s not just useful. It also becomes a highlight in the room.
What I’ll Cover in This Tutorial
In this guide, I’ll show you how to make your own wooden shelves. We’ll go from planning to finishing. We’ll talk about:
- The tools and materials you’ll need
- How to build strong shelves step by step
- Ways to make your shelves fit your space and style
- Finishing touches to make your shelves look professional
By following this tutorial, you’ll learn to do your own woodworking projects. You’ll make beautiful, useful pieces for your home.
👉👉 Check out TEDS Woodworking Plans here and start creating shelves that truly fit your space and style.
Essential Tools and Materials for Your Shelf Project
Starting a shelf project needs a well-stocked workshop. You’ll need the right tools and materials to make your shelves beautiful and strong. Knowing what you need is key to success.
Must-Have Woodworking Tools
First, gather the basic woodworking tools. You’ll need a table saw for straight cuts, a miter saw for angled cuts, and a drill press for precise holes. A sander is vital for smooth wood surfaces, and clamps keep pieces together while you assemble. Quality tools make a big difference in your project’s outcome.
- Table saw
- Miter saw
- Drill press
- Sander
- Clamps
Selecting the Right Wood for Your Shelves
Picking the right wood is crucial for your shelves’ look and durability. Think about what wood fits your style, like oak for a classic look or maple for something modern. Knowing the wood’s characteristics helps you choose wisely. Consider grain, color, and hardness.
- Match the wood to your shelves’ style.
- Think about how durable and easy to maintain it is.
- Choose within your budget.
👉👉 Check out TEDS Woodworking Plans here and start creating shelves that truly fit your space and style.
Hardware and Fasteners You’ll Need
The hardware and fasteners you pick affect your shelves’ stability and use. You’ll need shelf brackets, screws, and wall anchors. Choosing the right hardware ensures your shelves stay on the wall and hold the right weight. Also, consider your wall type, as different walls need different fasteners.
With the right tools and materials, you’re ready to make custom shelves that look great and work well.
Planning Your Custom Shelves

Starting a shelving project means knowing your space and needs. Whether you want rustic shelving ideas or modern storage, planning is key.
First, measure your space carefully. This ensures your custom wooden shelves fit right and work well. Lucas’s garden shed shows how tailored shelving can make any area useful and lovely.
👉👉 Check out TEDS Woodworking Plans here and start creating shelves that truly fit your space and style.
Measuring Your Space Accurately
Getting your measurements right is crucial for a good shelving project. Here’s how to do it:
- Use a tape measure to record the width, height, and depth of the area where you plan to install the shelves.
- Consider any obstructions, such as electrical outlets or windows.
- Take note of the distance between the floor and any ceiling fixtures.
Determining Shelf Dimensions and Load Capacity
After measuring, figure out your shelf sizes. Think about what you’ll store and how heavy it is. For heavy items, make sure your shelves can handle the weight. It’s safer to guess higher than the actual weight.
“A shelf that is sturdy and well-designed is not just functional, it’s also a piece of art.”
Creating a Detailed Sketch or Plan
With your measurements and shelf sizes ready, make a detailed plan. You can use graph paper or digital tools. Your plan should include:
- The exact dimensions of each shelf.
- The type of material you’ll use.
- Any additional features, such as drawers or cabinets.
5 Popular Shelf Designs for Different Spaces

There are many designs for shelves, from simple floating shelves to detailed bookcases. Each design can be tailored to meet your specific needs.
When picking a shelf design, think about both looks and use. The right design can make a room look better and offer the storage you need. Here, we’ll look at five popular designs for different areas and uses.
Floating Shelves for Minimalist Aesthetics
Floating shelves give a clean, modern look that’s great for living rooms or kitchens. They hide the mounting hardware, making the space look tidy. Use top-notch materials and precise mounting for this sleek look.
Bookcase Shelving for Home Libraries
Bookcase shelving is perfect for book lovers. It holds lots of books and can be made fancy with things like crown molding. Make sure the bookcase is strong enough to hold your books.
Kitchen and Pantry Organization Shelves
Kitchen and pantry shelves help organize these often-cluttered areas. Adjustable shelves fit different kitchen items, keeping things neat and easy to find.
Workshop and Garage Storage Solutions
In workshops and garages, strong shelves are key for tool storage. Use tough materials and design shelves that can be adjusted for different sizes.
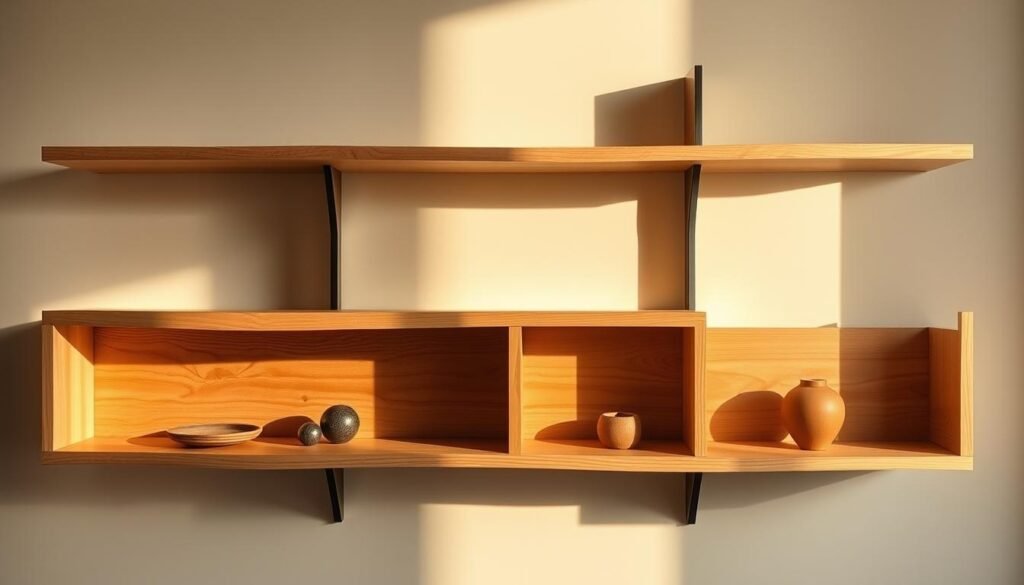
Decorative Display Shelving
Decorative shelves are great for showing off personal items like art or photos. You can design them with special shapes or finishes to add style to any room.
| Shelf Design | Ideal Space | Key Features |
|---|---|---|
| Floating Shelves | Living Rooms, Kitchens | Minimalist look, concealed mounting |
| Bookcase Shelving | Home Libraries, Studies | Ample storage, decorative elements |
| Kitchen and Pantry Shelves | Kitchens, Pantries | Adjustable, maximizes storage |
| Workshop and Garage Shelves | Workshops, Garages | Heavy-duty, adjustable heights |
| Decorative Display Shelves | Living Rooms, Bedrooms | Unique shapes, decorative finishes |
Choosing the right shelf design can make your space more functional and beautiful. Whether you’re new to DIY or have lots of experience, these designs are a great place to start your next project.
Step-by-Step Building Process

Building your own shelves lets you customize them in ways store-bought ones can’t. This woodworking project can be fun and rewarding if you follow the right steps.
Preparing Your Workspace Safely
Start by setting up your workspace right. Make sure it’s well-ventilated, especially when using wood finishes or adhesives. Keep it clean and clear to avoid accidents. Always wear safety glasses and a dust mask when using power tools.
Measuring and Cutting Your Wood
Getting your measurements right is crucial for strong shelves. Use a good tape measure and double-check your numbers before cutting. A sharp saw blade helps prevent splintering. For straight cuts, a table saw or circular saw works best. Use a jigsaw for curved cuts.
Assembly Techniques for Sturdy Shelves
Assembling your shelves needs careful attention. Use techniques like dado joints or screws for strength. Pre-drill screw holes to avoid splitting. Clamps are key for holding pieces together while you secure them.
Mounting Methods for Different Wall Types
The way you mount your shelves depends on your wall type. Use wall anchors for drywall. For concrete or brick, use masonry bits and the right fasteners. Always check your shelves are level before you finish mounting.
Common Mistakes and How I’ve Learned to Avoid Them
One big mistake is not thinking about the weight of items on your shelves. To avoid this, figure out your shelves’ load capacity and choose materials wisely. Another mistake is not measuring right, leading to parts that don’t fit. Measure twice and cut once to save yourself a lot of trouble.
Finishing Touches for Professional-Looking Shelves

After building your shelving unit, it’s time to add the final touches. These details will make your shelves look and last better. I’ll show you how to finish your DIY shelves like a pro.
Sanding Techniques for Smooth Results
Sanding is key to getting your shelves ready for the finish. I start with coarse-grit sandpaper (120-150 grit) to remove any flaws. Then, I switch to finer grits (220-240) for a smooth finish. This makes the shelves look better and helps the finish stick better.
Staining vs. Painting: Choosing the Right Finish
Choosing between staining and painting depends on the look you want. Staining highlights the wood’s natural beauty, adding warmth. Painting gives a bold, uniform color that can match or contrast with your decor. For a rustic look, stain is best. For something modern, paint is better.
| Finish Type | Aesthetic Outcome | Durability |
|---|---|---|
| Staining | Natural, warm look | High |
| Painting | Uniform, bold color | High |
Applying Protective Coatings for Longevity
Protecting your shelves from damage is crucial. I use polyurethane or varnish for most projects. These coatings protect the wood from moisture and scratches. Apply thin coats, letting each dry before adding the next, for a lasting finish.
Advanced Shelves Woodworking Techniques

Once you know the basics of woodworking, you can dive into more complex techniques. These advanced methods will make your custom wooden shelves both functional and beautiful.
Creating Custom Joinery for Unique Designs
Custom joinery is key in advanced woodworking. Dovetailing, mortise and tenon, and dado joints make your shelves strong and interesting. Learning these techniques lets you make unique and durable shelving designs that are different from store-bought ones.
Incorporating Decorative Elements and Edge Treatments
Adding decorative elements and edge treatments can make your shelves look amazing. Edge profiling with a router or adding carved motifs gives them a personal touch. These details can turn a simple shelf into a piece of functional art.
Building Adjustable or Modular Shelving Systems
Adjustable or modular shelving is great for changing storage needs. Using adjustable shelf pins or designing a modular system lets you make shelving that grows with you. This way, you get more storage and your shelves last longer.
Using these advanced techniques, you can make shelving plans that show off your style and skill. Whether it’s for a home library, kitchen, or workshop, these methods will help you achieve top-notch results.
Showcasing Your DIY Shelves: Styling and Organization
After building your custom shelves, it’s time to style and arrange them. This means balancing looks and use, arranging items for beauty, and keeping your shelves in top shape. They should be both beautiful and useful in your space.
Balancing Form and Function in Different Rooms
When showing off your DIY shelves, mix beauty with usefulness. In living rooms, you might display vases, sculptures, or photos with books and remotes. Kitchens can hold dishes and decorative items like vintage ceramics or cookbooks. The goal is to match your style with the room’s needs.
Think about the room’s purpose and how your shelves can help. For example, in a home office, shelves might hold files, supplies, and books, with a few personal touches.
Arranging Items for Visual Appeal
Arranging items on your shelves is an art that can change a room’s look. Begin by grouping similar items, like books or kitchenware. Mixing heights and textures adds interest. For example, a tall vase or books next to small items creates a lively display.
Try different setups until you find one that looks good and feels right. Leave space between items to avoid clutter and keep things simple.
Maintaining and Caring for Your Custom Shelves
To keep your DIY shelves looking great, regular care is key. Dust them often, and for wood shelves, use a conditioner to keep the wood healthy. Check the mounting hardware on heavy shelves to make sure it’s secure.
By following these tips, your custom shelves will last for years. They’ll remain a beautiful and useful part of your home.
Transforming Spaces with Your Handcrafted Shelves
Creating custom wooden shelves is a rewarding project. It can make your living or working space better. By following the plans and techniques, you’ve learned to make useful and attractive storage.
Handcrafted shelves do more than just hold things. They also make a room feel more personal. They’re great for organizing, displaying, or creating a cozy spot.
Now that you’ve finished your project, show off your work. Share your experience with others. This can inspire more people to try making their own shelves. It’s a way to share your creativity and help others improve their spaces.
👉👉Mastering Kitchen Cabinet Woodworking: A Hands-On Guide
👉👉DIY A-Frame Chicken Coop: Cozy Home for Your Flock
👉👉 Looking for Woodworking Classes Near Me?Find Top Woodworking Classes Near You Today 2025!
📌FAQ
🔍What are the benefits of building my own shelves instead of buying them?
Making your own shelves lets you tailor storage to fit your space perfectly. This ensures a great fit and maximizes storage.
🔍What are the essential tools required for a shelf project?
Key tools for shelf making include a table saw, miter saw, drill press, and sandpaper. These help with cutting, assembling, and finishing.
🔍How do I choose the right wood for my shelves?
Pick wood based on look, durability, and cost. Think about grain, density, and moisture resistance in your choice.
🔍What are some popular shelf designs suitable for different spaces?
There are many designs like floating shelves for a minimalist look. You can also make bookcases, kitchen shelves, workshop storage, and decorative shelves.
🔍How do I ensure my shelves are sturdy and can hold the desired weight?
Use strong assembly methods like brackets or dado joints. Also, think about the weight when setting shelf sizes.
🔍What are some advanced shelves woodworking techniques I can try?
Try advanced techniques like custom joinery and decorative edges. You can also build adjustable shelves for more function.
🔍How do I finish my shelves to achieve a professional-looking result?
For a pro finish, sand well, pick the right stain or paint, and apply protective coats. This ensures they last long.
🔍How do I maintain and care for my custom shelves?
Keep your shelves clean by dusting often. Don’t overload them. Fix any damage to keep them looking good.
🔍Can I build adjustable or modular shelving systems?
Yes, you can make shelves that adjust or change with your needs. Use custom joinery and smart design for this.
🔍What are some common mistakes to avoid when building shelves?
Avoid mistakes like wrong measurements, not enough support, and bad finishing. These can ruin your shelves’ look and stability.
🛠️ Whether you’re new to woodworking or ready to try advanced techniques?
👉👉 Check out TEDS Woodworking Plans here and start creating shelves that truly fit your space and style.
✅Affiliate Disclosure
Some of the links in this article are affiliate links. If you click through and make a purchase, I may earn a small commission — at no additional cost to you.
This helps support my work so I can continue creating helpful woodworking tutorials and product reviews.I only recommend products and services that I have thoroughly researched and believe could provide real value to my readers.
Thank you for your support!