woodworking mirror

Elevate Your Decor with a Handcrafted Woodworking Mirror

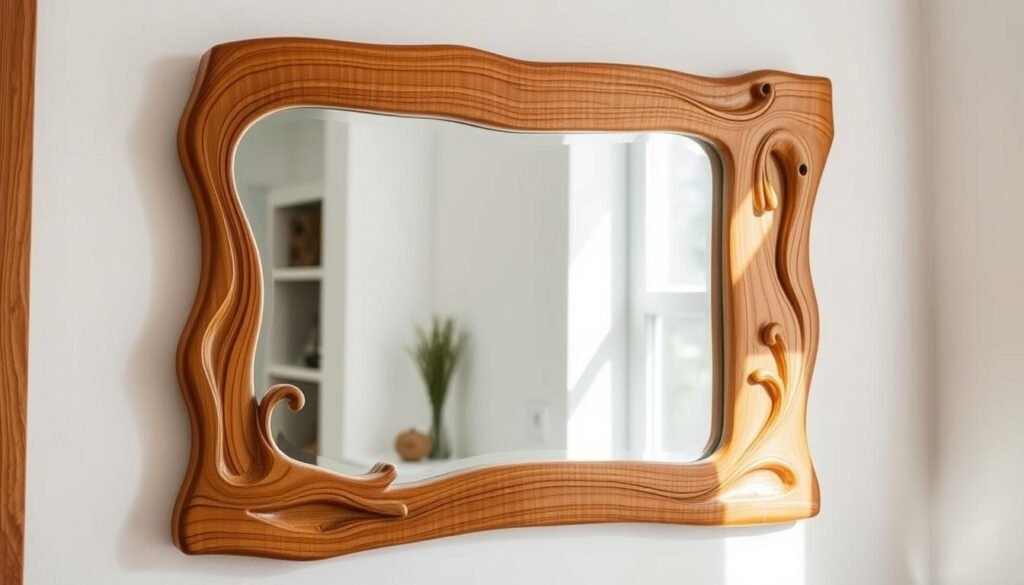
Looking to add rustic charm to your home? Making a handmade wooden mirror is a great idea. It’s a way to enhance your space and show off your DIY talents. Our guide will help you make a beautiful piece that brings warmth and character to any room.

We’ll guide you through every step, from planning to the final touches. You’ll get all the info you need to create a stunning rustic wood mirror. Our tutorial is perfect for both seasoned DIYers and beginners. It’s easy to follow and lots of fun.

👉👉 Click here to explore TedsWoodworking plans now »

🌿 👉 Browse top-rated wooden mirrors on Amazon and get inspired »

Key Takeaways

  • Create a beautiful handmade wooden mirror to elevate your home decor
  • Follow our step-by-step guide to craft a rustic wood mirror
  • Learn how to plan and prepare your project for a successful outcome
  • Add a touch of warmth and character to any room with your DIY creation
  • Develop your DIY skills and confidence with our easy-to-follow tutorial

The Timeless Appeal of Handcrafted Wooden Mirrors

Handcrafted wooden mirrors add a special touch to any room. A DIY woodworking mirror shows off your style and skill.

These mirrors have a charm that mass-produced ones can’t match. Making your own mirror means you get a piece that’s truly unique. It fits your taste and decor perfectly.

Why Custom Mirrors Stand Out in Home Decor

Custom mirrors are special because they’re made just for you. With a woodworking mirror project, you pick the wood, design, and shape. This way, your mirror matches your home’s look.

The Personal Touch: Benefits of Creating Your Own Mirror

Making your own mirror is rewarding. It lets you learn new skills and enjoy creating something with your hands. Plus, knowing you made it adds a special touch to your home.

Whether you’re experienced or new to woodworking, a DIY woodworking mirror is a great project. It’s a chance to challenge yourself and make something beautiful for your home.

👉👉 Click here to explore TedsWoodworking plans now »

🌿 👉 Browse top-rated wooden mirrors on Amazon and get inspired »

Essential Tools and Materials for Your Woodworking Mirror Project

Before starting your woodworking mirror project, make sure you have the right tools and materials. A well-prepared workspace makes the process smoother and ensures a professional finish.

Must-Have Tools for Mirror Construction

To build a sturdy and beautiful mirror frame, you’ll need certain tools. You’ll need a table saw for precise cuts, a miter saw for angled cuts, and a drill press for accurate drilling. Sandpaper is also important for smoothing out the wood surfaces. Don’t forget clamps to hold the frame together while the glue dries.

Using the right tools can greatly improve the quality of your woodworking mirror. For example, a high-quality table saw helps you make precise cuts. This is key for a seamless joint.

Selecting the Right Wood Types and Mirror Glass

Choosing the right wood and mirror glass is key for your mirror’s look and durability. Popular woods include oak, maple, and cherry, each with its own grain pattern and color. When picking mirror glass, consider its thickness and quality. Thicker glass feels more substantial, and high-quality glass ensures clarity and durability.

Wood TypeCharacteristicsBest Use
OakStrong, durable, visible grainRustic or traditional designs
MapleLight color, smooth grainModern or minimalist designs
CherryRich color, fine grainElegant or sophisticated designs
Detailed woodworking plans for a rustic, handcrafted mirror frame. The frame features intricate carved patterns, with a natural, weathered aesthetic. Arranged neatly on a workbench are the essential tools - chisels, sandpaper, and a sharp hand saw. Streams of warm, directional lighting illuminate the wood grain and cast dramatic shadows, creating an inviting, artisanal atmosphere. The mirror itself is slightly tarnished, adding an aged, vintage character to the design. The overall composition highlights the craftsmanship and attention to detail required for this woodworking project.

👉👉 Click here to explore TedsWoodworking plans now »

🌿 👉 Browse top-rated wooden mirrors on Amazon and get inspired »

Planning Your Woodworking Mirror Design

Starting a woodworking mirror project begins with planning its design. This step is key to your project’s success. As you work on your DIY woodworking mirror, think about what you want it to look like. You want it to be both useful and beautiful.

Popular Styles and Shapes to Consider

There are many woodworking mirror designs to choose from. You might like modern, rustic, or vintage styles. Think about your home’s decor and your personal taste. Also, consider the mirror’s shape. You can pick traditional shapes like rectangles or ovals, or go for something unique like hexagons or circles.

  • Modern minimalist frames
  • Rustic wooden frames with distressed finishes
  • Vintage-inspired frames with detailed carvings

Creating Templates and Measuring for Success

After picking your style and shape, make a template and measure carefully. This is important for a good fit and proper proportions. Use cardboard or paper for your template. Always double-check your measurements before cutting wood.

Intricate woodworking mirror designs, showcasing the beauty of natural grain and skillful craftsmanship. A warm, well-lit workshop setting, with tools and materials neatly arranged. In the foreground, a sleek, rectangular mirror frame takes shape, its edges sanded smooth and edges beveled. Delicate hand-carved floral patterns adorn the frame, casting soft shadows. In the middle ground, several mirror prototypes in various stages of completion, each with a unique design aesthetic. The background features a wall of wooden shelves, displaying an assortment of ornate mirror frames, ready to be customized and personalized. An atmosphere of artistry, precision, and attention to detail permeates the scene.

With careful planning, you can make a mirror that looks great and serves its purpose. It will add beauty to your home.

Preparing Your Workspace for Safe Mirror Construction

Before starting your woodworking mirror project, make sure your workspace is ready. A safe and organized area is key to a successful project.

Detailed woodworking plans for a rustic mirror frame, displayed on a sturdy workbench in a well-lit workshop. The foreground features carefully arranged tools and hardware like chisels, sandpaper, and finishing nails. In the middle ground, the unfinished mirror frame takes shape, its grain and texture visible. The background showcases a pegboard wall with additional woodworking tools, providing a sense of the dedicated workspace. Soft, directional lighting casts warm shadows, creating an atmosphere of focused craftsmanship. The overall scene conveys the precise preparation and attention to detail required for safe and successful mirror construction.

👉👉 Click here to explore TedsWoodworking plans now »

🌿 👉 Browse top-rated wooden mirrors on Amazon and get inspired »

Safety Considerations When Working with Wood and Glass

When working on woodworking projects for mirrors, safety is most important. Wood and glass can be dangerous if you’re not careful. Always wear safety glasses and gloves to protect yourself.

“A safe craftsman is a happy craftsman,” goes the saying. This is very true when working with glass and wood.

Organizing Your Tools and Materials for Efficiency

An organized workspace is safer and makes you work better. For your rustic wood mirror project, having everything within reach is important. Use toolboxes or pegboards for your tools and labeled containers for materials.

This way, you can focus on your woodworking mirror plans without delays. By focusing on safety and organization, you’ll make a beautiful and sturdy mirror.

Step-by-Step Guide to Building Your Woodworking Mirror Frame

Building a woodworking mirror frame can make your home look amazing. It lets you pick the size and style you want. Plus, you get to feel proud of making it yourself.

A well-lit woodworking studio, with a large workbench in the foreground. On the workbench, various hand tools and power tools are neatly arranged, including a circular saw, chisels, and a cordless drill. In the middle ground, a partially constructed wooden mirror frame takes shape, the pieces carefully joined together with wood glue and clamps. The frame is made of sturdy, natural-looking wood, with a slightly rustic, handcrafted aesthetic. The background features a wall of shelves stocked with an assortment of wood, stains, and finishing supplies, creating a sense of a well-equipped DIY workspace. The overall mood is one of focused, thoughtful craftsmanship, with a touch of warmth and hominess.

👉👉 Click here to explore TedsWoodworking plans now »

🌿 👉 Browse top-rated wooden mirrors on Amazon and get inspired »

Cutting and Preparing Your Wood Pieces

First, you need to cut and prepare your wood. Measure and cut it to fit your design. Use a miter saw for clean, angled cuts, like for mitered corners.

After cutting, sand the edges to make them smooth. This removes splinters.

Before assembling, check your wood for any flaws or warping. Use a planer to flatten and even out your pieces if needed.

Joinery Techniques for a Sturdy Frame

The joinery method you pick affects your frame’s strength and look. For a DIY woodworking mirror, butt or miter joints work well. But for extra strength, try dovetail joints or mortise and tenon joints.

Clamp your pieces tightly and use the right adhesives. For a nicer finish, use wood glue and reinforcing nails or dowels. This makes your frame strong and durable.

Assembly Tips for Perfect Corners

Assembling your mirror frame needs patience and focus, mainly for perfect corners. Use corner clamps to keep your corners square and frame even. Apply even pressure to avoid gaps or misalignments.

After assembling, check for any flaws. Sand any rough spots and apply your chosen finish. This protects the wood and makes your woodworking mirror ideas look great.

Creating Decorative Elements for Your Wooden Mirror

Adding decorations to your handmade wooden mirror can make it look amazing. We love trying out new ways to make our woodworking mirror designs special.

Carving and Detailing Techniques

Carving and detailing can make your rustic wood mirror look beautiful. You can use tools to create patterns, flowers, or shapes. For example, a chisel can make small details, and a gouge can make bigger carvings.

A finely crafted woodworking mirror, its intricate frame a testament to the artisan's skill. Delicate floral carvings adorn the edges, casting captivating shadows across the glass surface. Warm, diffused lighting illuminates the design, highlighting the natural grain and hues of the wood. The mirror is positioned in a sun-dappled studio, the backdrop a tranquil scene of potted plants and soft, neutral tones. This handmade piece exudes a sense of timeless elegance, seamlessly blending form and function to elevate the décor.

👉👉 Click here to explore TedsWoodworking plans now »

🌿 👉 Browse top-rated wooden mirrors on Amazon and get inspired »

Adding Inlays and Decorative Borders

Inlays and borders can make your wooden mirror look even better. Try using different woods or materials for the inlays for a cool effect. A nice border can make your mirror stand out in any room.

TechniqueDescriptionEffect
CarvingUsing tools to remove wood and create designsIntricate patterns and details
InlaysInserting contrasting materials into the woodContrasting colors and textures
Decorative BordersAdding a frame or edge around the mirrorEnhanced framing and visual appeal

By adding these decorative elements, you can make a unique handmade wooden mirror. It will show off your personal style.

Sanding and Finishing Your Woodworking Mirror

Now that your frame is built, it’s time to sand and finish it. These steps make your mirror look great and last longer. Sanding and finishing protect the wood and improve its look.

Progressive Sanding for a Smooth Surface

Progressive sanding means using sandpaper with finer grits. Start with a coarse grit (120) to smooth out the wood. Then, use finer grits (150, 220, and 240) for a smooth finish.

Always sand in the wood grain direction to avoid scratches. Use a sanding block for flat areas and a flexible pad for curves. This ensures a smooth finish.

Choosing and Applying the Perfect Finish

The right finish depends on your wood and desired look. Water-based or oil-based polyurethane works well for a natural look. For a rustic look, apply stain first and then a clear finish.

Follow the finish’s instructions carefully. Apply thin coats, letting each dry before sanding and applying the next. This creates a glossy, protective finish.

A finely crafted woodworking mirror, its elegant frame meticulously sanded and polished to a smooth, lustrous finish. The mirror's surface reflects the warm glow of natural lighting, casting a soft, ambient illumination throughout the space. Intricate joinery and precise mitering showcase the creator's skilled handiwork, while the clean, minimalist design allows the natural beauty of the wood to take center stage. The mirror is positioned in a well-lit, airy setting, its frame casting subtle shadows that add depth and dimension to the composition. The overall scene exudes a sense of refined craftsmanship and understated elegance, perfectly complementing the article's focus on elevating home decor with a handmade woodworking mirror.

Installing the Mirror Glass Safely and Securely

Now that your woodworking mirror frame is ready, it’s time to install the mirror glass. This step needs careful attention to ensure the mirror is securely attached. Also, the backing must be properly sealed.

A well-crafted, rustic wooden mirror installation, featuring a handmade frame with intricate woodgrain patterns. The mirror is mounted securely on the wall, illuminated by soft, natural lighting that casts warm shadows. The installation is situated in a cozy, minimalist interior setting, allowing the craftsmanship and materiality to take center stage. The overall composition emphasizes the process of careful, skilled woodworking and the timeless beauty of a handmade home accent piece.

👉👉 Click here to explore TedsWoodworking plans now »

🌿 👉 Browse top-rated wooden mirrors on Amazon and get inspired »

Methods for Attaching Mirror Glass to Wood Frames

There are a few ways to attach mirror glass to a wood frame. One common method is using mirror clips. These are small metal or plastic pieces that hold the mirror in place. Another method is applying a strong adhesive, like silicone or epoxy, to the back of the mirror and attaching it to the frame.

We suggest using a combination of both for extra security.

Sealing and Protecting the Mirror Backing

Sealing the mirror backing is key to protect it from dust, moisture, and damage. You can use a mirror backing board or a protective coating to seal the back. Make sure the backing is flush with the frame to prevent moisture from seeping in.

By taking these steps, your handmade wooden mirror will last for years. It will add elegance to any room.

When building your own woodworking mirror, pay close attention to detail. Following these steps will help you create a beautiful and durable piece.

Mounting Options for Your Completed Woodworking Mirror

Now that your woodworking mirror is done, it’s time to pick the best way to hang it. You’ve put a lot of work into making a stunning rustic wood mirror or a modern woodworking mirror design. The right way to hang it will make it look even better and keep it safe.

Wall Mounting Hardware and Techniques

To hang your mirror securely, you’ll need the right tools. You can use:

  • D-rings and picture hooks for an easy hang
  • French cleats for heavy mirrors or a fancy look
  • Mirror hanging kits with special hardware for glass

When picking your tools, think about your mirror’s weight and size. This will help you hang it safely and level.

Creating a Standing or Leaning Mirror Design

If you don’t want to hang your mirror on the wall, or if you like to change things up, try a standing or leaning design. You can do this by:

  1. Adding legs or a stand to the back of the frame
  2. Making a leaning frame to put against a wall
  3. Using adjustable easel backs for a flexible display

This way, you can easily move your mirror or change its spot. It’s perfect for those who like to switch up their decor often.

A well-lit, artfully arranged woodworking mirror display, showcasing a variety of elegant, handcrafted mirror designs. In the foreground, a rustic, wooden-framed mirror with a unique, organic silhouette stands prominently. In the middle ground, several additional mirror pieces are arranged on a sturdy, wooden workbench, each exhibiting distinct woodworking techniques and finishes, such as intricate carved patterns, smooth lacquered surfaces, and weathered, distressed frames. The background features a softly-lit, warm-toned workshop setting, with tools and materials subtly visible, creating a sense of craftsmanship and attention to detail. The overall composition highlights the diverse mounting options and design possibilities for a handcrafted woodworking mirror.

👉👉 Click here to explore TedsWoodworking plans now »

🌿 👉 Browse top-rated wooden mirrors on Amazon and get inspired »

Customization Ideas to Make Your Woodworking Mirror Unique

With a few creative tweaks, you can turn your woodworking mirror into a one-of-a-kind masterpiece. It will reflect your personal style. Customization is where the true magic happens in woodworking projects for mirrors. It allows you to add a personal touch that makes your handmade wooden mirror stand out.

Adding Stains and Paints for Different Effects

Experimenting with stains and paints can dramatically change the look of your woodworking mirror. For instance, a dark stain can add a sense of sophistication. On the other hand, a bold paint color can make a statement. “The right finish can make or break the overall aesthetic of your mirror,” as many woodworking enthusiasts would agree.

Consider the color scheme and style of the room where the mirror will be placed. This will help you choose the perfect finish.

A well-lit, rustic woodworking studio with an assortment of handcrafted mirrors displayed on wooden shelves. The mirrors feature intricate carved frames in various shapes and designs, showcasing the skilled craftsmanship of the woodworker. Soft, warm lighting casts a cozy glow, highlighting the natural wood grains and textures. In the foreground, a large, ornate mirror with a unique geometric pattern frame takes center stage, inviting the viewer to imagine the endless customization possibilities for a one-of-a-kind woodworking mirror. The overall scene exudes a sense of artisanal charm and bespoke elegance.

Incorporating Mixed Materials (Wood and Metal)

Incorporating mixed materials like wood and metal can add depth and visual interest to your mirror. For example, combining a wooden frame with metal accents can create a striking contrast. This blend of materials not only enhances the mirror’s appearance but also adds a layer of complexity to its design.

It makes the mirror a true piece of art.

Creating Themed Designs for Different Home Styles

Creating a themed design for your woodworking mirror can help it seamlessly integrate into your home decor. Whether you’re aiming for a rustic, modern, or vintage look, tailoring your mirror’s design to fit your home’s style can make it a cohesive and beautiful addition. Think about the overall aesthetic you want to achieve and let that guide your design choices.

By embracing these customization ideas, you can ensure that your woodworking mirror is not just a functional piece. It will be a unique element that enhances your home’s beauty.

Conclusion: Enjoying and Maintaining Your Handcrafted Wooden Mirror

Making a woodworking mirror is a fun DIY project. It adds a personal touch to your home. Whether it’s a rustic wood mirror or a sleek one, the joy of making it is special.

To keep your mirror looking great, clean it often. Use a soft cloth to dust the mirror and frame. Stay away from harsh chemicals that can harm the finish.

If you get a tough stain, a damp cloth might help. But make sure to dry it well to avoid water spots.

By following these easy care tips, your wooden mirror will stay beautiful for many years. Enjoy the pride of creating something unique. And appreciate your mirror’s beauty every day.

🛠️ Not Ready to Build It Yourself? Here’s a Shortcut You’ll Love

While there’s something special about crafting a shelter or toy with your own hands, not everyone has the time, tools, or space to take on a full DIY project right now.

💡 That’s why I highly recommend Ted’s Woodworking Plans – a collection of 16,000+ step-by-step woodworking plans. Whether you’re making a cat house, a dog shelter, or even holiday gifts, this resource gives you pro-level blueprints without the guesswork.

✨ Perfect for beginners
🧰 Detailed diagrams and cut lists
🪚 Projects from simple to expert level

👉 Grab Ted’s plans here and start your next project with confidence » Ted’s Woodworking – 16,000 Plans
👉👉 Click here to explore TedsWoodworking plans now »


🛒 Not Into DIY? No Problem.

If you love the idea of a beautiful wooden Mirror but don’t have the time or tools to build it yourself, you’re still in luck!
Check out our favorite ready-wooden Mirror, tools, and accessories on Amazon:

🌿 👉 Browse top-rated wooden mirrors on Amazon and get inspired »

FAQ

Key Takeaways

Create a beautiful handmade wooden mirror to elevate your home decorFollow our step-by-step guide to craft a rustic wood mirrorLearn how to plan and prepare your project for a successful outcomeAdd a touch of warmth and character to any room with your DIY creationDevelop your DIY skills and confidence with our easy-to-follow tutorialThe Timeless Appeal of Handcrafted Wooden MirrorsHandcrafted wooden mirrors add a special touch to any room. A DIY woodworking mirror shows off your style and skill.These mirrors have a charm that mass-produced ones can’t match. Making your own mirror means you get a piece that’s truly unique. It fits your taste and decor perfectly.

Why Custom Mirrors Stand Out in Home Decor

Custom mirrors are special because they’re made just for you. With a woodworking mirror project, you pick the wood, design, and shape. This way, your mirror matches your home’s look.

The Personal Touch: Benefits of Creating Your Own Mirror

Making your own mirror is rewarding. It lets you learn new skills and enjoy creating something with your hands. Plus, knowing you made it adds a special touch to your home.Whether you’re experienced or new to woodworking, a DIY woodworking mirror is a great project. It’s a chance to challenge yourself and make something beautiful for your home.Essential Tools and Materials for Your Woodworking Mirror ProjectBefore starting your woodworking mirror project, make sure you have the right tools and materials. A well-prepared workspace makes the process smoother and ensures a professional finish.

Must-Have Tools for Mirror Construction

To build a sturdy and beautiful mirror frame, you’ll need certain tools. You’ll need a table saw for precise cuts, a miter saw for angled cuts, and a drill press for accurate drilling. Sandpaper is also important for smoothing out the wood surfaces. Don’t forget clamps to hold the frame together while the glue dries.Using the right tools can greatly improve the quality of your woodworking mirror. For example, a high-quality table saw helps you make precise cuts. This is key for a seamless joint.

Selecting the Right Wood Types and Mirror Glass

Choosing the right wood and mirror glass is key for your mirror’s look and durability. Popular woods include oak, maple, and cherry, each with its own grain pattern and color. When picking mirror glass, consider its thickness and quality. Thicker glass feels more substantial, and high-quality glass ensures clarity and durability.Wood TypeCharacteristicsBest UseOakStrong, durable, visible grainRustic or traditional designsMapleLight color, smooth grainModern or minimalist designsCherryRich color, fine grainElegant or sophisticated designsPlanning Your Woodworking Mirror DesignStarting a woodworking mirror project begins with planning its design. This step is key to your project’s success. As you work on your DIY woodworking mirror, think about what you want it to look like. You want it to be both useful and beautiful.

Popular Styles and Shapes to Consider

There are many woodworking mirror designs to choose from. You might like modern, rustic, or vintage styles. Think about your home’s decor and your personal taste. Also, consider the mirror’s shape. You can pick traditional shapes like rectangles or ovals, or go for something unique like hexagons or circles.Modern minimalist framesRustic wooden frames with distressed finishesVintage-inspired frames with detailed carvings

Creating Templates and Measuring for Success

After picking your style and shape, make a template and measure carefully. This is important for a good fit and proper proportions. Use cardboard or paper for your template. Always double-check your measurements before cutting wood.With careful planning, you can make a mirror that looks great and serves its purpose. It will add beauty to your home.Preparing Your Workspace for Safe Mirror ConstructionBefore starting your woodworking mirror project, make sure your workspace is ready. A safe and organized area is key to a successful project.

Safety Considerations When Working with Wood and Glass

When working on woodworking projects for mirrors, safety is most important. Wood and glass can be dangerous if you’re not careful. Always wear safety glasses and gloves to protect yourself.“A safe craftsman is a happy craftsman,” goes the saying. This is very true when working with glass and wood.

Organizing Your Tools and Materials for Efficiency

An organized workspace is safer and makes you work better. For your rustic wood mirror project, having everything within reach is important. Use toolboxes or pegboards for your tools and labeled containers for materials.This way, you can focus on your woodworking mirror plans without delays. By focusing on safety and organization, you’ll make a beautiful and sturdy mirror.Step-by-Step Guide to Building Your Woodworking Mirror FrameBuilding a woodworking mirror frame can make your home look amazing. It lets you pick the size and style you want. Plus, you get to feel proud of making it yourself.

Cutting and Preparing Your Wood Pieces

First, you need to cut and prepare your wood. Measure and cut it to fit your design. Use a miter saw for clean, angled cuts, like for mitered corners.After cutting, sand the edges to make them smooth. This removes splinters.Before assembling, check your wood for any flaws or warping. Use a planer to flatten and even out your pieces if needed.

Joinery Techniques for a Sturdy Frame

The joinery method you pick affects your frame’s strength and look. For a DIY woodworking mirror, butt or miter joints work well. But for extra strength, try dovetail joints or mortise and tenon joints.Clamp your pieces tightly and use the right adhesives. For a nicer finish, use wood glue and reinforcing nails or dowels. This makes your frame strong and durable.

Assembly Tips for Perfect Corners

Assembling your mirror frame needs patience and focus, mainly for perfect corners. Use corner clamps to keep your corners square and frame even. Apply even pressure to avoid gaps or misalignments.After assembling, check for any flaws. Sand any rough spots and apply your chosen finish. This protects the wood and makes your woodworking mirror ideas look great.Creating Decorative Elements for Your Wooden MirrorAdding decorations to your handmade wooden mirror can make it look amazing. We love trying out new ways to make our woodworking mirror designs special.

Carving and Detailing Techniques

Carving and detailing can make your rustic wood mirror look beautiful. You can use tools to create patterns, flowers, or shapes. For example, a chisel can make small details, and a gouge can make bigger carvings.

Adding Inlays and Decorative Borders

Inlays and borders can make your wooden mirror look even better. Try using different woods or materials for the inlays for a cool effect. A nice border can make your mirror stand out in any room.TechniqueDescriptionEffectCarvingUsing tools to remove wood and create designsIntricate patterns and detailsInlaysInserting contrasting materials into the woodContrasting colors and texturesDecorative BordersAdding a frame or edge around the mirrorEnhanced framing and visual appealBy adding these decorative elements, you can make a unique handmade wooden mirror. It will show off your personal style.Sanding and Finishing Your Woodworking MirrorNow that your frame is built, it’s time to sand and finish it. These steps make your mirror look great and last longer. Sanding and finishing protect the wood and improve its look.

Progressive Sanding for a Smooth Surface

Progressive sanding means using sandpaper with finer grits. Start with a coarse grit (120) to smooth out the wood. Then, use finer grits (150, 220, and 240) for a smooth finish.Always sand in the wood grain direction to avoid scratches. Use a sanding block for flat areas and a flexible pad for curves. This ensures a smooth finish.

Choosing and Applying the Perfect Finish

The right finish depends on your wood and desired look. Water-based or oil-based polyurethane works well for a natural look. For a rustic look, apply stain first and then a clear finish.Follow the finish’s instructions carefully. Apply thin coats, letting each dry before sanding and applying the next. This creates a glossy, protective finish.Installing the Mirror Glass Safely and SecurelyNow that your woodworking mirror frame is ready, it’s time to install the mirror glass. This step needs careful attention to ensure the mirror is securely attached. Also, the backing must be properly sealed.

Methods for Attaching Mirror Glass to Wood Frames

There are a few ways to attach mirror glass to a wood frame. One common method is using mirror clips. These are small metal or plastic pieces that hold the mirror in place. Another method is applying a strong adhesive, like silicone or epoxy, to the back of the mirror and attaching it to the frame.We suggest using a combination of both for extra security.

Sealing and Protecting the Mirror Backing

Sealing the mirror backing is key to protect it from dust, moisture, and damage. You can use a mirror backing board or a protective coating to seal the back. Make sure the backing is flush with the frame to prevent moisture from seeping in.By taking these steps, your handmade wooden mirror will last for years. It will add elegance to any room.When building your own woodworking mirror, pay close attention to detail. Following these steps will help you create a beautiful and durable piece.Mounting Options for Your Completed Woodworking MirrorNow that your woodworking mirror is done, it’s time to pick the best way to hang it. You’ve put a lot of work into making a stunning rustic wood mirror or a modern woodworking mirror design. The right way to hang it will make it look even better and keep it safe.

Wall Mounting Hardware and Techniques

To hang your mirror securely, you’ll need the right tools. You can use:D-rings and picture hooks for an easy hangFrench cleats for heavy mirrors or a fancy lookMirror hanging kits with special hardware for glassWhen picking your tools, think about your mirror’s weight and size. This will help you hang it safely and level.

Creating a Standing or Leaning Mirror Design

If you don’t want to hang your mirror on the wall, or if you like to change things up, try a standing or leaning design. You can do this by:Adding legs or a stand to the back of the frameMaking a leaning frame to put against a wallUsing adjustable easel backs for a flexible displayThis way, you can easily move your mirror or change its spot. It’s perfect for those who like to switch up their decor often.Customization Ideas to Make Your Woodworking Mirror UniqueWith a few creative tweaks, you can turn your woodworking mirror into a one-of-a-kind masterpiece. It will reflect your personal style. Customization is where the true magic happens in woodworking projects for mirrors. It allows you to add a personal touch that makes your handmade wooden mirror stand out.

Adding Stains and Paints for Different Effects

Experimenting with stains and paints can dramatically change the look of your woodworking mirror. For instance, a dark stain can add a sense of sophistication. On the other hand, a bold paint color can make a statement. “The right finish can make or break the overall aesthetic of your mirror,” as many woodworking enthusiasts would agree.Consider the color scheme and style of the room where the mirror will be placed. This will help you choose the perfect finish.

Incorporating Mixed Materials (Wood and Metal)

Incorporating mixed materials like wood and metal can add depth and visual interest to your mirror. For example, combining a wooden frame with metal accents can create a striking contrast. This blend of materials not only enhances the mirror’s appearance but also adds a layer of complexity to its design.It makes the mirror a true piece of art.

Creating Themed Designs for Different Home Styles

Creating a themed design for your woodworking mirror can help it seamlessly integrate into your home decor. Whether you’re aiming for a rustic, modern, or vintage look, tailoring your mirror’s design to fit your home’s style can make it a cohesive and beautiful addition. Think about the overall aesthetic you want to achieve and let that guide your design choices.By embracing these customization ideas, you can ensure that your woodworking mirror is not just a functional piece. It will be a unique element that enhances your home’s beauty.Conclusion: Enjoying and Maintaining Your Handcrafted Wooden MirrorMaking a woodworking mirror is a fun DIY project. It adds a personal touch to your home. Whether it’s a rustic wood mirror or a sleek one, the joy of making it is special.To keep your mirror looking great, clean it often. Use a soft cloth to dust the mirror and frame. Stay away from harsh chemicals that can harm the finish.If you get a tough stain, a damp cloth might help. But make sure to dry it well to avoid water spots.By following these easy care tips, your wooden mirror will stay beautiful for many years. Enjoy the pride of creating something unique. And appreciate your mirror’s beauty every day.

🔎What type of wood is best for a woodworking mirror?

The best wood for a mirror depends on what you like and how durable it needs to be. Oak, maple, and cherry are popular. They give a classic look that lasts.

🔎How do I choose the right mirror glass for my woodworking mirror?

Pick mirror glass based on size, thickness, and type. You can choose from beveled, antique, or tinted glass. This adds a special touch to your mirror.

🔎What safety precautions should I take when working with power tools and glass?

Wear safety glasses, gloves, and a dust mask when using power tools and glass. Make sure your area is clean and well-ventilated to avoid accidents.

🔎Can I customize my woodworking mirror with different designs and patterns?

Yes, you can make your mirror unique. Add carvings, inlays, or decorative borders. This gives your mirror a personal touch.

🔎How do I properly attach the mirror glass to the wooden frame?

Use mirror adhesive or silicone to attach the glass. Clean and dry the frame first. Follow the adhesive’s instructions for a strong bond.

🔎What are some common mistakes to avoid when building a woodworking mirror?

Avoid mistakes like wrong measurements, bad joinery, and not sanding enough. Double-check your work for a professional finish.

🔎How do I maintain and care for my handcrafted wooden mirror?

Dust your mirror with a soft cloth. Avoid harsh chemicals or abrasive cleaners. Check the hardware and tighten it as needed.

🔎Can I create a rustic or distressed look for my woodworking mirror?

Yes, you can get a rustic look by distressing or wire brushing. Try different methods to find the look you want.

🔎What are some popular styles and shapes for woodworking mirrors?

Popular shapes include rectangular, round, and oval. You can choose from modern, traditional, or rustic designs. Pick what fits your home and style.

🔎How do I hang my woodworking mirror safely and securely?

Use D-rings or French cleats for hanging. Follow the manufacturer’s instructions. Make sure the mirror is level and secure to avoid accidents.

Affiliate Disclosure

Some of the links in this article are affiliate links. If you click through and make a purchase, I may earn a small commission — at no additional cost to you.
This helps support my work so I can continue creating helpful woodworking tutorials and product reviews.I only recommend products and services that I have thoroughly researched and believe could provide real value to my readers.

Thank you for your support!

Leave a Comment

Your email address will not be published. Required fields are marked *