
👉 👉Click here to explore 16000 TedsWoodworking plans now »
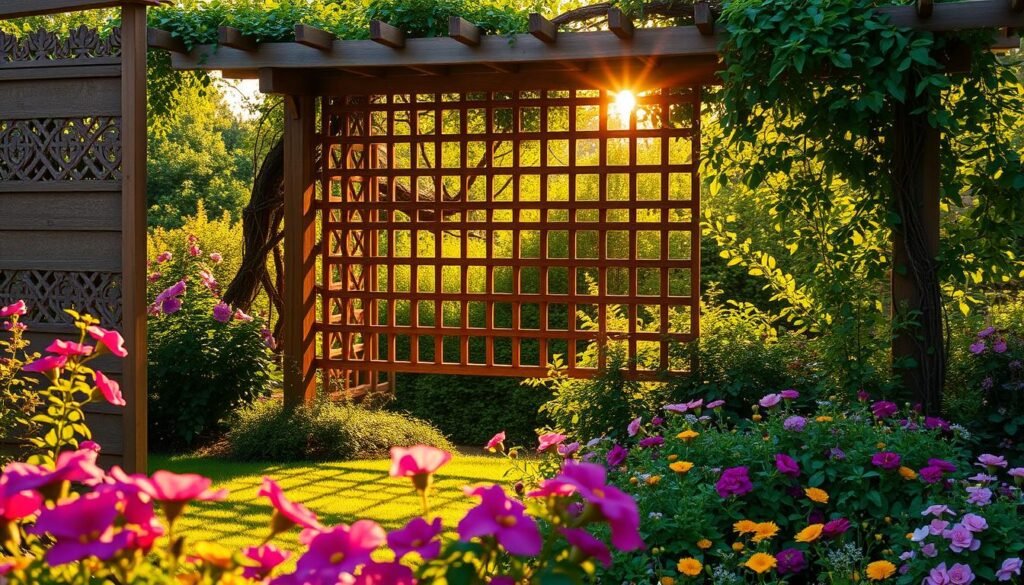
Imagine creating a cozy spot in your garden. Here, climbing roses or ivy grow up, making a beautiful scene. A woodworking trellis is more than just wood and screws. It’s a place for nature to flourish.
Every DIY trellis idea tells a story of growth and personal pride. It shows how creating something with your hands can be rewarding.
Learning to make a trellis should be fun, like walking through a nursery. It shows you have the skills to turn wood into something useful. Whether you’re experienced or just starting, we have tips to help you make a trellis that shows off your skills and love for gardening.
Join us as we explore ways to improve your outdoor space with DIY trellis ideas. If you’re thinking about making a woodworking trellis, this guide is for you. It’s here to help and inspire your woodworking journey.
Key Takeaways
- Experience the joy of creating a focal point in your garden with a homemade trellis.
- Understand the essential steps in turning DIY trellis ideas into a reality.
- Gain confidence in your ability to complete a woodworking trellis project.
- Learn how to select materials that will ensure the longevity of your trellis.
- Discover practical advice for beginners on how to build a trellis that thrives.
- Recognize the value of a trellis as both a functional and aesthetic garden feature.
Understanding the Basics of Woodworking Trellis
Welcome to the next stage of adding charm and utility to your garden with outdoor woodworking projects. Whether you’re new or experienced, learning to make a wooden garden trellis is exciting. It’s rewarding to see climbing plants grow through the trellis you built. Let’s explore what a woodworking trellis is, its benefits, and the materials you’ll need.
What is a Woodworking Trellis?
A woodworking trellis supports climbing plants and veggies, blending them into your garden. It’s not just for plants; it can also be a garden centerpiece, a privacy screen, or even a light support. The design and material you choose will affect your garden’s look and function.
Benefits of Adding a Trellis to Your Garden
Adding a trellis to your garden is more than just making it look good; it changes it. A wooden garden trellis uses vertical space well, perfect for small gardens. It keeps plants healthy by improving air flow, reducing pest problems, and getting more sun. Plus, a trellis can create private spaces, making your garden a cozy retreat.
Materials Needed for a DIY Trellis Project
👉 👉Click here to explore 16000 TedsWoodworking plans now »
To start your trellis project, choosing the right materials is key. Pick materials that fit your outdoor woodworking projects for a lasting trellis. Here’s a list of common materials for a strong trellis:
| Material | Characteristics | Benefits |
|---|---|---|
| Treated Lumber | Pressure treated to resist decay | Longevity and durability in outdoor conditions |
| Cedar or Redwood | Naturally resistant to rot and insects | Aesthetically pleasing with natural textures |
| Stainless Steel Screws | Rust-resistant | Ensures sturdy construction |
| Weather-Resistant Finish | Seals the wood from environmental elements | Extends the life and look of the trellis |
With the right materials, you’re ready to start making a beautiful and sturdy wooden garden trellis. But first, let’s see what kind of trellis you can create.
Choosing the Right Design for Your Trellis
Starting a backyard trellis project means picking a design that fits your needs and style. You might prefer classic elegance or modern simplicity. Knowing the difference helps you choose the best for your garden.
Classic vs. Modern Trellis Designs
Classic trellises are loved for their timeless beauty. They have detailed lattice patterns that go well with many garden styles. On the other hand, modern trellises are simple and clean. They use straight lines and shapes that fit well with modern gardens.
Customizing Designs for Unique Spaces
Customizing your trellis can be rewarding, making it fit your unique garden. Adding personal touches like curves or built-in planters makes it special. It turns a simple garden feature into a beautiful part of your home.
When planning your trellis, think about what you like and your garden’s look. The right design makes your trellis a strong support for plants and a beautiful garden centerpiece.
Woodworking Trellis: Planning Your Project

👉 👉Click here to explore 16000 TedsWoodworking plans now »
Creating a successful woodworking trellis starts with careful planning. It’s like planning a treasure hunt, where every step is important. First, decide on the right size and spot for your trellis. Think about the sunlight, the plants, and how it will look in your garden.
Sketching your diy trellis ideas might seem old-fashioned, but it works. It helps you see your project before you start. Use trellis construction plans to guide you, saving time and materials.
Choosing your trellis style is important. It should be easy to maintain and last long. Whether you pick a simple grid or a fancy lattice, think about the materials and cost. A good plan leads to a project you’ll love.
Are you ready to start? It’s time to make your trellis ideas real! With the right plan and materials, your trellis will be strong and beautiful. It will be a highlight of your garden, adding beauty and function.
Tools and Equipment for Building a Trellis

Deciding to how to build a trellis means you need the right tools and equipment. A good toolbox makes your project easier and faster. Let’s see what you’ll need.
Basic Woodworking Tools
For a woodworking trellis, basic tools are a must. You’ll need saws, hammers, screwdrivers, and drills. Each tool is important for building your trellis right and strong. Make sure your tools work well for safety and quality.
Safety Equipment
Safety is key in trellis building tips. Wear gloves, goggles, and ear protection to stay safe. A safe builder is a smart builder!
Measuring and Cutting Tools
When making a trellis, precision is important. Use measuring tapes, carpenter squares, and miter saws for accurate cuts. These tools help you make sure everything fits perfectly.
| Tool Type | Tool Name | Usage |
|---|---|---|
| Basic Tool | Saw | Cutting Wood |
| Basic Tool | Hammer | Assembling Parts |
| Measuring Tool | Carpenter Square | Ensuring Right Angles |
| Safety Gear | Goggles | Eye Protection |
With the right tools, your trellis project will be a success. You’ll be ready to work safely and effectively. Get your tools ready, roll up your sleeves, and start making your garden beautiful with a woodworking trellis.
Preparing the Wood for Your Trellis

👉 👉Click here to explore 16000 TedsWoodworking plans now »
Starting outdoor woodworking projects, like a wooden garden trellis, is rewarding and adds beauty to your home. We’ll explore how to prepare wood for your trellis. This ensures it lasts long and looks great.
Choosing the right wood is key for your gardening structures’ success. Cedar and redwood are great because they resist decay and pests. Pressure-treated lumber also keeps your trellis strong against the weather.
Protecting the wood is next to keep your trellis beautiful for years. We’ll look at different treatments and protective methods. This will help your wooden garden trellis stay beautiful all year.
| Treatment Type | Benefits | Best Used For |
|---|---|---|
| Sealant | Protects against moisture and UV damage | All outdoor woodworking projects |
| Preservative | Prevents fungal growth and insect attacks | Areas prone to dampness and insects |
| Staining | Enhances natural wood color and grain texture | Decorative outdoor features |
Pre-treating and sanding your wood well preserves your trellis and improves its finish. This makes it a beautiful part of your landscape. Let’s focus on these steps to enjoy the joy of creating something beautiful by hand.
You may also like
Step-by-Step Guide to Constructing Your Trellis

Building a trellis might seem hard, but with the right trellis building tips, it’s a fun DIY project. This guide will help you build a trellis that’s both useful and beautiful for your garden.
Start by drawing your design on a flat surface. Measure and cut the wood to your planned size. Being precise is important to make sure everything fits right.
- Assemble the Frame: Begin by building the frame. Make sure it’s square, as it’s the base of your trellis. Use screws or nails to hold the corners tightly.
- Attach Slats: Then, add the vertical and horizontal slats as you like. This is where you can get creative—play with spacing and patterns to make your trellis stand out.
- Secure the Trellis: Use the right fasteners to make sure everything is firmly together. A strong trellis can handle weather and support plants.
- Anchor Your Trellis: Last, secure the trellis in the ground or against a wall. Make sure it’s deep enough to stay steady and can handle the weight of growing plants.
By following these easy steps, you’ll not only learn about DIY trellis ideas, but also make a trellis that will last. The joy of DIY projects is in making something yourself and adding your own special touch.
👉 👉Click here to explore 16000 TedsWoodworking plans now »
Decorative Touches and Finishing

Once you’ve built your wooden garden trellis, it’s time to add a personal touch. This step not only makes it look better but also helps it last longer. Staining or painting can protect it from the weather and make it fit right in with your garden.
Staining and Painting Your Trellis
Choosing the right stain or paint is key. Pick colors that match your home and garden. A good stain can show off the wood’s natural beauty. Paint can make your trellis stand out. Always use outdoor products to protect it from the weather.
Adding Decorative Elements
There’s more to personalizing than just paint. Finials, planters, or solar lights can turn a simple trellis into a garden highlight. These extras are not only pretty but also useful, supporting plants and lighting up your garden.
With these finishing touches, your trellis becomes more than just a plant support. It shows off your style and creativity in your garden. Enjoy the beauty it brings to your outdoor space!
Maintenance Tips for Your Wooden Garden Trellis
Keeping your wooden garden trellis in good shape is key. It needs regular care and trellis maintenance. Catching and fixing any damage early on is important. This way, your trellis will last longer.
Stay ahead with trellis maintenance by checking your trellis often. Look for any signs of damage. A good routine is essential for keeping your trellis looking great.
Regular Inspection and Repair
Walk around your trellis every few months. Check for loose nails, rotting wood, or anything unstable. These are common problems for outdoor projects. Fix loose parts and replace damaged wood to keep your trellis stable.
Protecting Your Trellis from the Elements
Use a sealant or wood preserver every two to three years. This protects the wood from moisture and UV rays. If your trellis is painted, touch up the paint as needed to keep it protected.
Here’s a simple table to guide you on how often to perform maintenance tasks on your trellis:
| Maintenance Task | Frequency |
|---|---|
| Inspection | Every 3-6 months |
| Cleaning and Debris Removal | As needed or every 6 months |
| Staining/Painting | Every 2-3 years |
| Applying Sealant | Every 2-3 years |
| Structural Repairs | As needed |
Maintaining a wooden garden trellis is more than just keeping it working. It also keeps your garden looking good. Regular care makes your trellis last longer and keeps your garden beautiful.
👉 👉Click here to explore 16000 TedsWoodworking plans now »
Backyard Trellis Projects for Beginners
Starting your woodworking journey can be very rewarding. Projects like building your first trellis can make your backyard look better. They also help improve your DIY skills. Simple diy trellis ideas are great for beginners, whether you want a vertical garden or a decorative piece for climbing plants.
We’ll explore two easy trellis designs for beginners. We’ll also share important trellis building tips to help your project succeed. These tips will guide you through the process, making it fun and fulfilling.
- Classic Grid Trellis: This design is made of wooden strips. It’s great for beginners and supports climbing vines. You can adjust its size easily.
- Ladder Trellis: Use an old wooden ladder or build a new one. Lean it against a wall or fence for a rustic look. It’s versatile and works well with many plants.
Tips for First-Time Builders
- Start with a Clear Plan: Before cutting wood, have a detailed blueprint. This saves time and materials.
- Choose Quality Materials: Use weather-resistant wood like cedar or redwood. It makes your trellis last longer.
- Take Safety Seriously: Always wear safety goggles and gloves. Know your tools before starting to avoid accidents.
- Ask for Help: Seek advice from more experienced woodworkers. Their tips can improve your skills and confidence.
These trellis projects are perfect for beginners. They help you transform your outdoor space into something beautiful and useful. With these simple designs and tips, you’re on your way to becoming a skilled woodworker. Enjoy the beauty of your garden, thanks to your hard work.
Starting a woodworking trellis project opens a door to the world of DIY and outdoor projects. We’ve shown you from the first designs to the final touches. These steps show how trellises add beauty and function to your outdoor area.
Choosing the right materials and tools is key. This way, your garden gets a trellis that shows off your skills and effort. Every detail you add makes it more than just woodwork; it’s a sign of your success.
A DIY trellis can do more than just look good. It can help plants grow, add privacy, or give your garden character. By mixing skill with creativity, each trellis is a personal statement. Plus, we’ve given tips to keep it looking great for years, through all kinds of weather.
This guide should give you the confidence to start your own project. It will make your home better and your life more fulfilling. Your garden will grow, not just in plants, but in DIY spirit too. So, get ready to enjoy the process and make something amazing!
💡 Ready to Take the Next Step in Woodworking?
If building your own trellis has sparked a deeper interest in woodworking, why not take it further?
🔨 TedsWoodworking offers over 16,000 step-by-step woodworking plans that cover everything from garden trellises to furniture and toys. Whether you’re a beginner or an advanced builder, you’ll find clear blueprints, material lists, and easy-to-follow instructions to turn your ideas into reality.
👉 Click here to explore 16000 TedsWoodworking plans now »
🛒 Not Into DIY? No Problem.
If you love the idea of a beautiful wooden trellis but don’t have the time or tools to build it yourself, you’re still in luck!
Check out our favorite ready-made trellises, tools, and accessories on Amazon—perfect for upgrading your garden without picking up a saw.
🌿 👉 Browse Top-Rated Trellises on Amazon »
FAQ
🔍What is a Woodworking Trellis?
A wooden trellis is a structure used to support plants. It adds visual interest to the garden and can also provide privacy.
🔍Benefits of Adding a Trellis to Your Garden
Adding a trellis can make your outdoor space more appealing. It helps plants grow upward in a healthy way and increases the functionality of your garden.
🔍Materials Needed for a DIY Trellis Project
A DIY trellis requires wood, screws, and weatherproof coating. Choosing treated lumber, cedar, or redwood makes your trellis more durable.
🔍Classic vs. Modern Trellis Designs
Classic trellis designs often feature traditional lattice patterns that suit a variety of styles. Modern designs are more minimal and may include geometric shapes for a contemporary look.
🔍Customizing Designs for Unique Spaces
For unique garden layouts, trellises can be customized to fit specific needs. You might incorporate curves or alter the structure to add function.
🔍Basic Woodworking Tools
Building a trellis requires basic tools like a saw, hammer, and screwdriver.
🔍Safety Equipment
To stay safe, always use gloves, safety goggles, and ear protection.
🔍Measuring and Cutting Tools
Accurate measuring and cutting are crucial. Tools like a tape measure, carpenter’s square, and miter saw make the job easier.
🔍Selecting the Right Type of Wood
Choose rot- and insect-resistant woods like cedar or redwood. Pressure-treated lumber is also a good option for longevity.
🔍Treating and Protecting the Wood
Apply preservatives or sealants before construction to protect the wood. This helps prevent weather and moisture damage.
🔍Staining and Painting Your Trellis
Staining or painting enhances the visual appeal of your trellis. Pick colors that match your garden’s overall style.
🔍Adding Decorative Elements
Add decorations like finials or solar lights. These details increase both aesthetic interest and functionality.
🔍Regular Inspection and Repair
Inspect your trellis regularly for signs of wear or damage. Prompt repairs ensure the structure stays safe and stable.
🔍Protecting Your Trellis from the Elements
Reapply sealant or weatherproof paint every few years. This protects the wood from moisture and sun damage.
🔍Simple Trellis Design Ideas
Beginners can start with basic designs like grids or ladder-style frames. These require fewer materials and simpler tools.
🔍Tips for First-Time Builders
If you’re new to woodworking, start with simple plans and choose high-quality materials. Follow safety guidelines strictly, take your time, learn step by step, and seek help from experienced builders when needed.
Affiliate Disclosure
Some of the links in this article are affiliate links. If you click through and make a purchase, I may earn a small commission — at no additional cost to you.
This helps support my work so I can continue creating helpful woodworking tutorials and product reviews.I only recommend products and services that I have thoroughly researched and believe could provide real value to my readers.
Thank you for your support!