
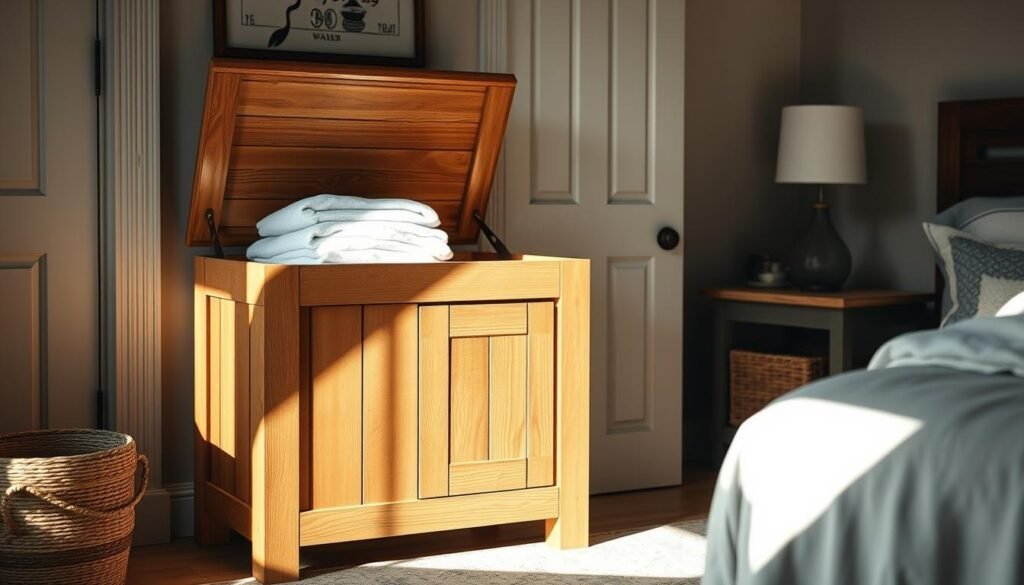
Are you looking for a fun and rewarding woodworking project? Creating a wooden laundry hamper is a great way to keep your laundry room organized. It also shows off your DIY skills. In this tutorial, we’ll show you how to build a functional and stylish hamper.
By following our step-by-step instructions, you’ll make a beautiful and practical DIY laundry hamper. It will meet your needs. This project is perfect for anyone, whether you’re a beginner or an experienced woodworker.
🛠️ Want the Look Without the Sawdust? Here’s Your Shortcut
There’s something rewarding about building a wooden piece with your own hands—but let’s face it, not everyone has the time, tools, or space for a full DIY project.
💡 That’s why I recommend Ted’s Woodworking Plans – a massive library of 16,000+ step-by-step plans for every kind of woodworking project you can imagine. From pet houses to holiday gifts, you’ll get:
✨ Easy-to-follow blueprints
🧰 Complete material & cut lists
🪚 Projects for all skill levels👉 Start your woodworking journey with Ted’s 16,000 plans »
💝 Ted’s Woodworking Plans also makes an amazing gift for parents, children, friends, boyfriends, girlfriends, brothers, and sisters.
🛒 Prefer to Buy Instead of Build?
No problem! If you love the look of handcrafted wood but would rather skip the tools, we’ve got you covered.
🌿 👉 Browse top-rated wooden-hamper and get inspired on Amazon »
Key Takeaways
- Learn how to build a functional and stylish wooden hamper
- Improve your DIY skills with our step-by-step guide
- Create a practical storage solution for your laundry room
- Customize your hamper to fit your personal style
- Enhance your woodworking skills with this rewarding project
Why Build Your Own Wooden Laundry Hamper
Why choose a generic laundry hamper when you can make one that fits you perfectly? A custom laundry hamper lets you design something that matches your space and style.
Benefits of Custom-Built Hampers
Custom hampers have many advantages. You can pick the size and design that suits your laundry room and decor. You can also add features like a lid or ventilation to make laundry easier.
Cost Savings vs. Store-Bought Options
Building your own hamper can save you money. High-quality wood hampers from stores can be pricey. By picking your own materials, you can make a similar or better hamper for less.
Sustainability Aspects
Using local or reclaimed wood makes your hamper more eco-friendly. This choice not only helps the environment but also gives your hamper a unique look.
| Aspect | Custom-Built Hamper | Store-Bought Hamper |
|---|---|---|
| Cost | Variable, potentially lower | Fixed, potentially higher |
| Customization | High | Limited |
| Sustainability | High, with eco-friendly material choices | Variable, depending on manufacturer’s practices |
Materials Needed for Your Wooden Laundry Hamper
Let’s explore the materials needed for your wooden laundry hamper. Choosing the right materials is key for a great DIY project.
Wood Selection Guide
Choosing the right wood is essential for your hamper’s look and durability. You need wood that can handle the humid bathroom environment.
Best Woods for Bathroom Environments
For a bathroom laundry hamper, consider water-resistant woods like cedar or teak. These woods fight moisture well and add elegance to your bathroom.
Budget-Friendly Options
If you’re on a budget, think about pressure-treated pine or reclaimed wood. They’re affordable and durable enough for your needs.
Hardware and Fasteners
The hardware and fasteners you pick are important for your hamper’s strength. Use rust-resistant screws and durable hinges for a long-lasting hamper.
Additional Materials
You’ll also need materials like sandpaper, wood finish, and a lid support. These add to your hamper’s function and look.

Essential Tools for This Project
Before starting your wooden hamper, let’s look at the tools you’ll need. The right tools are key for a great DIY project.
Power Tools
You’ll need a circular saw and a jigsaw for cutting wood. A drill is also necessary for making holes.
Hand Tools
Hand tools like a hammer, tape measure, and square are vital. They help you assemble and check if the structure is square.
Measuring and Marking Tools
Getting precise measurements is important. Use a tape measure and a pencil to mark your cuts.
Safety Equipment
Remember to wear safety glasses and a dust mask. They protect you from sawdust and debris.

Planning Your Hamper Design
Let’s explore how to plan your hamper design. It should meet your needs and match your home’s style. A good hamper looks great and works well.
Size Considerations for Different Spaces
Think about the space where your hamper will go. Measure it well to make sure it fits. Consider its height, width, and depth to match the room.
Style Options to Match Your Decor
Your hamper’s style should match your home. Pick a design that goes with your furniture and colors. You can choose a modern or traditional look.
Functional Features to Include
Function is key, just like looks. Think about what you need. Do you want a lid or ventilation slots? Slots help keep your laundry fresh.
Ventilation Requirements
Good ventilation stops moisture buildup. Add slots or a mesh panel to your design.
Accessibility Considerations
Your hamper should be easy to reach. Think about its height and if it needs handles or a light lid.
By planning well, you’ll get a hamper that’s both useful and stylish. Take your time, and don’t hesitate to make adjustments as needed.
Preparing Your Workspace
A well-prepared workspace is key for a successful DIY project like our wooden laundry hamper. It’s not just about having the right tools and materials. It’s also about creating a space that helps you work well and safely.
Safety Considerations
To work safely, clear your workspace of clutter and keep your tools organized. Make sure your work surface is stable and secure. Always wear protective gear like safety glasses and a dust mask when using power tools.
Organizing Your Materials
Group similar items together, like all your cutting tools in one area. This saves time and reduces frustration during the project.
Setting Up for Efficiency

Arrange your tools and materials for efficient work. Think about the workflow and place items you use often within easy reach.
Cutting the Wood Pieces
Now that we have our materials ready, let’s start cutting the wood for our DIY laundry hamper. Making accurate cuts is key for a strong and useful hamper.
Creating a Cutting List
First, make a detailed cutting list. This list keeps you organized and ensures you cut everything needed. Measure your materials and check your design plans to figure out each piece’s exact size.
Measuring and Marking Techniques
To cut wood accurately, you must measure and mark it well. Use a combination square to draw straight lines. For curved cuts, a template or compass works best. Always double-check your measurements to avoid mistakes.

Making Precise Cuts
Now, it’s time to cut your wood. Use a sharp saw blade for clean cuts. If using a power saw, keep your hands away and use a push stick if needed. For hand saws, apply gentle, consistent pressure.
Sanding Cut Edges
After cutting, sand the edges to smooth them out. This is important for a tight fit when assembling the hamper. Use medium-grit sandpaper and sand in the wood grain direction.
By following these steps, you’ll cut your wood accurately and efficiently. This will help you build a successful wooden laundry hamper.
Assembling the Wooden Laundry Hamper Frame
Now that we have all our wood pieces cut, it’s time to assemble the frame. This step is key. It turns our wood pieces into a sturdy laundry hamper.
Building the Base
The base is the hamper’s foundation. It gives the hamper stability and support. We need to make sure it’s strong.
Ensuring Stability
To make the base stable, we’ll use sturdy wood and precise joinery. Check that all corners are square and the base is level.
Adding Floor Protection
Adding felt pads or rubber feet to the base protects your floor. This small step helps keep your floors safe and the hamper stable.
| Material | Purpose | Benefits |
|---|---|---|
| Sturdy Wood | Frame and Base | Durable, Long-lasting |
| Felt Pads or Rubber Feet | Floor Protection | Prevents Scratches, Enhances Stability |
Constructing the Sides
Now, let’s build the sides of our hamper. Make sure they’re even with the base and securely attached.

Attaching the Back Panel
The back panel adds stability to our hamper. Attach it to the sides and base, ensuring it’s flush with the back edges.
Reinforcing the Structure
To make the hamper stronger, add internal supports or metal brackets at the corners. This is important for regular use.
By following these steps, we’ll have a sturdy and functional wooden laundry hamper frame. Remember, precision and patience are key.
Creating and Installing the Lid
We’re almost done with our wooden laundry hamper. Now, we’ll show you how to make and put on the lid. The lid is key for both looks and function.
Building a Basic Hinged Lid
First, measure and cut the wood for the lid. Make it a bit bigger than the hamper’s opening. Use 1/2-inch thick plywood or solid wood for the lid. Sand the edges to make them smooth.
Installing Hinges Properly
You’ll need hinges to attach the lid. Pick hinges that can hold the lid’s weight. 2-inch brass or steel hinges are good for this. Place the hinges on the back of the lid and the hamper, then screw them in. Make sure the lid opens and closes smoothly.
Adding Lid Supports
If your lid is heavy or you want it to stay open, add lid supports or stay rods. They keep the lid from falling back and hurting the hamper or someone.
Creating a Finger Groove or Handle
To open the lid easily, you can make a finger groove or add a handle. A finger groove is a simple cut that makes lifting the lid easy. A handle gives you a better grip.
By doing these steps, you’ll finish your wooden laundry hamper with a useful and attractive lid.
Adding Ventilation and Decorative Elements
As we near the end of our wooden hamper, we can make it look better with ventilation and decorations. Ventilation is key, more so if you use it for laundry. It stops moisture from building up.
Creating Ventilation Slots or Patterns
To improve airflow, you can make slots or patterns on the sides or lid. This not only helps with ventilation but also makes your hamper look cool. Use a jigsaw or a router to make these designs. Make sure they’re spaced right for both looks and function.

Decorative Trim Options
Decorative trim can really make your hamper pop. You can pick trim that goes with or stands out against the wood. Think about your room’s style when picking trim. It should match your decor.
Custom Design Elements
For a personal touch, add custom designs. You can route decorative edges or add inlays and accents.
Routing Decorative Edges
Routing gives your hamper a pro look. Use a router to make decorative edges on the lid or body.
Adding Inlays or Accents
Inlays or accents can be made from different wood or materials. They add a special touch and make your hamper unique.
Finishing Your Wooden Hamper
After building your hamper, it’s time to make it look and last better. A well-finished wooden laundry hamper is not just pretty. It also handles daily use well.
Sanding Techniques for a Smooth Finish
Sanding is key before you add a finish. Begin with coarse-grit sandpaper (about 120-grit) to smooth out any rough spots. Then, move to finer grits (150-220) for an even smoother look. Always sand in the wood grain direction to avoid scratches.
Tip: Use a sanding block for flat areas and a sanding sponge for curved spots.
Staining Options for Different Woods
Staining brings out the wood’s natural beauty. Different woods react differently to stain, so test it first. Oak and pine, for example, look different with the same stain. Pick a stain that matches your wood type.
Applying Protective Finishes
After staining, add a protective finish to seal and protect your hamper. You can use varnish, polyurethane, or wax. For a laundry hamper, a moisture-resistant sealant is best to guard against humidity and spills.
Moisture-Resistant Sealants
Water-based polyurethane is a good choice for a clear, protective layer. It’s easy to apply and dries fast.
Application Methods
Use a clean, lint-free cloth or foam brush to apply your finish. Apply thin coats, letting each dry as instructed before adding the next. This method ensures a smooth finish.

As “The Wood Whisperer” advises, “A good finish is not just about applying a coat; it’s about preparing the surface and choosing the right product for your project.” By following these steps, you’ll get a beautiful, durable finish for your wooden laundry hamper.
Troubleshooting Common Issues
Every DIY project needs troubleshooting. Building a wooden laundry hamper is no exception. You might face some common problems. But, with the right help, you can solve them easily.
Fixing Alignment Problems
Alignment issues are common. If your pieces don’t fit right, it’s okay. First, check your measurements and wood cuts. A small tweak can often fix it.
Remember, “Measure twice, cut once” is key in woodworking. Double-checking your measurements can prevent a lot of headaches.
Dealing with Warped Wood
Warped wood is another problem. If your wood is warped, clamp it and let it dry. You can also use a damp cloth to straighten it.

Repairing Loose Joints
Loose joints can weaken your hamper. To fix this, re-glue the joints and clamp them until dry. Always check the alignment after gluing.
Addressing Lid Functionality Issues
If your lid isn’t working, check the hinges. Make sure they’re attached well. You might need to adjust the hinges or add lubricant for smooth operation.
With these tips, you can tackle common problems. This way, you can finish your wooden laundry hamper project successfully.
Conclusion
Now that you’ve finished your wooden laundry hamper, you’ve got a useful item for your laundry room. You also feel proud of completing your DIY project. Making a wooden laundry hamper is rewarding. It’s a mix of being practical and enjoying the process of creating something yourself.
Using your new hamper, you’ll see how it meets your needs. Making it from scratch lets you pick every detail. This means your hamper is both useful and looks good.
We hope this guide made you want to do more DIY projects and try woodworking. With each project, you learn new things and get more confident. This lets you make even more beautiful and useful items for your home.
FAQ
What type of wood is best for a laundry hamper?
How do I ensure my hamper is stable and doesn’t tip over?
Can I customize the size of my laundry hamper?
What kind of finish should I use to protect my wooden hamper?
How do I add ventilation to my laundry hamper?
What are some common issues that may arise during assembly, and how can I troubleshoot them?
Can I add decorative elements to my laundry hamper?
How do I maintain my wooden laundry hamper?
Affiliate Disclosure
Some of the links in this article are affiliate links. If you click through and make a purchase, I may earn a small commission — at no additional cost to you.
This helps support my work so I can continue creating helpful woodworking tutorials and product reviews.I only recommend products and services that I have thoroughly researched and believe could provide real value to my readers.
Thank you for your support!